iTunes and iOS devices offer a number of ways to tweak the sound during playback. You can use an equalizer to adjust certain frequencies, use Sound Check to normalize the volume of different tracks, and use Sound Enhancer to, well, enhance your sound. There’s also Crossfade Songs, which lets you play songs so they segue from one into another. Here’s what you can do to fiddle with your sound in iTunes and on your iOS device.
Equalization
Depending on how you listen to your music, you may want—or need—to adjust the sound that comes out of your computer or your iOS device. If you have simple speakers connected to your computer or use an iMac’s internal speakers, you might not have bass and treble adjustments available. Yet for some music, you may want to change the overall sound by increasing or decreasing certain frequencies.
Changing the volume of certain frequencies to change the sound of music during playback is called equalization. Equalizers used to be pretty common in high-end home audio systems back in the 1970s. These devices are still used for live music mixing and for studio recording, but they’ve become rare in home audio, as many amplifiers include equalization features.
iTunes includes a graphic equalizer that lets you change the volume of ten different frequency bands to alter your music, and, in many cases, improve the sound. To access the iTunes equalizer, press Command-Option-E, or choose Window > Equalizer. If you’re familiar with the way an equalizer works, you’ll see that the display of the Equalizer window is pretty much the same as a standalone graphic equalizer. It has sliders that let you adjust the volume of each of its 10 bands; just drag them up or down.
However, many people don’t know how to apply equalization. For this reason, the iTunes Equalizer has two dozen presets, including Classical, Jazz, Rock, Bass Booster, Bass Reducer, Treble Booster, and Treble Reducer, and even one called Beats. If you check the On box and choose one of those presets, your sound output will change according to the frequency adjustments the preset contains.
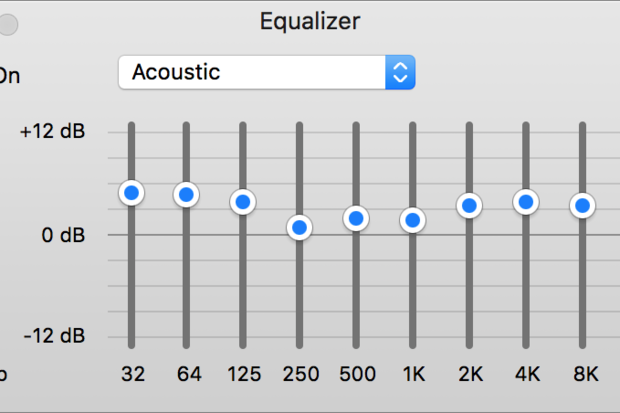
The iTunes Equalizer window.
Using an equalizer is hit or miss; in most cases, the “genre” presets won’t work with all the music of that genre since every recording is different. You will find that, say, Rock will make some rock music sound better, because it enhances the bass and treble, and that the Dance setting, which enhances bass, might make dance music sound better. But in other cases, the music may sound muddy or tinny.
Equalization is more designed to compensate for your environment (your room) and your playback equipment (your speakers). For example, if you find that you get poor bass response, either because your speakers aren’t bassy enough or your room dampens the bass, try using the Bass Booster preset. Or if you’re using small speakers, such as an iMac’s internal speakers, the Small Speakers preset might improve your sound. You can either use the equalizer for all your music or apply presets to specific songs or albums: to do the latter, select a song, press Command-I, click on the Options tab, then choose an Equalizer Preset.
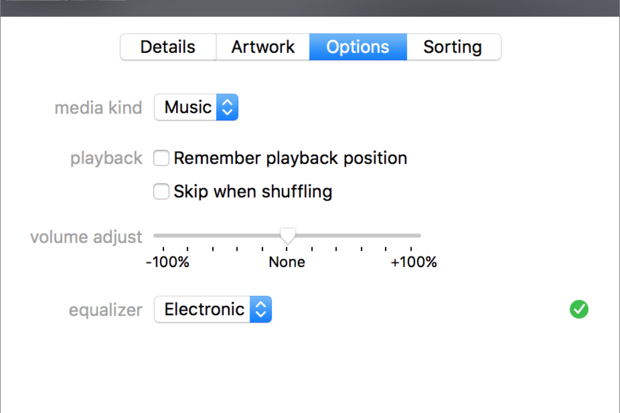
You can apply equalizer presets in the Info window.
iOS devices offer equalization as well, using the same presets as iTunes (Settings > Music > EQ). Here, you might be more tempted to use equalization to compensate for weaknesses in your earbuds or headphones. One of the most common uses is to increase bass since many earbuds are wimpy at the low end, but I use EQ on my iPhone to lower the bass on my Jabra Revo Bluetooth headphones, which are a bit too heavy in low frequencies for my taste.
If you apply equalization to specific songs or albums using iTunes, that setting will override any global setting you’ve chosen in iTunes or on your iOS device. No matter how you use equalization, you need to try out different settings and see how they sound. You may notice distortion with some presets; I’ve found that some piano music distorts in high-volume sections when treble frequencies are raised, for example.
You might also like to roll your own equalizer presets. In iTunes, move the sliders to where you want, then, from the preset menu, choose Make Preset and save your preset. You can only use your preset on your computer; custom presets don’t get carried over to iOS devices, nor do they get saved with your songs. They also don’t get transferred with your music to another computer, so to duplicate your presets, copy your iTunes EQ preferences (located in your user folder/Library/Preferences/com.apple.iTunes.eq.plist) from one Mac to another.
Sound check
You’ve certainly noticed, if you listen to music in shuffle mode or in a playlist you’ve cobbled together, that some songs are louder than others. You raise the volume when a soft song comes on, only to be assaulted when the next song’s volume is much higher. This is not only annoying, but it also doesn’t sound great.
On the radio and on streaming radio services, such as Apple Music Radio, volume is normalized; the overall level of each song is adjusted so nothing is too loud or too soft.
iTunes has a feature that allows you to normalize playback. Sound Check, in the Playback preferences, does this for you. In iOS, you can activate Sound Check in Settings > Music.

iTunes’ Playback preferences offer several options for tweaking your sound, including Sound Check.
Check the box to activate Sound Check. iTunes automatically analyses your music when you add it to your library to determine how much adjustment to make. This adjustment shows on the File tab of the Info window when you select a track and press Command-I.
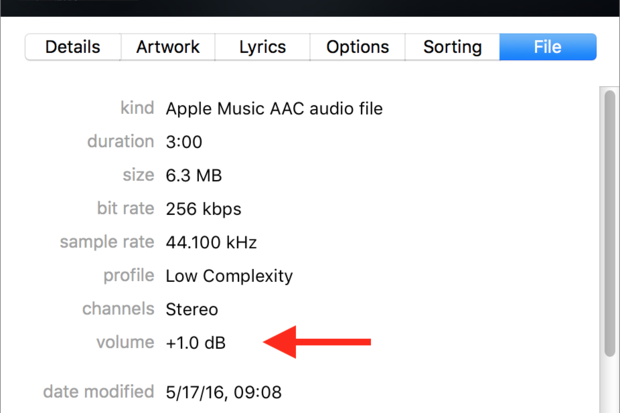
You can see how much iTunes will alter the volume of a track in the Info window.
Sound Check isn’t perfect, though. It adjusts the volume based on the overall level of each track, so a track with a lot of soft music followed by a loud crescendo may end up being too loud, and vice versa.
Sound Enhancer
iTunes’ Sound Enhancer is another way of tweaking your sound. Found in the Playback preferences, this setting, according to Apple, “increases the perceived ‘wideness’ of the stereo effect by modifying bass and treble response.” Apple also says that you can use this to “Change the music’s sound quality during playback. Drag the slider to increase or decrease the Sound Enhancer’s effect.”
What exactly the Sound Enhancer does is vague. With some music, it adds a sort of faux surround sound effect; but sometimes I barely hear a difference with it turned on. There are three settings, from low to high, and you can try it out to see if your music sounds better.
Crossfade Songs
The Crossfade feature doesn’t change the sound of the music you play in iTunes, but it changes the way songs are played. When you turn this on and choose a setting for a number of seconds, your songs overlap; they segue from one to another. One song fades out as another song fades in over the first. This isn’t perfect, because some songs end or begin with varying amounts of silence.
I’m not a fan of this, but if you want your music to sound more like a DJ mix, you can try this setting.

You can adjust how long your songs segue with Crossfade Songs.
Move the slider from 1 to 12 seconds to choose the amount of time you want the songs to overlap. Note that Crossfade Songs does not work with Apple Music.
These sound features can help make your music sound better. Try them out at different settings to find what’s best for you. You may find that you want to use some of them, or you may be happy with the sound you already have.


