Excel spreadsheet databases work because users can filter the data inside these workbooks. Filters are conditions you specify in databases and spreadsheets to extract only the precise, requested information.
For example, in a Human Resources spreadsheet database, the IT director may want to hire a candidate with a degree in Computer Science plus experience using HTML, Java, and C++ languages. The IT director uses filters based on logical operators to extract all the candidates with these credentials: equal to (Equals) degrees in "Computer Science" plus computer languages equal to (Equals) "HTML, Java, and C++." She may add more conditions, such as candidates equal to (Equals) "CS Software Developer," but not equal to (Does Not Equal) "CS Hardware Engineer," to minimize the list. This selective process can go on and on until the number of candidates is pared down to a reasonable number.
Note that the data extraction is based on the field columns in your database. You cannot extract applicants equal to "speaks Spanish" if the database does not contain a field for languages. Therefore, it's critically important that you create field columns to collect all the information that you plan to extract or filter by later.
In this how-to, we'll show you how to apply Date, Number, and Text filters to your spreadsheet. To make it easier for you to practice the filtering tasks we're about to describe, we've created a downloadable Excel workbook with all the data we use in this article. Just click the arrow or link below to start the download.
Using the Sort & Filters menu
1. Access the Violations table. Click the arrow beside the field column called Points. Notice the drop-down menu begins with Sort Smallest to Largest or Sort Largest to Smallest. Choose one of these sorting options and notice that Excel sorts the table using the field that your cursor resides on. For example, if your cursor is on the Points field column, Excel sorts the table by the Points field.
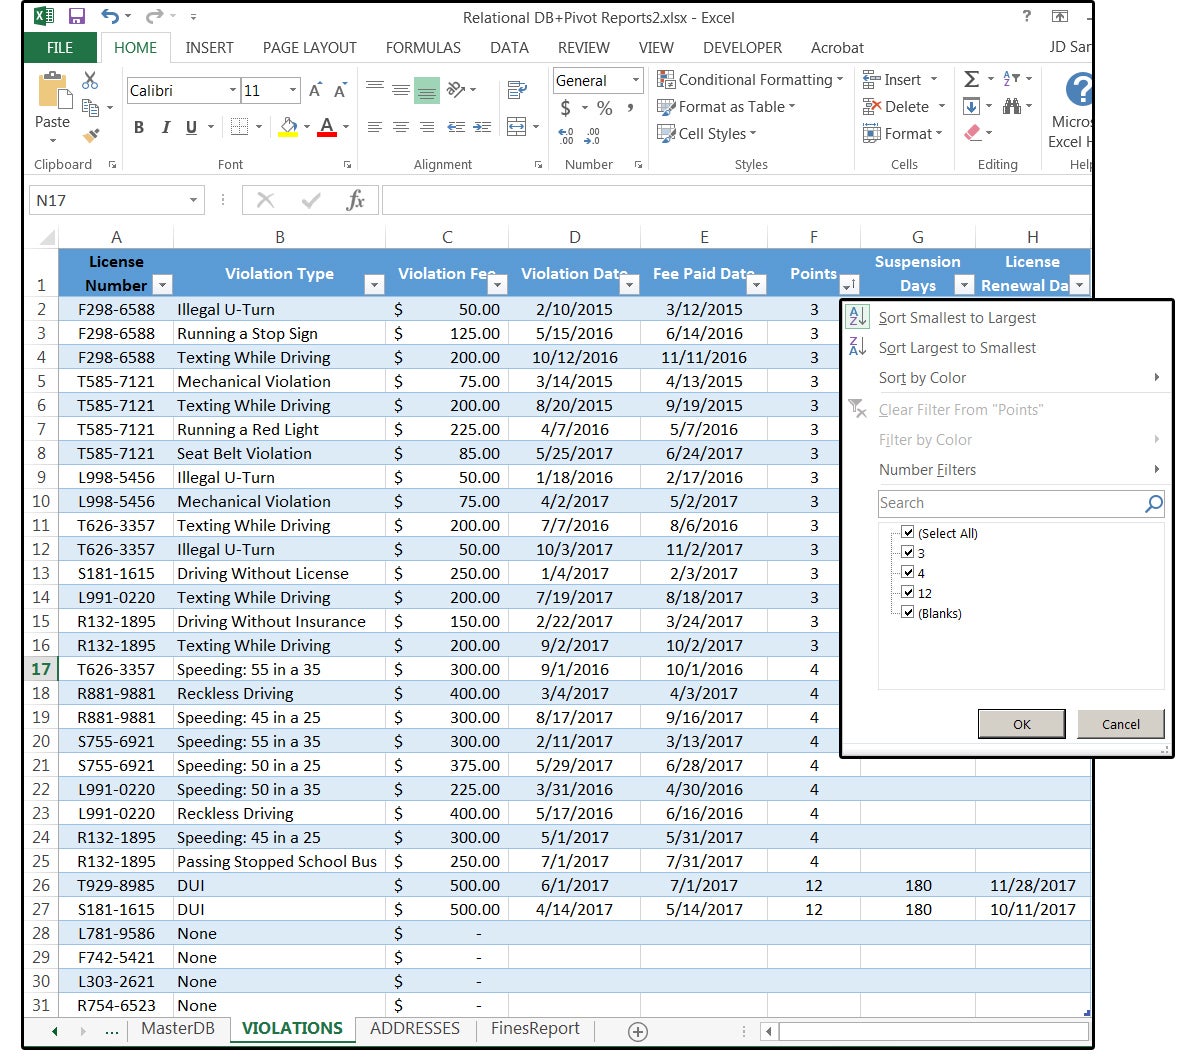 JD Sartain / PC World
Use the Sort + Filters menus to sort fields
2. In a small table like this, it's easy to quickly see how many Florida drivers have 3, 4, or 12 points. In reality, however, this table would likely have thousands of records and many different levels of points. Using the filters would be a much easier and more efficient way to determine how many (and which) drivers have Greater Than or Equal To 12 points.
Number Filters (one condition, one field)
1. Click the arrow beside the field column called Points again. Scroll down and select Number Filters. From the submenu that pops up, select Greater Than or Equal To.
2. When the Custom AutoFilter dialog window opens, notice the field name Points is displayed under the prompt that says Show Rows Where > Points > Is greater than or equal to (your original Logical Operator), which displays in the first Input box.
3. Click the down arrow on the right side of the Input box. Notice that all of the Logical Operators are listed in this drop-down menu, which you can re-select if you change your mind and want to use a different Logical Operator.
4. If you're satisfied with your original selection (Greater than or equal to), click OK and your table reappears with the records that match your filter only (in this case, only two records). If you had selected Greater than or equal to the number 4, then all records equal to 4 and above (through 12, on this table) would display.
5. To cancel this filter and view all the records in this table again, click the Points arrow again, then click Clear Filter From "Points" from the Sorting/Filters drop-down menu.
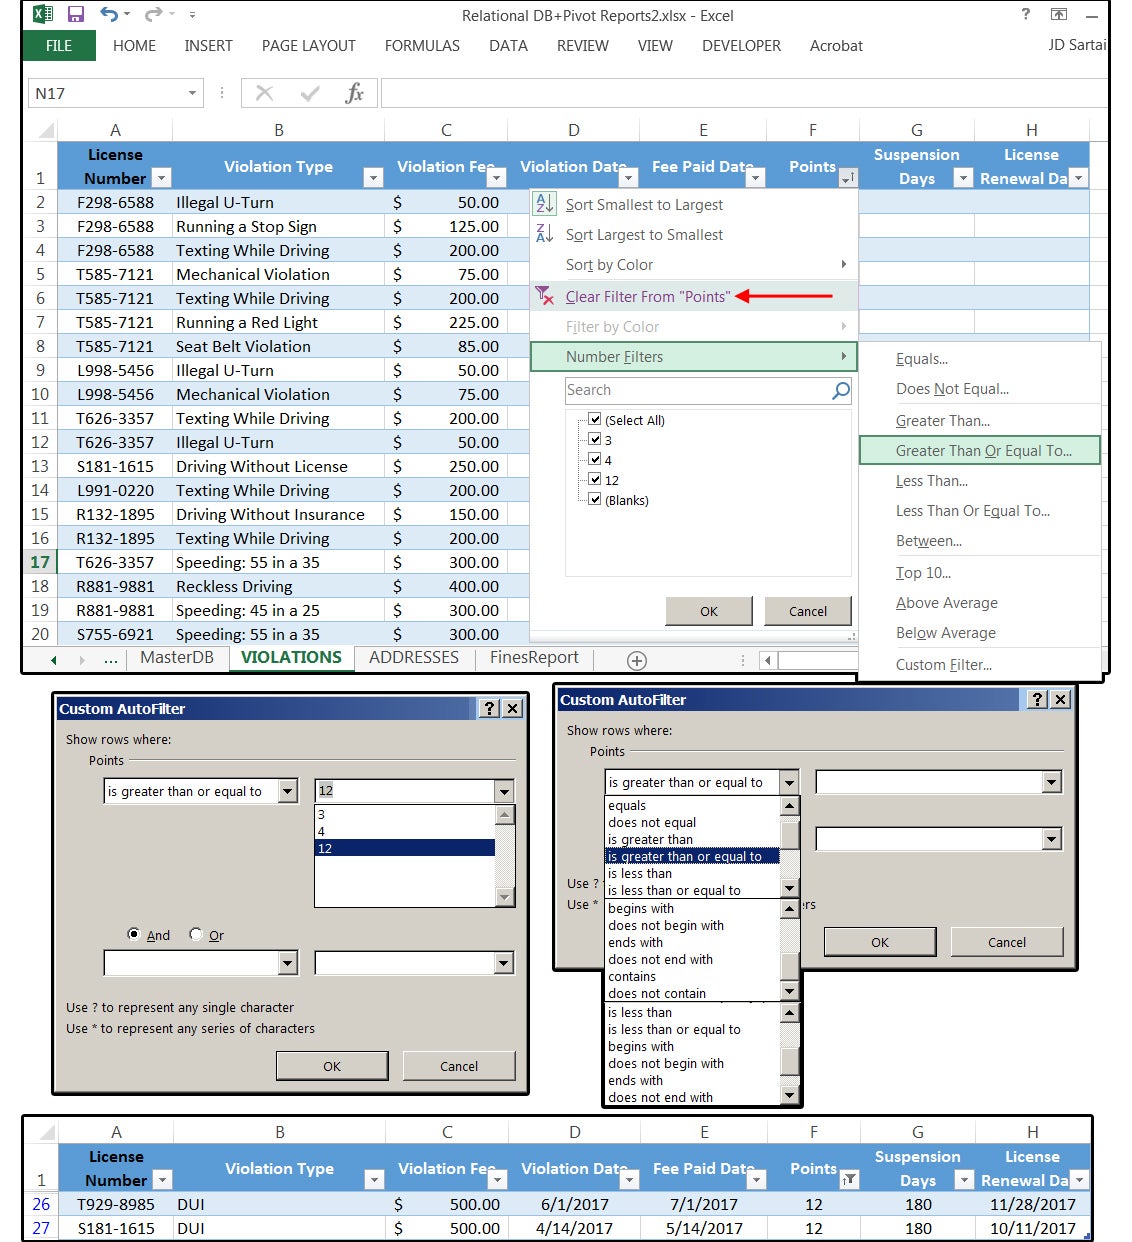 JD Sartain / PC World
From Number Filters, Select Greater Than Or Equal To
Note: Points is a numeric field; therefore, the Filters that are available on the Filters submenu (which says Number Filters) are Logical Operators that work with numbers: Equals, Does Not Equal, Greater Than, and so forth. The options for other filters are different yet again. For Dates, it's Tomorrow, Last Week, Next Quarter, etc. Text filters include Begins With, Contains, Does Not Contain, etc. Some filters overlap between the Text fields and the Number fields, but the Date filters are unique.
6. You can also use the data under the Search Input box to extract records that are equal to the values (or text items or dates) in the table. Click Points, then under the Search Input box, uncheck the check box that says Select All.
7. Check the values you want displayed for your query or report (such as 4 and 12), then click OK.
8. Excel removes all records from this view that do not match your filtered query, which means everything is gone except the drivers who have 4 points or 12 points.
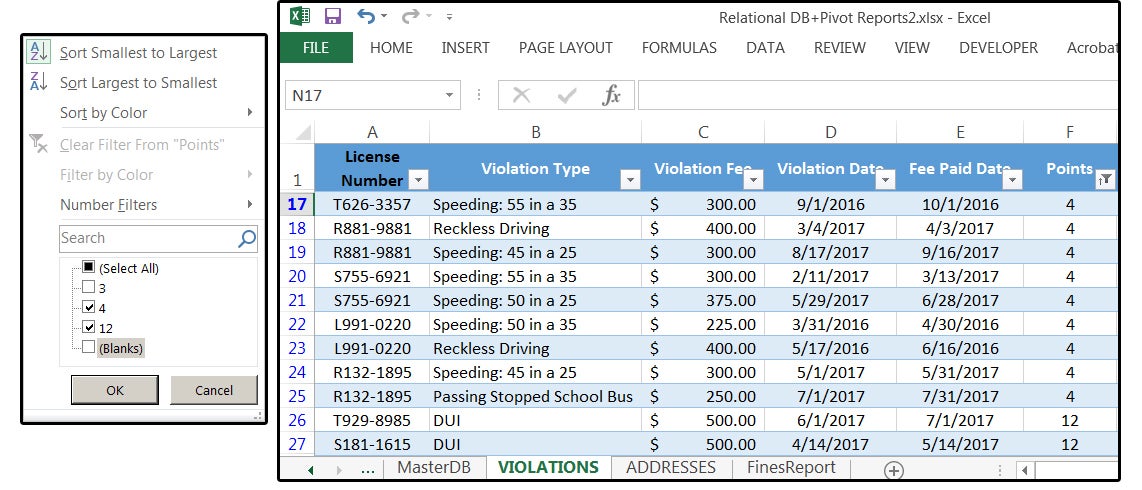 JD Sartain / PC World
Filter out all Florida drivers with 4 points or 12 points
Text Filters (two conditions, multiple fields)
1. Click the arrow beside the field column called Violations (a Text field). Scroll down and select Text Filters. From the submenu that pops up, notice the Text filters that are available: Equals, Does Not Equal, Begins With, Ends With, Contains, Does Not Contain, and Custom Filter.
2. When the Custom AutoFilter dialog window opens, notice the field name Violations is displayed under the prompt that says Show Rows Where—Violation Type: Equals (displays in the first Input box). Click the arrow on the right side of the Input box beside the Equals Input box) and choose a Violation Type from the drop-down list.
3. Follow the instructions above (4-8 under Number Filters) to extract the driver's license data you need for your report. For example, all drivers with Violation Types equal to "Running a Red Light," or "Seat Belt Violation," or "Speeding."
4. What if you want to extract all the records that show DUI's and/or Reckless Driving? Choose Equals in the top left Input box and then select DUI from the top right Input box. Then click the OR circle (tick mark). Next choose Equals (again) in the bottom left Input box and select Reckless Driving from the bottom right Input box.
Important note: Why choose OR instead of AND? OR means any record with DUI OR any record with Reckless Driving. AND means records that contain both of these violations. In this database/table, none of the individual records contain multiple violations, although some of the drivers do.
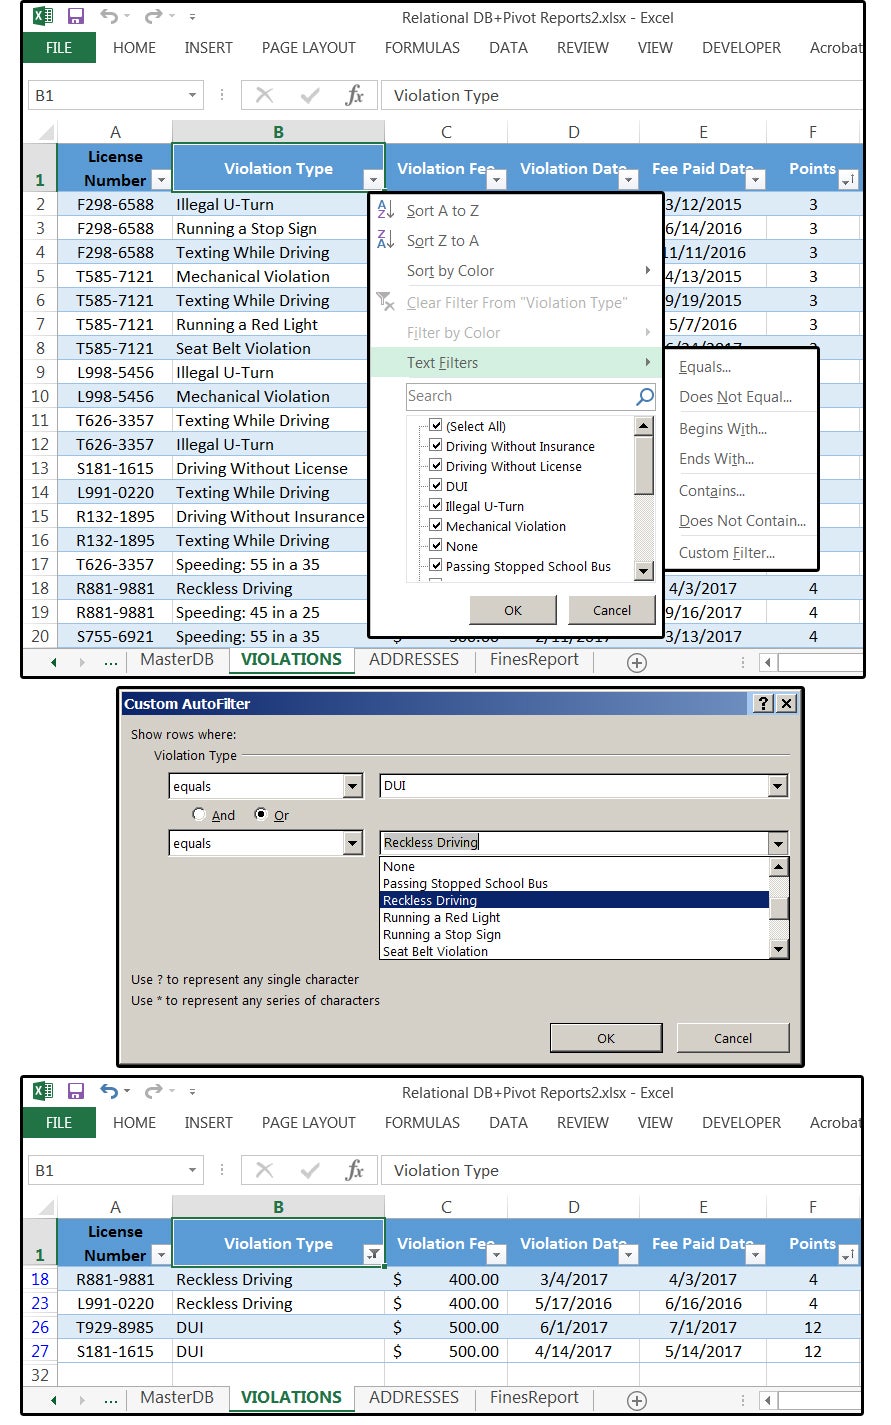 JD Sartain / PC World
Use Text filters to extract specific text data
Date Filters (using custom conditions)
Excel's Date filters are very comprehensive and allow you to extract individual or multiple dates by day, week, month, year, quarter, or year-to-date, plus dates within ranges. You can also use negative logic, such as all dates that do not equal 2017, or all dates that do not equal March, April, and May.
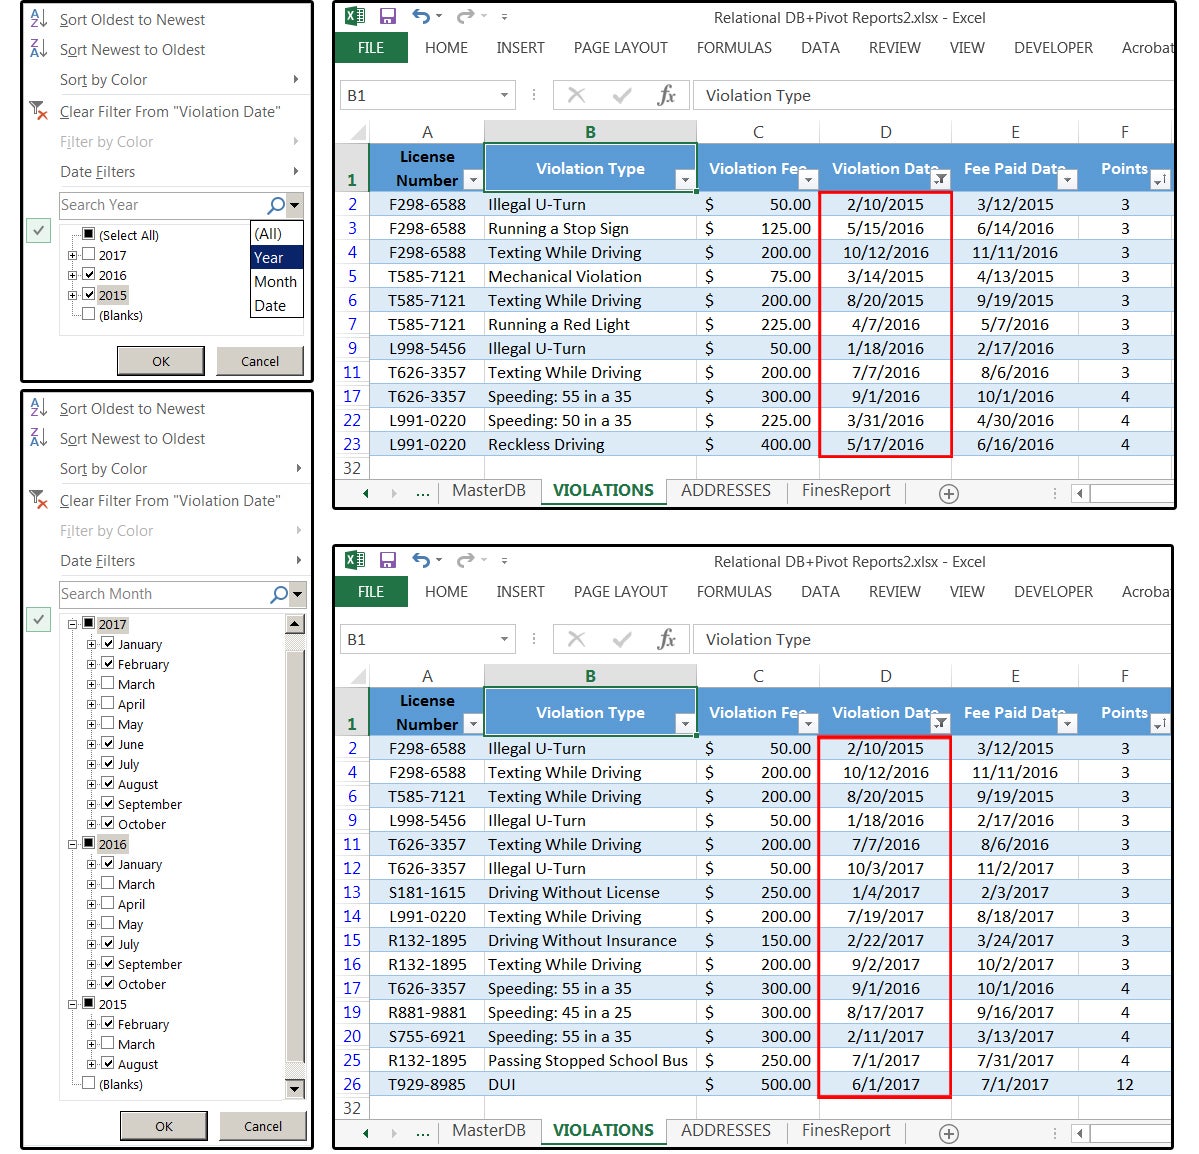
1. Select the Violation Date field. Click the arrow beside the Search box under Date Filters (on the Sort/Filters submenu) and select YEAR from the small dropdown menu.
2. Uncheck Select All, then recheck 2016 and 2015 and click OK.
3. Excel removes all years not equal to (Does Not Equal) 2017.
4. Click Clear Filter From Violation Date on the Sort/Filters submenu.
5. On same menu, select MONTH from the Search box dropdown menu.
6. Click the plus sign beside 2017, 2016, and 2015, then uncheck March, April, and May. Then uncheck Blanks and click OK.
7. Excel displays all records not equal to (Does Not Equal) March, April, and May.
 JD Sartain / PC World
Use negative logic to show all dates NOT EQUAL to something
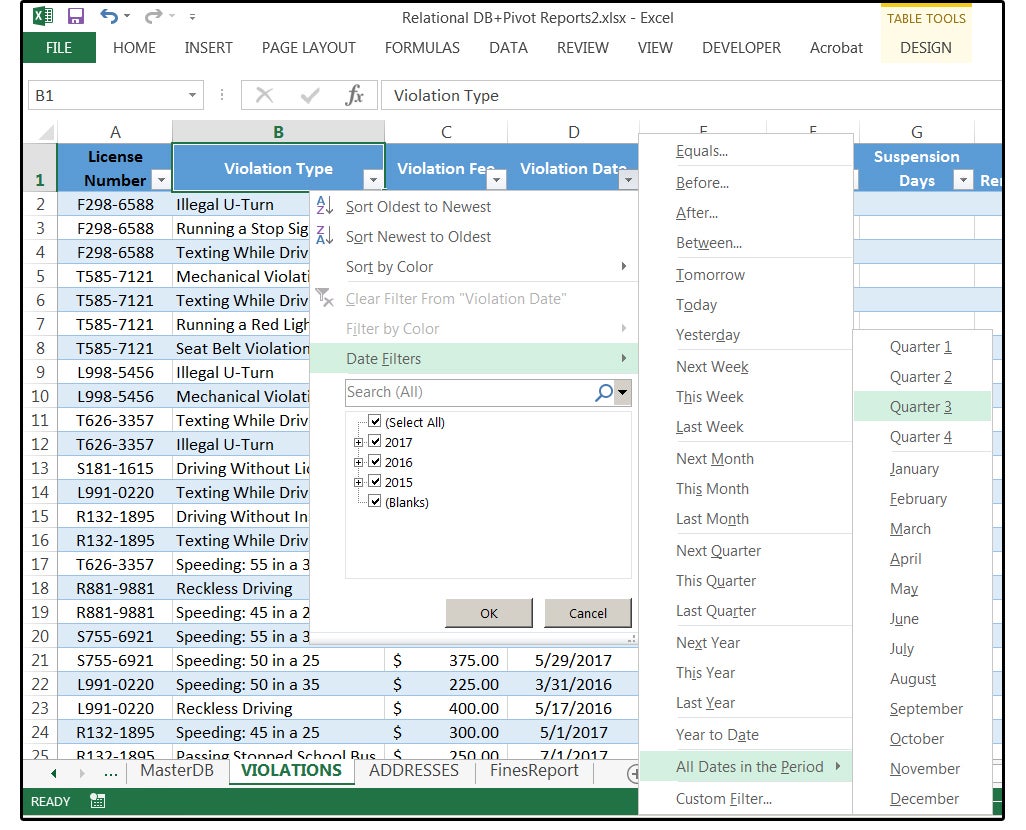
8. The long list of Date filters includes: Equals, Before, After, Between, Tomorrow, Today, Yesterday, Next Week, This Week, Last Week, Next Month, This Month, Last Month, Next Quarter, This Quarter, Last Quarter, Next Year, This Year, Last Year, Year-to-Date, All Dates in a Period (with four quarters and 12 months), plus Custom Filters.
9. Most of these filters are a one-step/one-click process: You click a filter, and the results appear instantly.
 JD Sartain / PC World
Select from a long list of Date Filters
10. If you choose Equals, Before, After, Between, or Custom Filters, the Custom AutoFilter dialog window opens and prompts you for additional information such as Equals to, Before, or After a specific date; or Between two dates; or to create a Custom Filter.
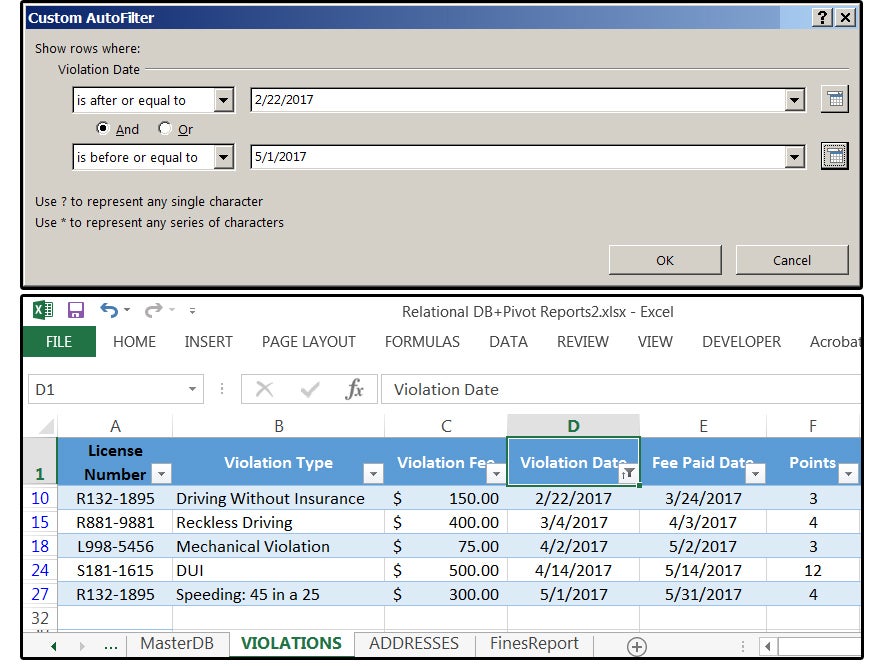
11. Select Between and in the Custom AutoFilter dialog window, notice that Excel has already added the conditions for this filter. All you have to do is select the dates from the drop-down lists, such as:
Is After or Equal To: 2/22/2017
Is Before or Equal To: 5/1/2017
And then click OK. Excel displays only the dates you requested.
NOTE: For this Filter, AND is the correct Boolean operator because you want ALL dates between (A) AND (B). If you select OR, Excel displays the entire database table because ALL the dates are Before, After, OR Equal To the dates you selected.
 JD Sartain / PC World
Use the Date Filter BETWEEN to extract a range of dates


