 Credit: IDG
If you have a newer Mac, it likely uses a speedy solid-state drive to store files, apps, music, videos, and a lot of other important stuff. But there’s one thing you may not know about SSDs: They wear out over time.
Since the SSD is such a vital part of your Mac, it’s a good idea to keeps tabs on its health. While it usually takes a really long time to wear out an SSD—likely far longer than you'll keep your Mac—problems can arise. Most recently, users started noticing that new M1 Macs and some Intel-based ones are showing advanced wear after just a few months of use, a troubling sign that could cause drives to burn out years before expected.
So even if you have a brand new M1 Mac, you might want to check on your drive's health from time to time. To gain insight into the health of your SSD, you can use a software tool called smartmontools, which taps into the Self-Monitoring, Analysis and Reporting Technology (SMART) system that’s built into SSDs. There is a catch with smartmontools, though. It’s not a typical app with an icon that you double-click to launch and menus and windows you navigate. It runs in the Terminal, the command-line interface for the Mac that you’ll find in the Utilities folder inside Applications.
In this article, you’ll learn how to set up the Terminal so you can install and run smartmontools. Set aside some time, however. While the procedure isn’t difficult (if I can do it, you certainly can), since you’re dealing with command line entries, you need to pay a little closer attention to what you’re doing than with apps you usually use on the Mac. There are so many times I could’ve saved myself some frustration if I was just more careful with my typing.
These instructions were created using macOS Big Sur, but they can also be used in macOS Catalina. If something goes wrong, don't panic. The worst-case scenario is you'll need to reinstall macOS in Recovery Mode, which will take some time but will leave all of your files intact.
How to install Xcode
The first thing you need to do is install Xcode, an Apple app for developers. It has a set of command line tools that your Mac needs before you can install and run Homebrew, which is a prerequisite for running smartmontools. You can get Xcode in the App Store for free.
After you download Xcode, head over to the Utilities folder to open it. You need to agree to its software license before you can continue, type your Mac password, and as well as the Terms and Conditions. Then you can quit the app.
How to install Homebrew
Now you need to install a package manager, which is a set of tools needed to perform tasks like installations and uninstalls. There are different package managers available, and Homebrew is a popular one, so we’ll use it here.
1. Open Terminal (Applications>Ultilities)
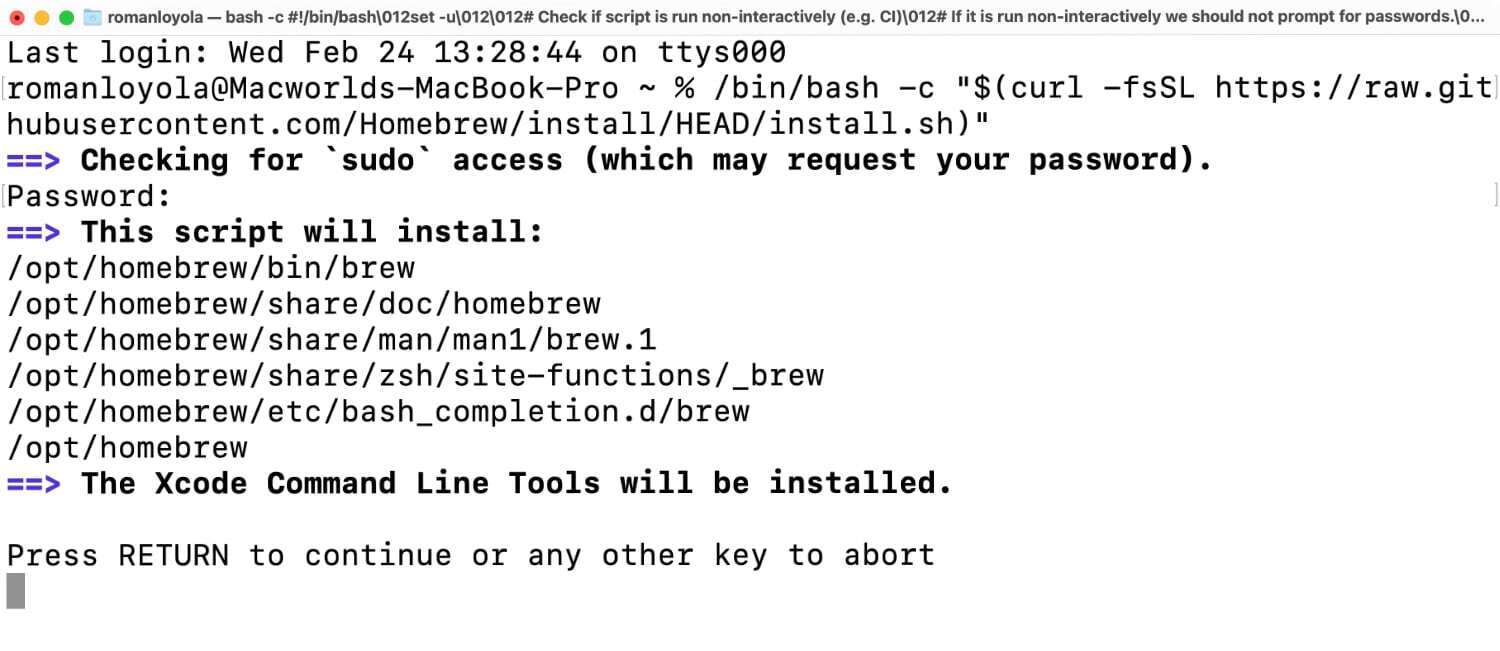
2. Copy the line below (triple-click it to select all) and then paste it into the Terminal, then press Return.
/bin/bash -c "$(curl -fsSL https://raw.githubusercontent.com/Homebrew/install/HEAD/install.sh)"
2. You’ll be asked to enter your Mac login password in order to grant 'sudo' access, which allows you to run programs with security privileges. Terminal will not show any visual indication that you are typing in your password (no bullets, asterisks, or the like), so type it in carefully and press the Return key.
 IDG
IDGTerminal responds by telling you what will be installed. Press Return to continue, or any other key if you decide to stop installation.
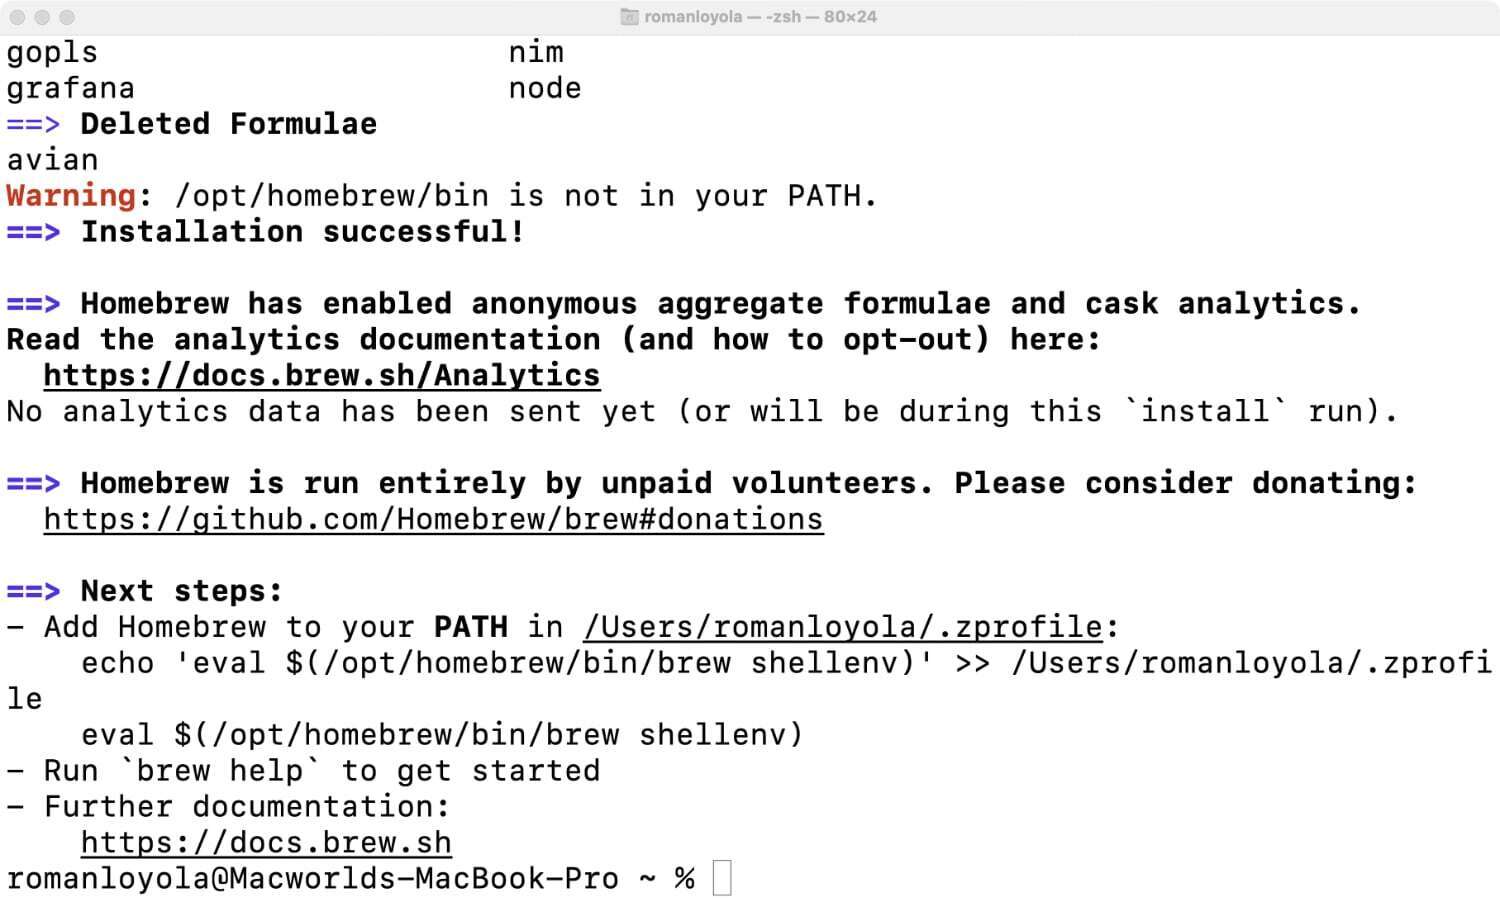
3. Terminal displays status updates on the installation, which takes several minutes, but you won’t see any spinning icons, a progress bar, or anything like that. It may sit at Installing with Command Line Tools for Xcode for a bit, but it is working (really, it is).
 IDG
IDGEventually, Terminal will display a bunch of stuff in quick succession. You should see Downloading and installing Homebrew, followed by New Formulae, Updated Formulae, and Deleted Formulae. Then below that, you should see Installation successful! followed by some helpful reference info.
4. At the end of the installation there should be a Terminal prompt, and a few lines above the prompt you may see in bold Next steps. You may need to add Homebrew to your PATH file. PATH tells the Terminal where to find executables.
 IDG
IDGSince I’m using macOS Big Sur, the Terminal uses ZSH as the default shell, the UI used to execute commands. The command to modify the PATH file is as follows:
nano ~/.zshrc
Copy and paste that into the Terminal and press Return.
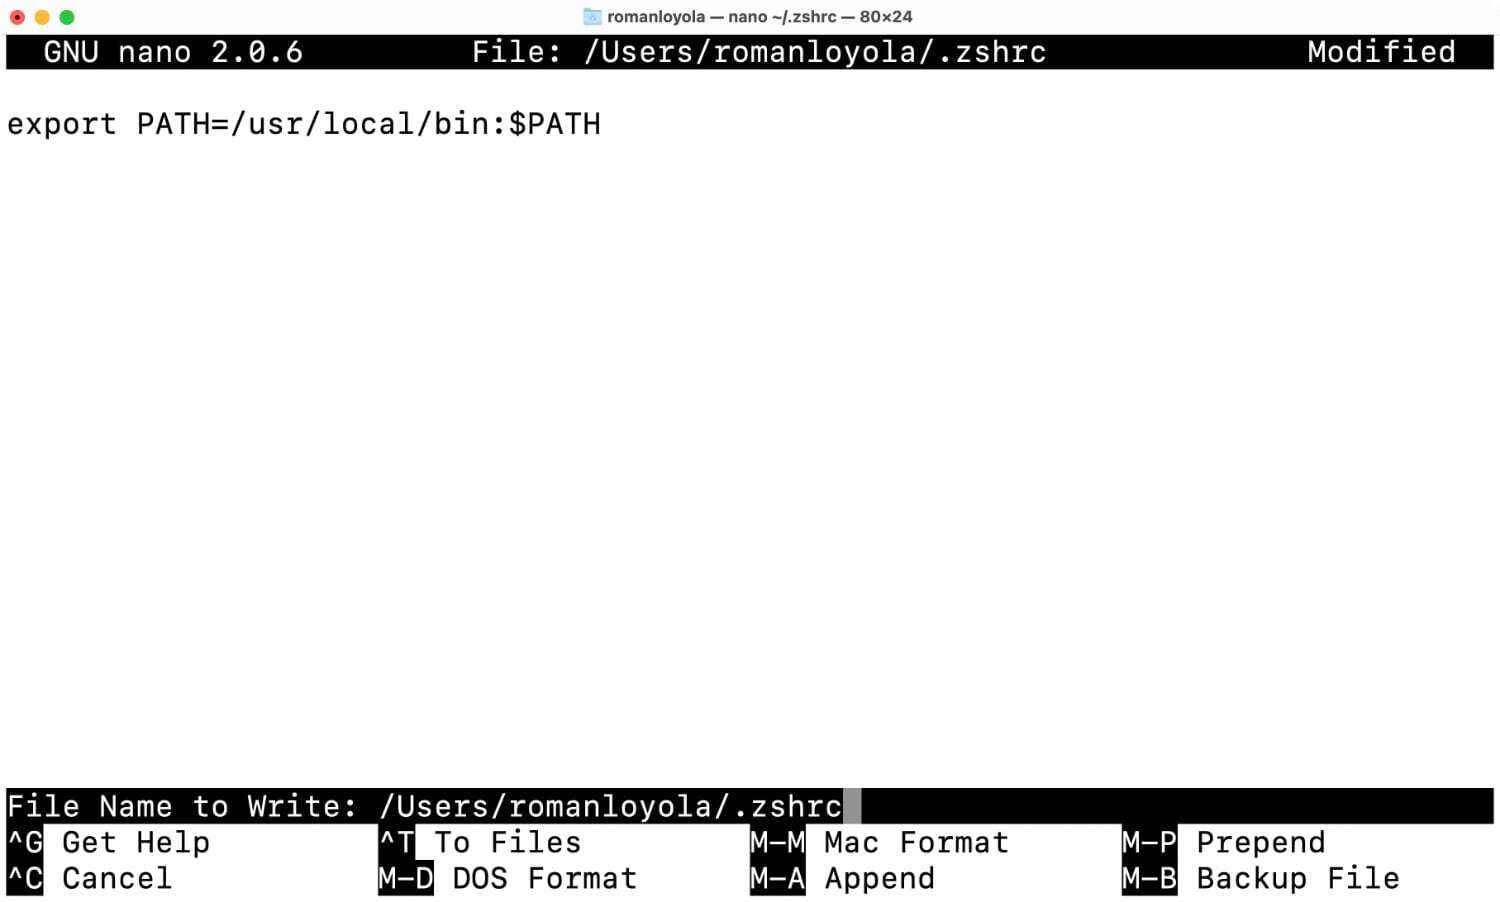
5. A new window appears that looks like the screenshot below, with the main section blank. See that line in the main section of the screenshot? You’re going to enter that in your own window. Here’s the code so you can copy and paste it.
export PATH=/usr/local/bin:$PATH
 IDG
IDG6. Now you can save the file by pressing Control+O (the letter, not zero). A prompt will appear near the bottom of the window, telling you the file name that will be saved. Press Return, then exit by pressing Control+X, and then quit and relaunch Terminal to implement the changes.
How to install and run smartmontools
Now it’s time to install the utility to let you check the health of your Mac’s SSD. You can visit the smartmontools website to learn more about the software.
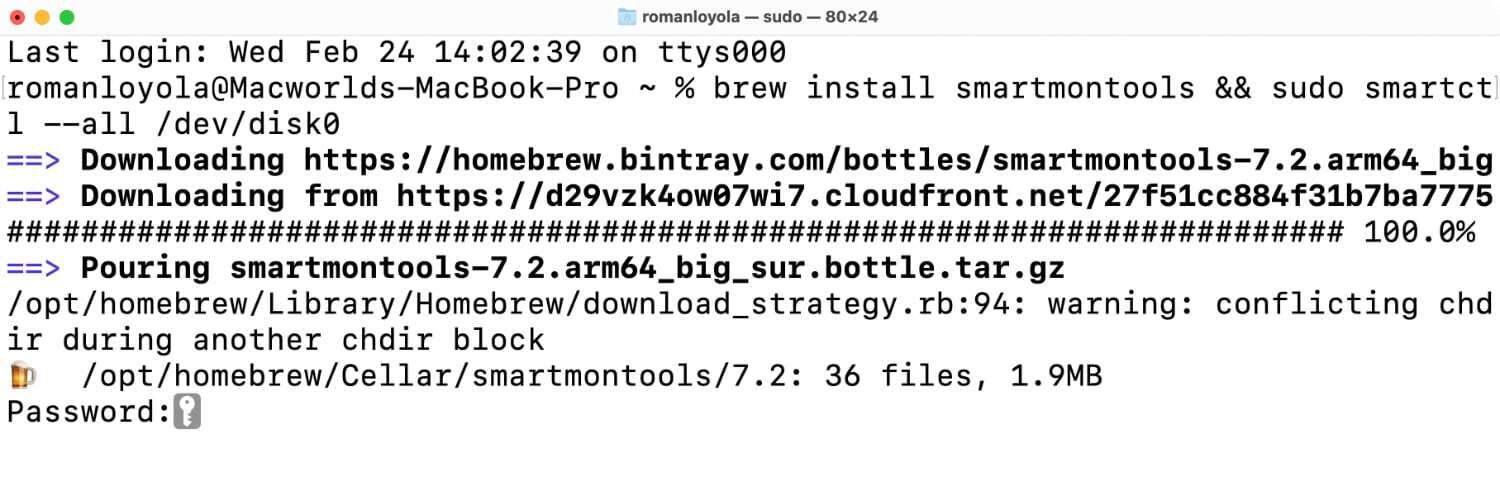
1. To install smartmontools, copy and paste the code below into the Terminal (hat tip to @marcan42).
brew install smartmontools && sudo smartctl --all /dev/disk0
Press Return.
Note: If you see zsh: command not found: brew, you need to modify your PATH. Re-type nano ~/.zshrc in the window and then
export PATH=/opt/homebrew/bin:$PATH
2. Enter your password and press Return. This will install the software and then run it. Your Terminal window should look like this before you enter your password:
 IDG
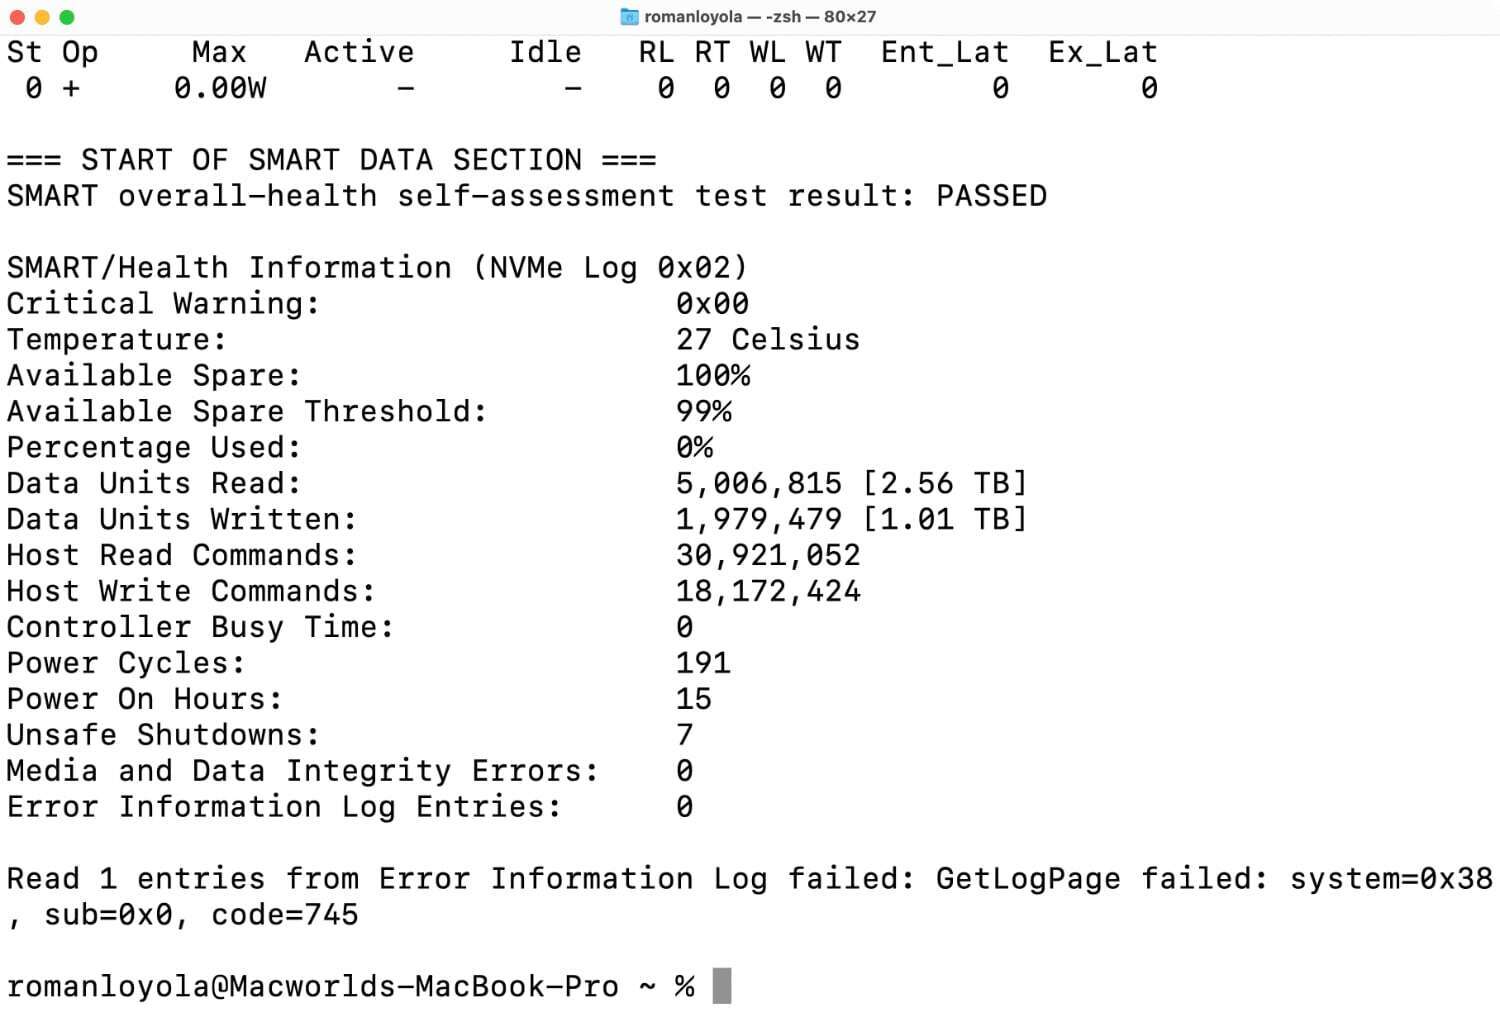
IDGSmartmontools provides a helpful number of data points about your Mac’s SSD. Kingston has a PDF that explains the collected data points. For quick reference, here are a few.
Available Spare: Percentage of the remaining spare capacity available for use.
Percentage Used: This is an estimate of the amount of life used by the SSD.
Data Units Read/Data Units Written: Pay attention to the bracketed number in terabytes. The number in front of that is the data presented as 512 byte data units.
 IDG
IDG
The Smart Data Section is full of helpful stats. Keep an eye on the Percentage Used number, because that tells you the amount of life used by the SSD. The higher the number, the shorter the life remaining.
How to use smartmontools in the future
Here’s how to run smartmontools at a later point, since it's a good idea to check on your SSD every once in a while to make sure it’s in good health. If you ran the installation noted above, smartmontools will be on your Mac for you to use whenever you want.
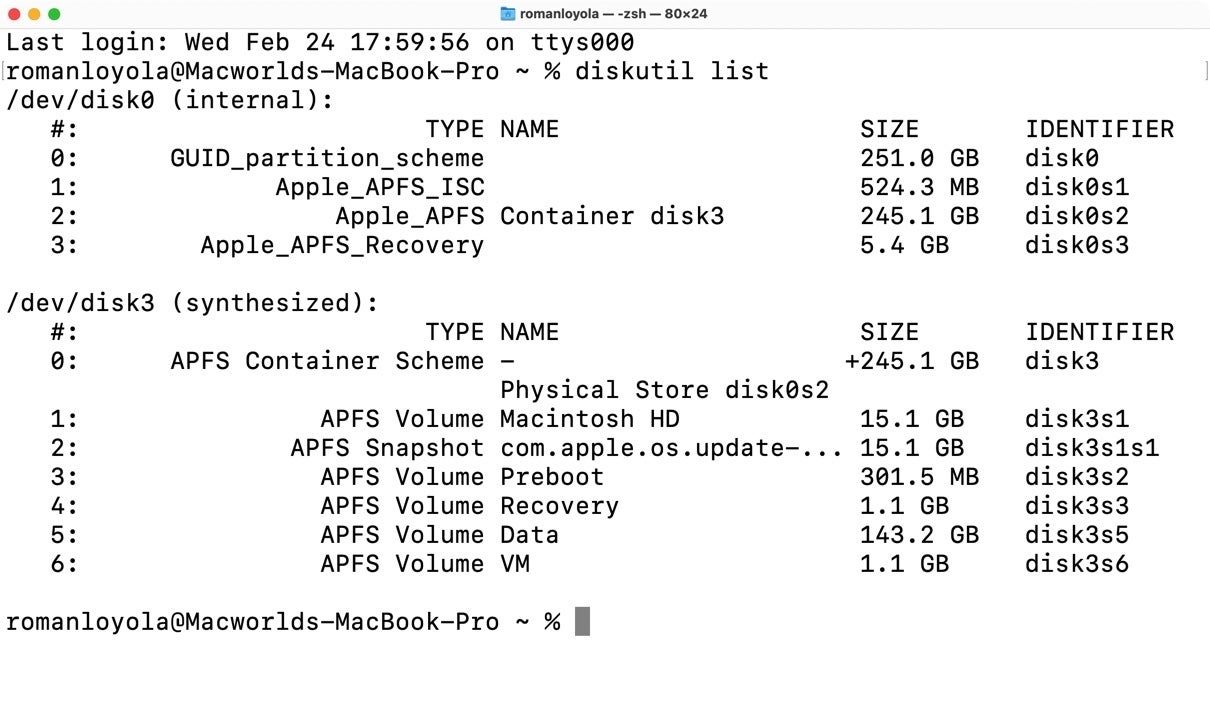
1. Launch Terminal and at the prompt, type diskutil list and press Return. This will show information on the SSD in your Mac.
2. Look for the section labeled /dev/disk0 (internal). Under the headers (#, TYPE NAME, SIZE, IDENTIFIERS), copy and paste the identifier of the entry starting with 0. In my situation, it’s disk0.
 IDG
IDG3. Go to the prompt below, then type smartctl -a, then a space, and then paste in the identifier. So, for example, in my situation, I would type smartctl -a disk0. Press Return.
Smartmontools will run and post a report on the health of your drive. You can give the numbers a look and make sure your SSD is okay.


