5 things I learned while setting up my first media server
- 05 February, 2021 15:40
For years, there was a lonely Raspberry Pi 3 gathering dust on my desk, right next to a cup of pens and a stack of Post-Its. Occasionally I’d pick it up and absent-mindedly twirl it around, as if it were a stress ball. But during a long holiday break, an idea started forming in my head: Could I actually turn this glorified paperweight into something useful?
Working here at TechHive as I do, I was aware of at least one enticing way to put a Raspberry Pi to work: as a media server for videos and music files. Now, I’m not an expert at building PCs, nor do I consider myself an audiophile (although I think I know good sound when I hear it), but I was drawn to the idea of putting my modest CD collection (and some old DVDs as well) into my own personal cloud, where I could stream it to my phone, my tablet, my home theater, or just about any device I wanted to.
Now, I’m not here to give you a step-by-step guide on how to build your own media server (we already have those). Instead, I wanted to share a few things I learned during my own experience, starting with…
It’s surprisingly easy
Setting up a home media server may sound intimidating, but it doesn’t have to be. For my own first project, I took the middle road, choosing to use the Linux-based Raspberry Pi (which involves spending quality time with the command line in Terminal) with Plex, a popular, off-the-rack, and relatively easy-to-use media server package. (We reviewed Plex as a DVR, but it’s also a capable music and video server.)
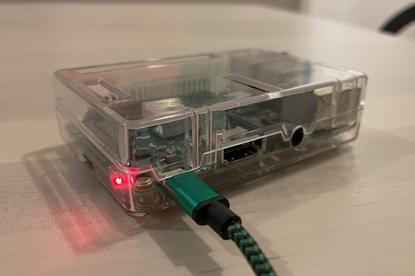
There are plenty of online tutorials on how to install Plex Media Server on a Raspberry Pi, and within an hour or so I had Plex up and running. Mounting an 8GB USB thumb drive (I decided to start small until I knew what I was doing) on the Pi turned out to be a little trickier, although I even had that licked after another 45 minutes or so. I then tossed some old MP3s and home video files on the memory stick, and before I knew it, my unused Raspberry Pi had turned into a media server.
 Ben Patterson/IDG
I’m no expect at building PCs, but I had my first media server up and running on a Raspberry Pi in only a few hours.
Of course, you don’t necessarily need a Raspberry Pi to set up a home media server. In minutes, you can simply install Plex Media Server on a Mac or Windows PC, pick some folders filled with music, videos or other media, and start streaming away. There are limitations to installing Plex on a desktop PC or a laptop—namely, you’ll need to keep it running whenever you want to stream media—but it’s a great, low-effort way to see what all the fuss is about.
It doesn’t have to be expensive
It’s certainly possible to spend thousands of bucks on NAS drives, “endpoints” and other hardware for your home media server. Being the beginner that I am, I opted for a rock-bottom budget, spending just $25 for an external DVD drive (after realizing that I’d long ago shed my old PCs with optical drives) and $30 for a new 256GB USB memory stick (which holds my entire 200-CD music collection, in lossless FLAC format, with tons of room to spare). Oh, and I later sprung for a $40 powered USB 3.0 hub and a $15 power strip (for reasons I’ll explain in a moment).
Now, being cheap with your home media server has its downsides. Installing media server software on underpowered hardware can lead to sluggish performance, while skimping on high-quality endpoints means sacrificing some audio quality when the bit stream is converted to analog. But there’s something to be said for starting small when you’re a beginner, and you can always upgrade your media server piece by piece if you get the urge.
Media server software doesn’t have to be expensive, either. Plenty of free options are available, while the free Plex software lets you unlock some nifty advanced features (such as music downloads and Plex’s iOS and Android apps) for $5 a month. Roon, a slick media server for music aficionados (read our review), goes for a more pricey but still reasonable $13 a month.
You can (and should) re-use components you already have
Few things make me happier than reviving old components that I have sitting on my shelves, and my home media server project gave me plenty of opportunities to do just that.
The starting point was that Raspberry Pi that had been languishing on my desk, but then I started thinking bigger. That 10-year-old MacBook Air I was going to give away: could I turn it into an always-on server for my media? Why sure (with a little help from Amphetamine, a free MacOS app designed to keep your Mac awake indefinitely). An old 512GB hard drive sitting on another desk became a media storage device, and when I dug out another dusty 512GB HDD from a drawer (I thought it was dead, but it came to life when I plugged it in), I decided to combine them into a 1TB RAID drive (which you can do in a few clicks using the MacOS Disk Utility tool). One powered USB 3.0 hub and a power strip later, and I had my dedicated media server—sluggish, noisy and temperamental, mind you, but extremely satisfying from an economic perspective.
It can be a gateway to high-resolution audio
For years, I’d settled for the iffy 128Kbps MP3s that I’d collected from iTunes and Napster (the old Napster, mind you), or for the somewhat better 320Kbps Ogg Vorbis streams on Spotify. But I’d long felt that something was missing when listening to my MP3 library; I was hearing the tunes, sure, but I wasn’t really enjoying them in the same way that I did with my old CDs. For my media server project, I decided to start fresh, ditching the MP3s and instead re-ripping my CDs (using the free Exact Audio Copy utility) into lossless FLAC files.
Just to be clear, the 16-bit/44.1kHz FLACs you can rip from CDs don’t qualify as high-resolution audio files, which are generally considered to be 24-bit/48kHz or better. But while it’s debatable whether the human ear can discern the difference between a 24-bit/96kHz stream and a 24-bit/192kHz one, the leap in quality from a 128- or even 320Kbps MP3 and a 16-bit/44.1kHz FLAC is dramatic, and it may leave you with a taste for more. And if you do get the urge to dabble in high-res audio, you can download a sampler (HDTracks has some) to your home media server and start streaming, for free.
I missed my music collection
One of the joys of Spotify, Tidal, Apple Music, and other streaming music services is the ability to dip into a world of music, skipping from one song to the next in any mix you can dream up. What I didn’t realize until I’d set up my home media server, however, was how much I missed my music.
 Ben Patterson/IDG
Remember album covers?
Streaming my tunes on Plex and (especially) Roon reminded me of sitting on the floor with my records, listening to albums all the way through (remember that?) while pouring over the cover art and the liner notes. Instead of tossing a Spotify mix onto the Google smart speakers in our living room, my family and I would queue up Led Zeppelin I-IV and listen to them in order. I rediscovered artists that I’d known and loved back in college, music that would never have surfaced in my Spotify Daily Mix. In short, my home media server brought my neglected binder of CDs back to life.


