-
HP recently released the sixth generation of its popular DL380 server. It improves on the HP ProLiant DL380 G5 in many areas, including the design and layout of its chassis. It has a 2U rack form factor and can be easily maintained and serviced without tools.
-
The HP DL380 G6 has the option for an integrated storage controller (HP SmartArray P410i) for SAS or SATA drives ('3'). It has 512MB of battery-backed write cache, which means that cached instructions are not lost in the event of a power failure ('1'). The SD card slot can be used as a boot device ('2').
-
The CPU heat sinks can be removed without tools: there is a release lever that allows you to lift the plate holding the heat sinks in place, and then you can lift the heat sinks off the CPUs.
-
The hot-swappable drive bays take 2.5in SAS or SATA drives, and they can be removed and replaced easily. Simply press the button and pull the release lever outward.
-
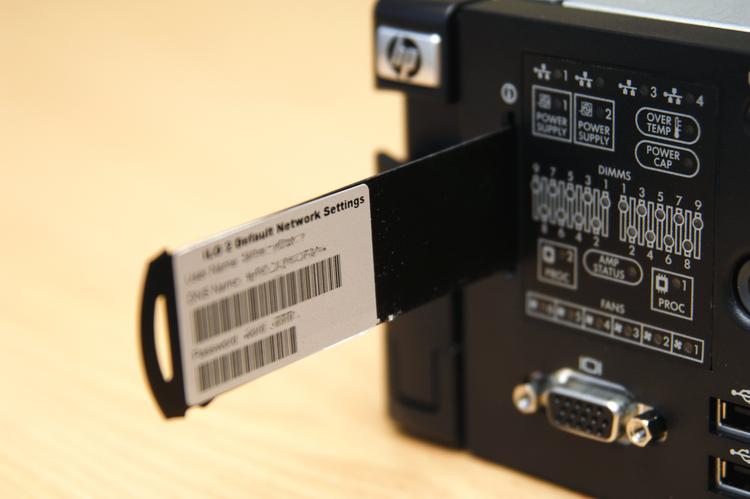
Like the DL380 G5, the DL380 G6 has a convenient tab so that the default iLO 2 settings of the server are always to hand.
-
Once the top panel is removed, the expansion card cage can be lifted up and off the server by simply manipulating the two levers as shown in the picture.
-
The rear of the HP DL380 G6 has four Ethernet ports ('2'), which can also be used for iSCSI; as well, you get PS/2, serial, monitor and USB 2.0 ports ('4'), and an iLO 2 Ethernet port for accessing the server's built-in management console ('3'). There is space for up to six PCI Express expansion cards ('1'); there is an option to have a PCI-X/PCI Express card configuration instead. The UID light on the back ('5') lets you quickly identify the server if you can't get to the front of it.
-
It also provides a diagram with labels for all of the server's components. This is very handy, particularly when examining the server for the first time.
-
Two quad-core Intel Xeon CPUs can be installed in the HP DL380 G6 ('2'), for a maximum of eight cores. It will also work with a single quad-core CPU. Frequencies range from 2.0-2.8GHz. There are nine memory slots either side of the CPUs ('1' and a '3'), which require DDR3 SDRAM. Up to 144GB (18 x 8GB) of registered memory can be installed via the HP DL380 G6's 18 memory slots.
-
The inside of the panel has handy information on cooling, cabling, memory configuration and CPU installation.
-
There are six cooling fans between the motherboard and the hard drives, and these can easily be lifted out and replaced (see insert).
-
The DL380 G6 ships with two 750W power supplies but only needs one to run. They can easily be replaced in the event of a failure; simply press and hold the coloured tab while pulling on the black handle. The power supplies in the DL380 G6 are also compatible with other G6 servers such as the DL360.
-
HP ships the ProLiant DL380 G6 with rack mounts.
-
The front panel of the HP DL380 G6 has a different layout to the DL380 G5, but all of the key aspects that made the DL380 G5 an administrator's dream are still there.
1. This is the status panel, which lets you know if everything is running smoothly, and which has a UID so you can identify which server you are working on. On this portion of the front panel you will also find the monitor and USB ports.
2. The DL380 G6 has eight hot-swappable drive bays. They accommodate small form factor (2.5in) SAS and SATA drives.
3. The DL380 G6 has a SATA optical drive bay, in which an optional slimline DVD drive can be installed.
Unlike the DL380 G5, the connectivity on the front panel of the server does not mirror the connectivity on the rear. You only get the monitor and USB ports on the front, while the rear also has PS/2 and serial ports in addition to the monitor port and USB. -
Getting inside the server is easy. The top panel doesn't require any tools to open; simply pull up the release lever, which slides the cover forward a couple of centimetres (see insert), and then lift it up off the chassis.
-
The server also comes with a cable management system.
-
Here is a shot of the CPU sockets once the heat sinks have been removed.
-
A network mounting kit can be used to mount the server on a two-post telco rack.
-
The status panel on the front of the server has an array of LEDs that light up in green when everything is running without any problems. An amber colour means that a failure has occurred, but that there is a redundancy in place. If the light is red, that means the failure is critical.
Server walkthrough: Taking apart the HP Proliant DL380 G6 server
19 Photos
HP has released the sixth generation of its popular DL380 server


