
Photos has long been a snooze of an app in iOS, and when its OS X complement arrived in Yosemite, it was underwhelming. Through many small releases in El Capitan, Photos’ stability improved and features expanded. Now, in iOS 10 and macOS Sierra, Photos is poised to be much more useful for the most common task after sharing: searching.
Apple finally added content analysis of photos, allowing Photos on both platforms to recognize and associate faces of the same person across many images, and interpret a limited array of emotions. It also now tags images that contain any of thousands of object features, like mountains and dogs.
Photos automatically assembles sets of memories into pseudo-albums, ostensibly saving you the tedium of organizing and culling. Apple goes one step further, creating movies that are…well, they’re pretty hilarious and may be more accurate about our lives than we want to believe.
With the public betas of iOS 10 and macOS Sierra out, you can try out all these features for yourself.
At the moment, Apple doesn’t synchronize facial and object recognition across devices. It’s not clear yet whether it will because Apple’s push at its recent Worldwide Developers Conference was for local analysis of private information that’s never uploaded to the cloud. While that’s great in theory, it does mean you might have to repeat the effort in tagging and merging faces, across every device to which you sync the same set of photos.
Facial recognition and organization
Apple added a Faces feature to iPhoto years ago, and frustrated many Mac owners to pieces by weakly implementing it in Photos, and dropping all recognized faces when converting libraries from iPhoto to Photos. iOS has never included any recognition support.
For both iOS and macOS, the new Photos scans quietly for objects and scenes, but because facial recognition is more computationally (and thus battery) intensive, both OSes let you know that face-interpretation only occurs when iOS devices and Mac laptops are plugged in and have sufficient charge. In iOS, it can happen in the background while the device is plugged in.
The initial process can take some time. In iOS 10’s second developer beta on a 9.7-inch iPad Pro, a library synced from iCloud with almost 27,000 low-res “optimized” images took almost an entire day to process. After the initial process, new images added to your library can be scanned in seconds. In macOS Sierra, it stalled after a few hours, certainly an expected problem with a beta release.
Photos doesn’t automatically label faces with names, doesn’t use previous Photos or iPhoto information, and doesn’t import information from other devices. So this can be a little tedious, though to me the facial recognition seems improved in terms of both finding faces (even when rotated and minuscule) and grouping together more images containing the same person.
The faces interface is nearly identical between iOS and macOS, and I’ll walk through what you can do with it. As soon as Photos starts identifying people, a People album appears that you can select. Even while it’s still churning away, you can tap View People Album to show the results so far.
Note one convention that may be confusing because the interaction is otherwise so similar between the two operating systems: in iOS, toggle the selection of an item in a set by tapping it; in macOS Sierra, use the Command key to add or remove items from a selection.
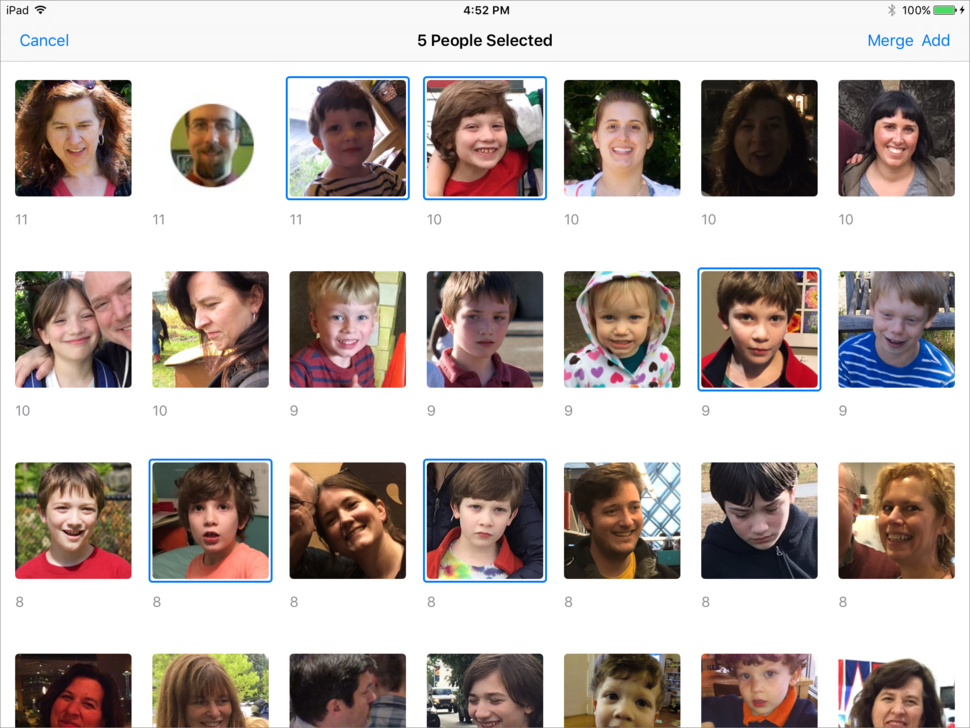
The Select People view lets you add people to the main People album, but you can also merge faces before adding.
Add People. By some criteria I can’t tell yet, some faces will appear on the album’s main page, and some only when you tap an Add People button. You can merge faces in the Select People view that appears, but you can’t name them. For that, you have to select one or more faces and then tap or click Add.
Labeling. From the main Photos Album view, you can tap or click any unnamed face to name it; in macOS, you can also click the Add Name gray item to type the name in there. Tap or click Add Name in the face view, and then, as you type, Photos autocompletes potential matches. If the person isn’t in your contacts, you can type in the name, but there’s no way to indicate you're done either in iOS or macOS. Just tap or click elsewhere or return to the main People album, and the name is retained.
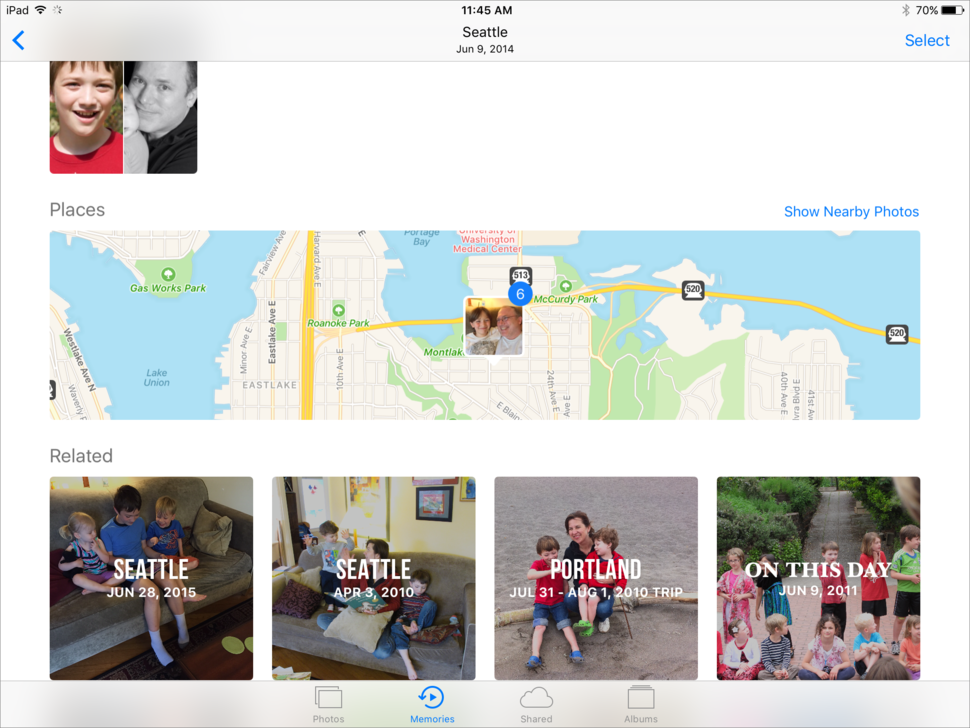
The bottom section of each person’s view has faces of other people in the photos, places the photos were taken, and related Memories.
View People. You can view all the photos in a set for a person by tapping or double-clicking the face in the People album. At the top, you see an automatically slowly-playing slideshow of the photos in that set. Photos default view then shows an artistically arranged album below that, which comprises a subset of all matched images. You can tap or click Show All to see every image matched for that person.
The automatic slideshow at the top can also be played as a full-screen movie with music, a la Memories. In iOS 10, there’s a play button overlaid on the image when you hover over; in macOS, click the Play button in the menu bar, then click Play Slideshow. This quasi-movie can even be added to Memories by tapping or clicking Add to Memories at the bottom of the person view. In iOS, you can also play the movie and tap the Details button, at which point you’re prompted to add it to Memories in order to edit it.
If you want to see the face matched in each photo, tap Select at upper right and then tap Show Faces at upper left in iOS 10, or click the Faces button at upper right in macOS.
Scroll or swipe down, and a People section shows all the other people matched in the same photo; Places shows the images on a map; and Related matches against Memories.
At the very bottom, you can favorite or unfavorite a person, but also tap or click the very hidden Confirm Additional Photos option. This brings up additional potential matches for the person you’re viewing, something which was front and center in the earlier Faces technology used in Photos and iPhoto.
Pick the key face. You probably don’t want the default selected facial image to identify a person—in my testing, it’s almost always a peculiar one. In iOS 10, tap a person in the People album, tap Select in the upper right, select a single photo in the Photos list, tap the Share button, and then tap Set Key Face.
In macOS Sierra, double-click a person in the People album, and then right-click a photo to select Make Key Face.

Merging faces collapses multiple sets into a single one.
Merge. Photos offers a couple of ways to merge separately identified faces.
- Whenever you add a name to an identified face, if you’ve already used that name, you’ll be prompted to merge. Agreeing will combine those sets.
- In the People Album in iOS, tap Select in the upper right, select two or more faces, and then tap Merge at the lower right.
- In the People Album in macOS, select two or more faces, and then right-click to bring up a Merge item in the menu.
- Tap or click Add People, and you can select multiple faces and then tap Merge, at which point you’re prompted to Merge & Add, which collapse the sets and puts the face in the main People album.
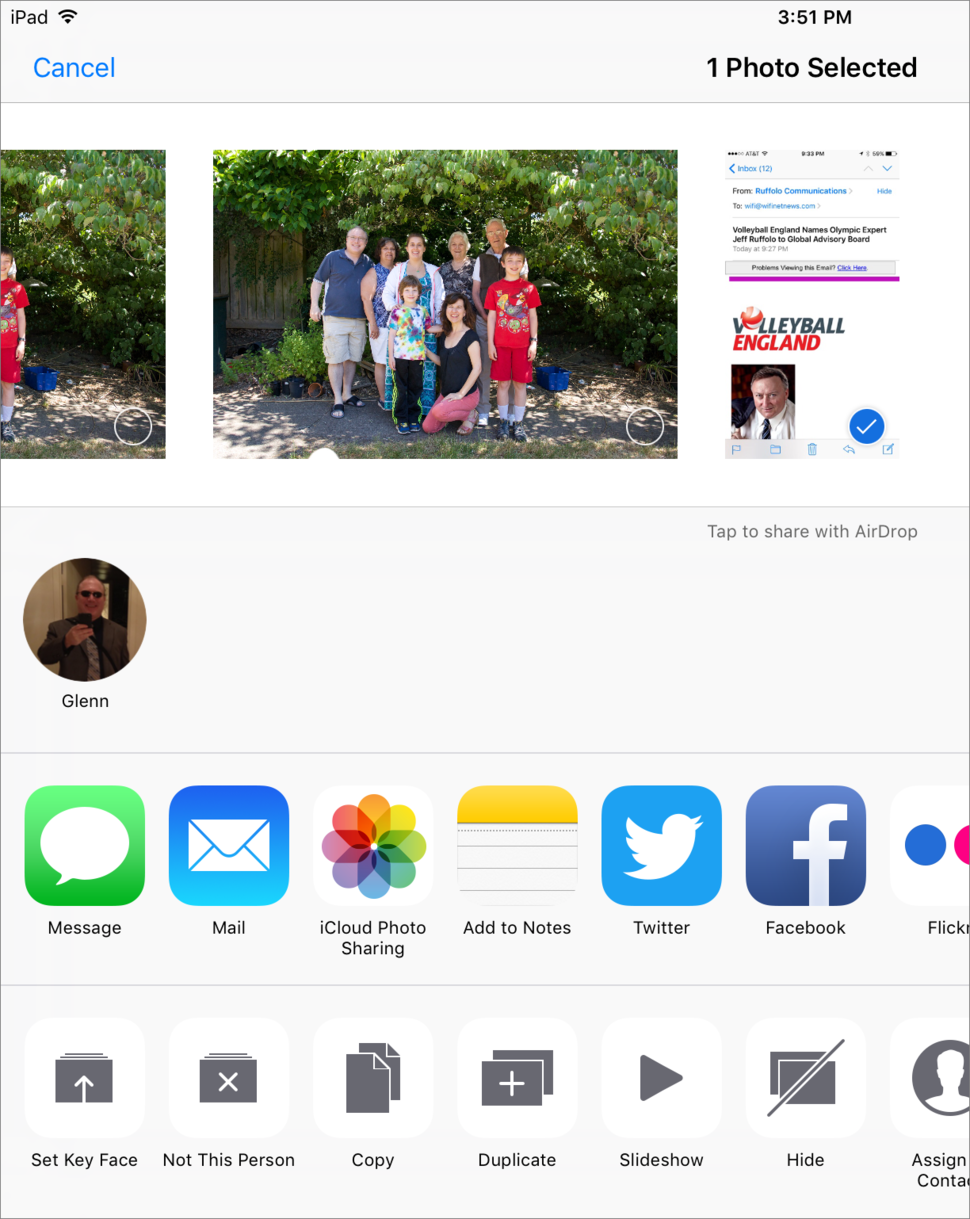
Removing an incorrect face match is a bit awkward in iOS 10.
Remove photos from a faces set. Apple’s chosen a slightly awkward way to remove people.
In iOS 10:
- Select the face in the People album to open it.
- Optionally, to the right of the Photos label, tap Show All.
- Tap Select in the upper-right corner. You can then optionally tap Show Faces in the upper-left corner to zoom in on just what Photos is “looking” at.
- Tap one or more photos to select.
- Tap the Share button.
- Tap Not This Person to remove those photos from the matched set.
In macOS Sierra:
- Double-click the person in the People album.
- Select one or more images; click Show All to show all of them. Click the Faces button if you want to just see the identified face in the image.
- Right-click to select This Person Is Not In This Photo.
Favorites. You can put favorite faces at the top by dragging them into the Favorites area. In iOS, tap Select in the upper right, select one or more faces, and then tap Favorite at the bottom middle. In macOS, select one or more faces, and then right-click to choose Favorite from the menu.

The People album is organized into favorites at the top and other people below; so-called “hidden” faces appear (or can be hidden) even lower
Hide. Too many faces in the People album? You can hide them selectively! In iOS 10, tap the Select button at upper right, select one or more faces, and then tap Hide at lower right. In macOS, select one or more faces, and then right-click to choose Hide from the menu. The hidden faces are below Favorites and the rest of the faces. Tap or click Show Less to hide the hidden faces or Show Hidden Faces to display them. You can also tap or click Show Favorites to hide everything but favorites; tap or click Show All to display the other faces again.
Memories
Memories is my favorite new feature in Photos, but it also reveals some of the odd and amusing limitations with AI learning algorithms. In some slideshows it creates, blurry images and strange close-ups of objects seem to dominate. In others, the results aren’t far off from what I might have put together myself. In yet others, interesting associations I wouldn’t have made are brought together. It’s a work in progress that should get better.
Tap the Memories button in Photos in iOS or click the Memories link in the sidebar in macOS, and Photos lists all the self-assembled memories that it “thinks” are most important. These memories include both photos and videos.
However, Memories are not entirely gathered in this view, but also scattered around Photos (or at least in the current beta). The Related area in any view that has it, such as the People album or at the bottom of any Memories item, shows additional potential Memories. You can tap or click those, and then scroll or swipe to the bottom to tap Add to Memories to have them appear. This kind of select is a form of training. In the Memories view, you can tap and hold down or right-click to remove a memory or add it to favorites, which trains the system further.
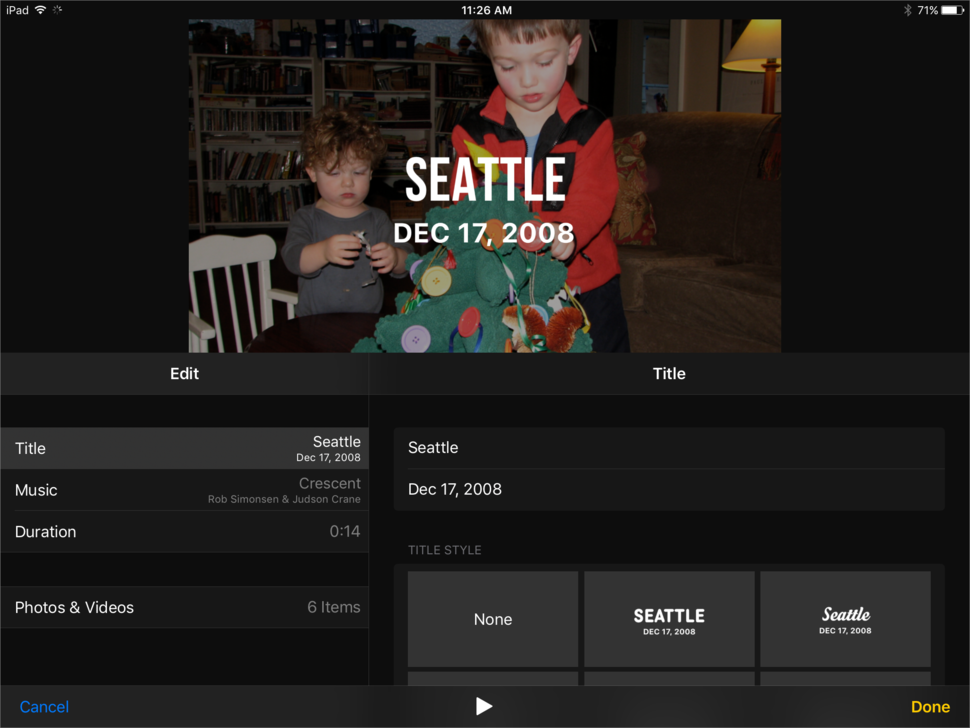
The movie-editing interface in iOS 10 for Memories has a lot more options than the macOS version.
You can change the music that goes along with a memory as you would with a slideshow. In macOS, it’s an option when you click the Play button: you can select existing themes and pick music from iTunes. In iOS, it’s a little more involved: tap the play button, then tap the movie, and then tap the Details button in the lower right. This brings up a very elaborate editing window for title, music selection, duration, and title style.
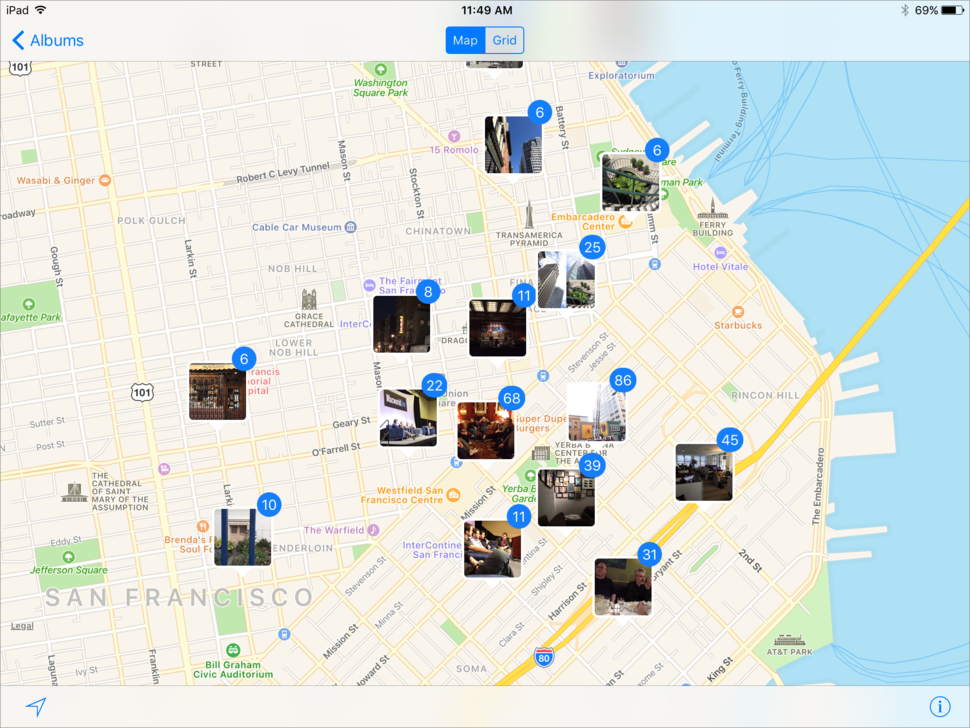
Places groups photos by the level of magnification on a map.
Places
Stepping up its geographical game, Photos now does a vastly better job of showing where photos were taken that have geotag information, and provides a more appealing interface for looking around. In nearly every collected view, Places appears as a section if any media is geotagged.
Places appears as an album, and it seems to zoom in by default to where most of your photos are taken; for me, that’s the continental United States. Based on zoom level, Places organizes images into groups. For instance, I have 905 images marked for the entire state of California. Tap a group, and it reveals all the photos, sorted into moments.
But if you zoom in or out, the groups change based on granularity. The closer you zoom, the more groupings you see, all the way down to a close street view. In macOS only (as in previous versions of Photos), you can reset a location for a photo or video by selecting one or more items, clicking the i button in the upper right, and then dragging the pin on the map to a new place.

Photos did a fabulous job of finding images of “nightfall.”
Better search
Search has certainly been the weakest aspect of Photos in iOS and macOS, and Apple has lagged significantly as competitors, using cloud-based photo analysis, added whizbang matching. Google Photos, which I started using not long after its introduction, has nearly terrifyingly accurate matching of people across ages, haircuts, and expressions. It also has the sense to interpret dates correctly.
iOS 10 and macOS Sierra come a lot closer to Google Photos, and finally present decent ways to find images. Keywords you enter can be matched against people’s names, facial expressions, place names, titles generated or assigned to memories, objects, and elements in a scene, as well as the more conventional words in titles, file names, dates, description, and other text metadata.
In the current beta, I was unable to get facial expressions to match, but objects and scene types matched, like “train station,” “cow,” and “nightfall.” Date matching remains primitive for now: you can type in a month, which matches all photos taken in that month, or a month and a year for that subset of results.


