[Editor’s note: The MPAA and most media companies argue that you can’t legally copy or convert commercial DVDs for any reason. We (and others) think that, if you own a DVD, you should be able to override its copy protection to make a backup copy or to convert its content for viewing on other devices. The law isn’t entirely clear one way or the other. So our advice is: If you don’t own it, don’t do it. If you do own it, think before you rip.]
You may buy and rent digital movies, or even get digital copies of your films when you buy DVDs so you can watch them easily on an Apple TV or iOS device. But not all movies offer digital copies, and you may not want to buy movies from the iTunes Store; you may want to own hard copies of your favorite films. Or, you may, like me, buy DVDs of concerts and operas, or have a collection of older DVDs, such as my box sets of The Honeymooners and The Twilight Zone.
Fortunately, it’s easy to rip DVDs and add them to your iTunes library so you can use them more freely and watch them when you want. Here’s how.
Get software
The go-to tool for ripping and converting video files has long been the free Handbrake. This software was in beta for years, and only recently saw its version 1.0 release.
But there’s a problem with Handbrake and macOS Sierra. Handbrake uses a library file called libdvdcss, which enables the app to circumvent copy protection on DVDs, but Sierra’s security system prevents the installation of this library. There’s a relatively easy way to install this, however, using the Terminal and some software called Homebrew.
Homebrew is a command-line app installation system. In short, when you install Homebrew, you can then easily install other command-line executables on your Mac. You may never need to do this again, but if you want to use Handbrake to rip discs, then this is the easiest method.
Open Terminal (it’s in your /Application/Utilities folder), and paste this line of code into the app:
/usr/bin/ruby -e “$(curl -fsSL https://raw.githubusercontent.com/Homebrew/install/master/install)”
Press Return and follow the instructions. Homebrew software will be downloaded and installed. If you haven’t previously installed the Xcode command line tools, they will also be downloaded and installed. (These are a few tools that are part of Apple’s developer software.) This process may take a couple of minutes; don’t worry if Terminal stops giving feedback while it’s downloading and installing these tools.
When this has completed, paste this command into Terminal and press Return. This tells Homebrew to install the libdvdcss file:
brew install libdvdcss
This takes just a few seconds. When this is completed, quit Terminal.
Use Handbrake
Insert a DVD in your optical drive. Launch Handbrake, select the DVD, then wait a few seconds while the app reads the disc. If your DVD contains multiple titles, such as a movie and some bonus features, you’ll need to select each one that you want to rip. Handbrake’s Title menu shows you the durations of each title, but not their names, so you’ll need to check the DVD to find out which is which. The longest one is generally the movie itself; select it in the Title menu, then click Add to Queue. If you want to rip any other items, select them, one at a time, and click Add to Queue for each one.
If you don’t see the drawer at the right of the Handbrake window, click Toggle Presets in the toolbar. This is where you choose the quality of your final file. Check the General section; as you can see, there are four groups of presets: Very Fast, Fast, HQ, and Super HQ.
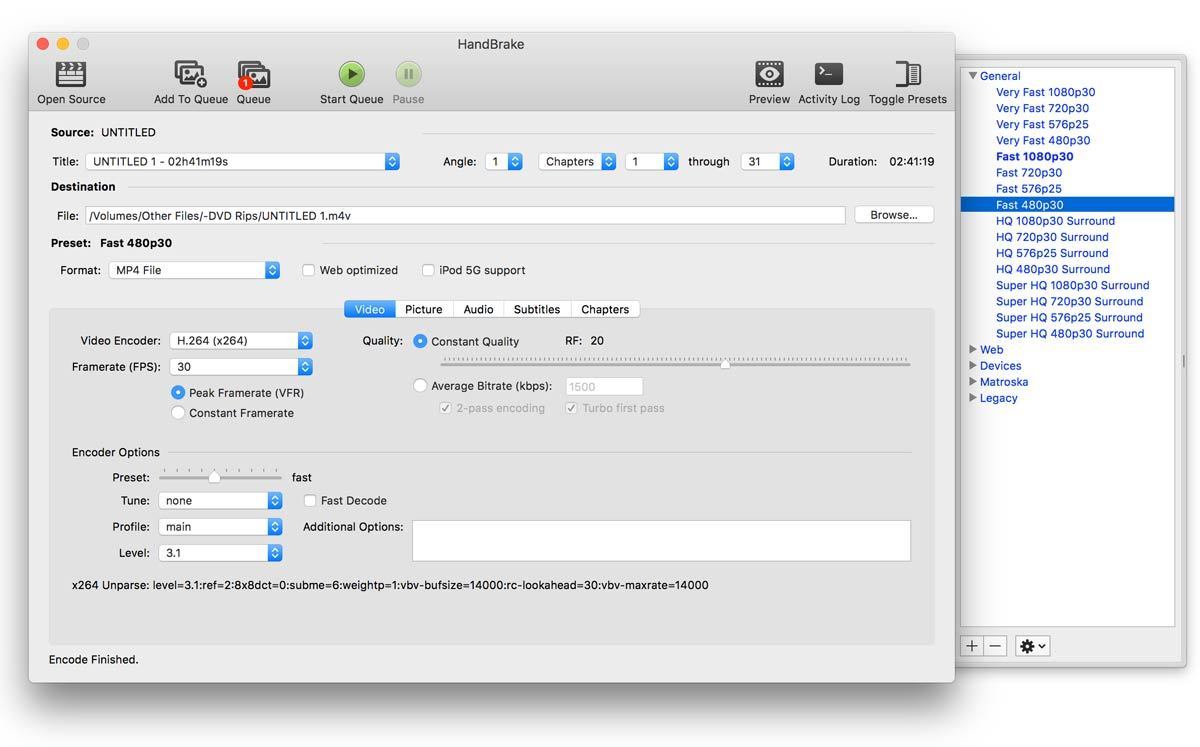 Kirk McElhearn/IDG
 Handbrake showing a DVD it has read. I selected the main title (the movie) from the Title menu and clicked Add to Queue. You can see the presets drawer at the right of the window.
If you’re ripping a DVD in NTSC format (sold in the US), then it has 480 lines, so choose one of those presets. (If you’re ripping a DVD in PAL format, it has 576 lines.) Don’t bother using the HD presets (1080p and 720p), they won’t make your DVDs look any better.
If your DVD has surround sound, and you have a surround sound playback system, you definitely want one of the presets that offers this audio.
There’s not that much of a difference in size between the Fast and Very Fast presets (they’re both much smaller than the HQ presets), or between HQ and Super HQ, but there is a time difference. HQ is much faster than Super HQ, for example. If you’re ripping a lot of discs, I recommend trying the different formats out to see if there’s a visible difference.
The advantage of these presets is that you don’t need to fiddle much with Handbrake’s many settings. However, you may want to check the Audio and Subtitles tabs of Handbrake after you’ve selected a title and preset. In the Audio tab, you can choose an audio track (this could be English, another language, or a commentary) and choose how it’s mixed down. If you’ve selected an HQ preset for quality, but don’t have a surround sound system, you may want to just rip the stereo track, or mix the surround mix to stereo. Or you might want to rip both the surround and stereo mixes just in case.
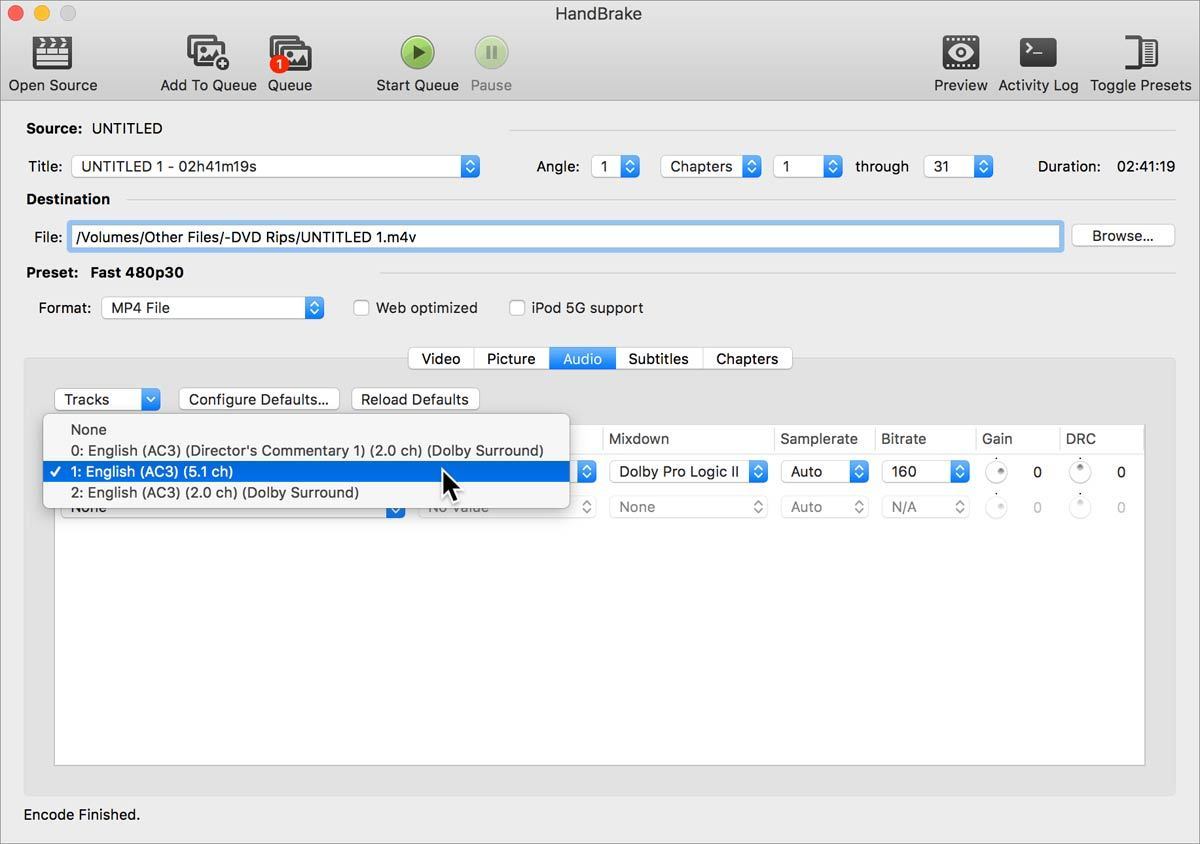 Kirk McElhearn/IDG
 Choose which audio track(s) you want to rip.
For foreign films, or those with closed captions, the Subtitles tab lets you choose what titles you’ll see (or not). (Read more about subtitles in this article.)
Click Start, and Handbrake rips your selections one or more MP4 video files. When this is finished, you can add them to your iTunes library. After you do this, find the files in iTunes, select them, and press Command-I to display the Info window. In Options, you’ll see that the Media Kind is Home Video; change this to either Movie, TV Show, or Music Video, according to the type of video.
Handbrake has lots of other settings you can use when converting your files. Have a look at this Macworld article, written a few years ago. While Handbrake has changed a bit, the information about its more advanced settings is still valid. But with Handbrake’s new presets, you may not need to change any of these.
In a forthcoming article, I’ll explain another way to rip your DVDs without installing anything in Terminal.


