 Credit: IDG / Hayden Dingman
Is it worth it to upgrade a laptop's RAM or storage? We had a chance to find out when Dell asked us to test the upgradability of its Inspiron 15 7000.
I admit that as I faced this challenge, I started sweating. Panic-sweating. In my experience, upgrading a laptop is never a fun time. Cracking the case open feels borderline illegal, and once you’re inside you find a maze of tiny screws, tiny parts, tiny wires—like disarming a bomb built for ants. Many laptops don't want to be opened, hiding the screws or voiding the warranty if you dare.
Imagine my surprise when I found the Inspiron 15 7000 almost...friendly? Getting inside still feels a bit illicit, but it was pretty easy to do. Was it worth it? We ran benchmarks to find out.
Building a better laptop
The Inspiron 15 7000 is a good candidate for upgrades, because no single configuration is perfect. The model Dell sent over is the top-of-the-line Inspiron 15 7000 Model 7591 (currently $1,050 on Dell.com), a humble little machine that packs an Intel Core i7-9750H, an Nvidia GeForce GTX 1050, a 512GB M.2 SSD, and 8GB of DDR4 RAM.
It’s a strange machine, for sure. At just over $1,000, the Inspiron 15 7000 still feels a bit overpriced—blame the Core i7 processor and that generous 512GB of storage. But only 8GB of RAM? Meanwhile, the cheaper $900 model touts a Core i5-9300H and Intel UHD 630 graphics, but 16GB of RAM.
What’s an enterprising buyer to do if they want a Core i7-9750H and 16GB of RAM to go with it? You do it yourself, of course.
Cracking the case
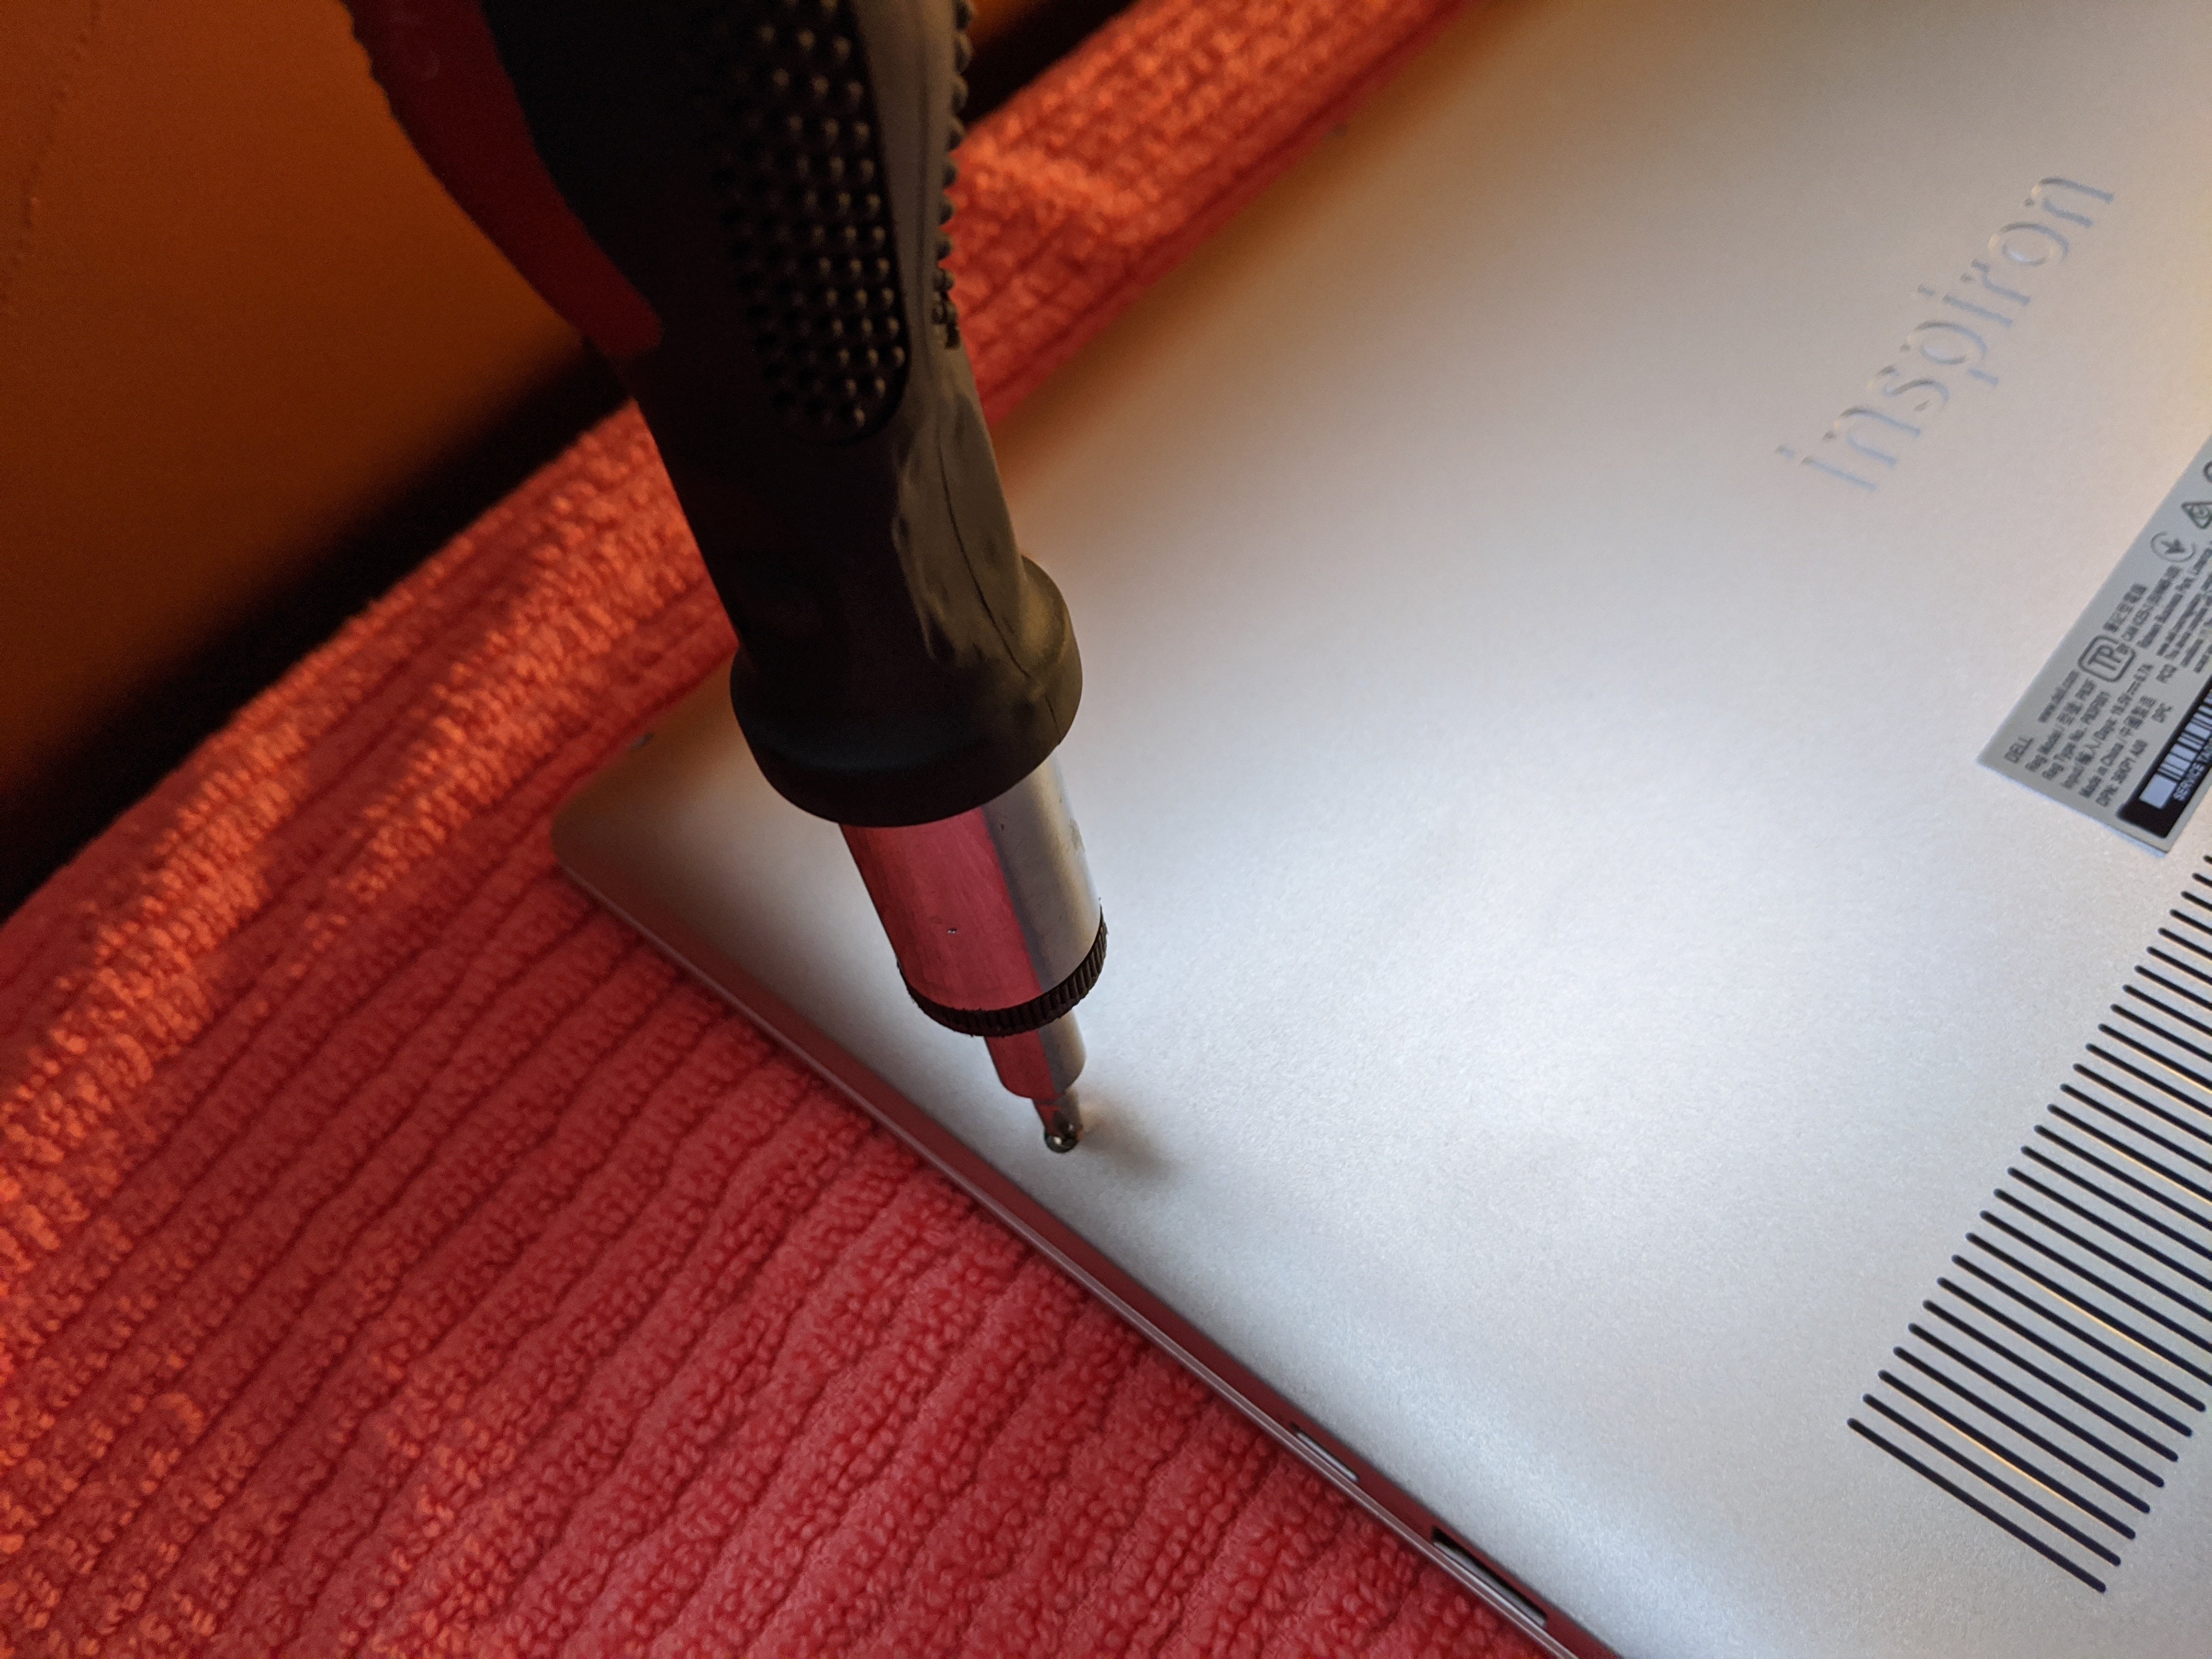
The Inspiron 15 7000 is held together by eight screws, all very visible on the bottom of the machine. The three along the hinge side are “captive,” meaning they’re not meant to come out of the lid. After turning them a bit, you’ll hear a pop as the threads snap back into place. Stop turning! They’re “out,” even if it’s difficult to tell.
 IDG / Hayden Dingman
Captive screws help separate the bottom panel from the rest of the chassis. Once you’ve loosened all three, you should notice the side with the hinges has already begun separating. All that’s left is to loosen the five remaining screws. Keep a coffee cup nearby to stash them so they don’t get lost.
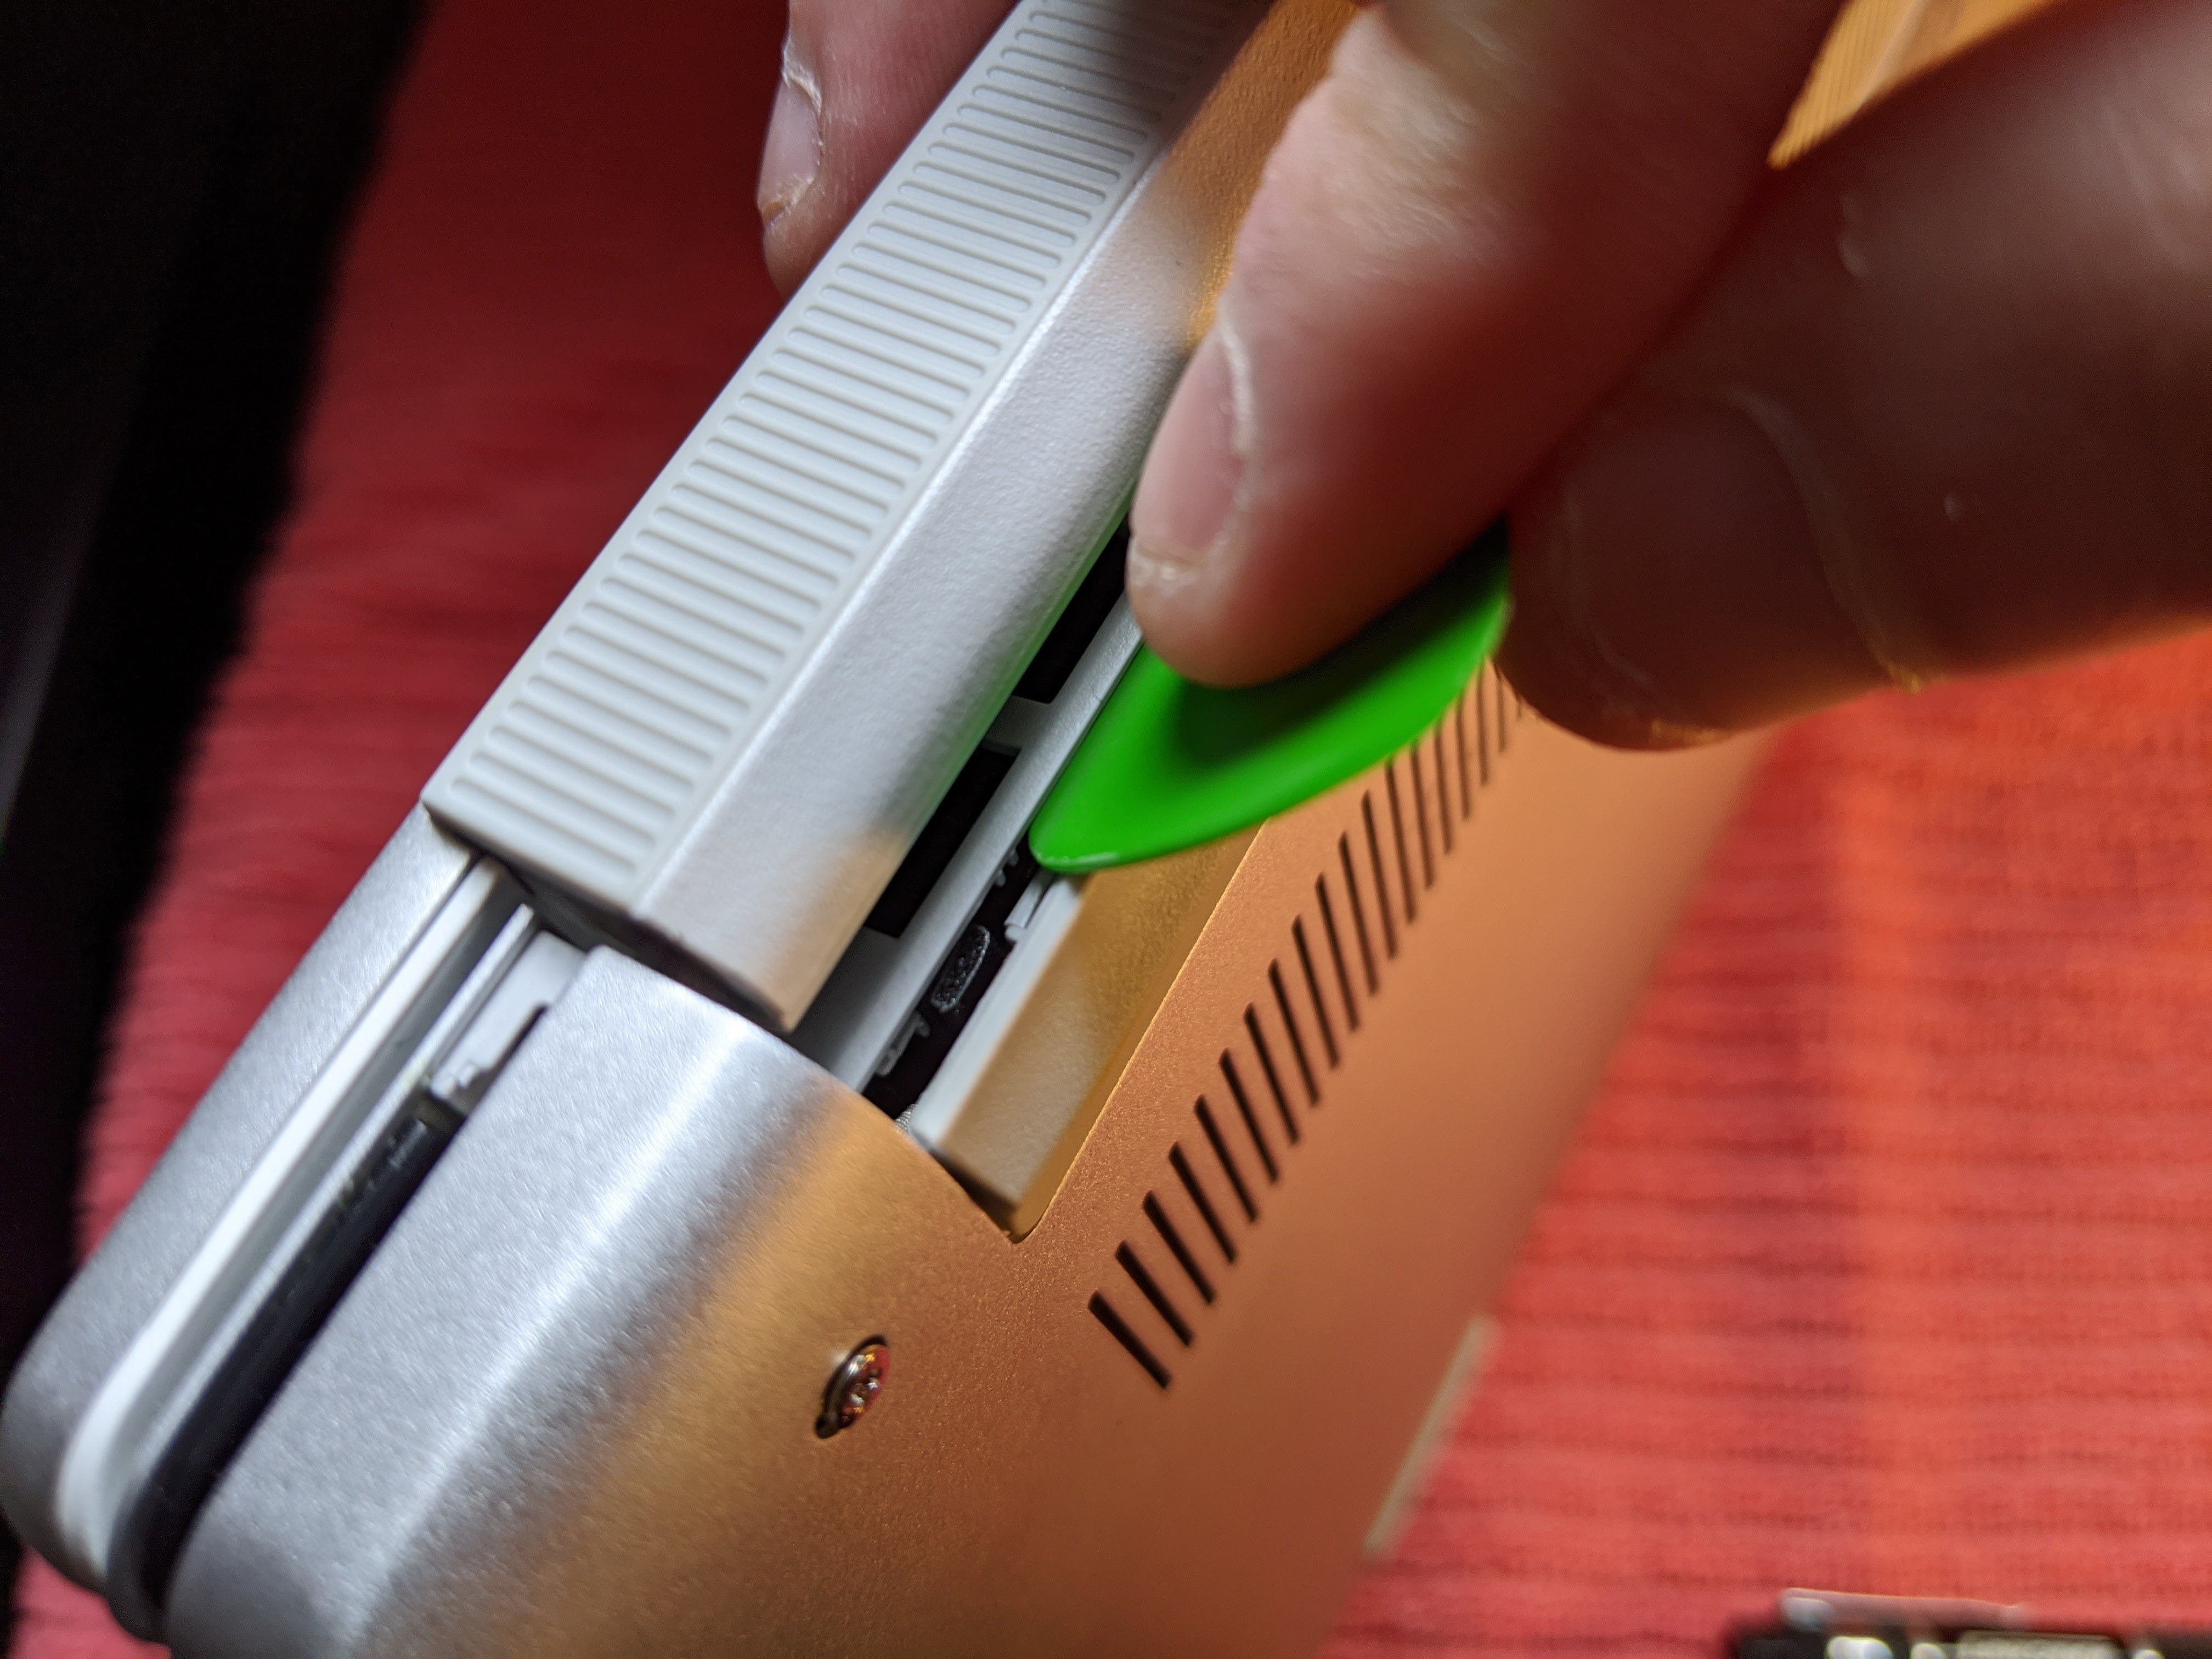
Then, get ready to rock—by which I mean, find a guitar pick if you have one. A “spudger” is the correct tool for the job, but anything will do so long as it’s thin, durable, and plastic. Starting from the existing gaps on the hinge side, run your plastic doohickey under the edges to pop the clips holding the bottom panel in place. This is the part that always feels illegal. Even after you’ve freed the edges you might notice the panel’s still holding on. Give the captive screws one more twist if this happens. That’s usually the culprit.
 IDG / Hayden Dingman
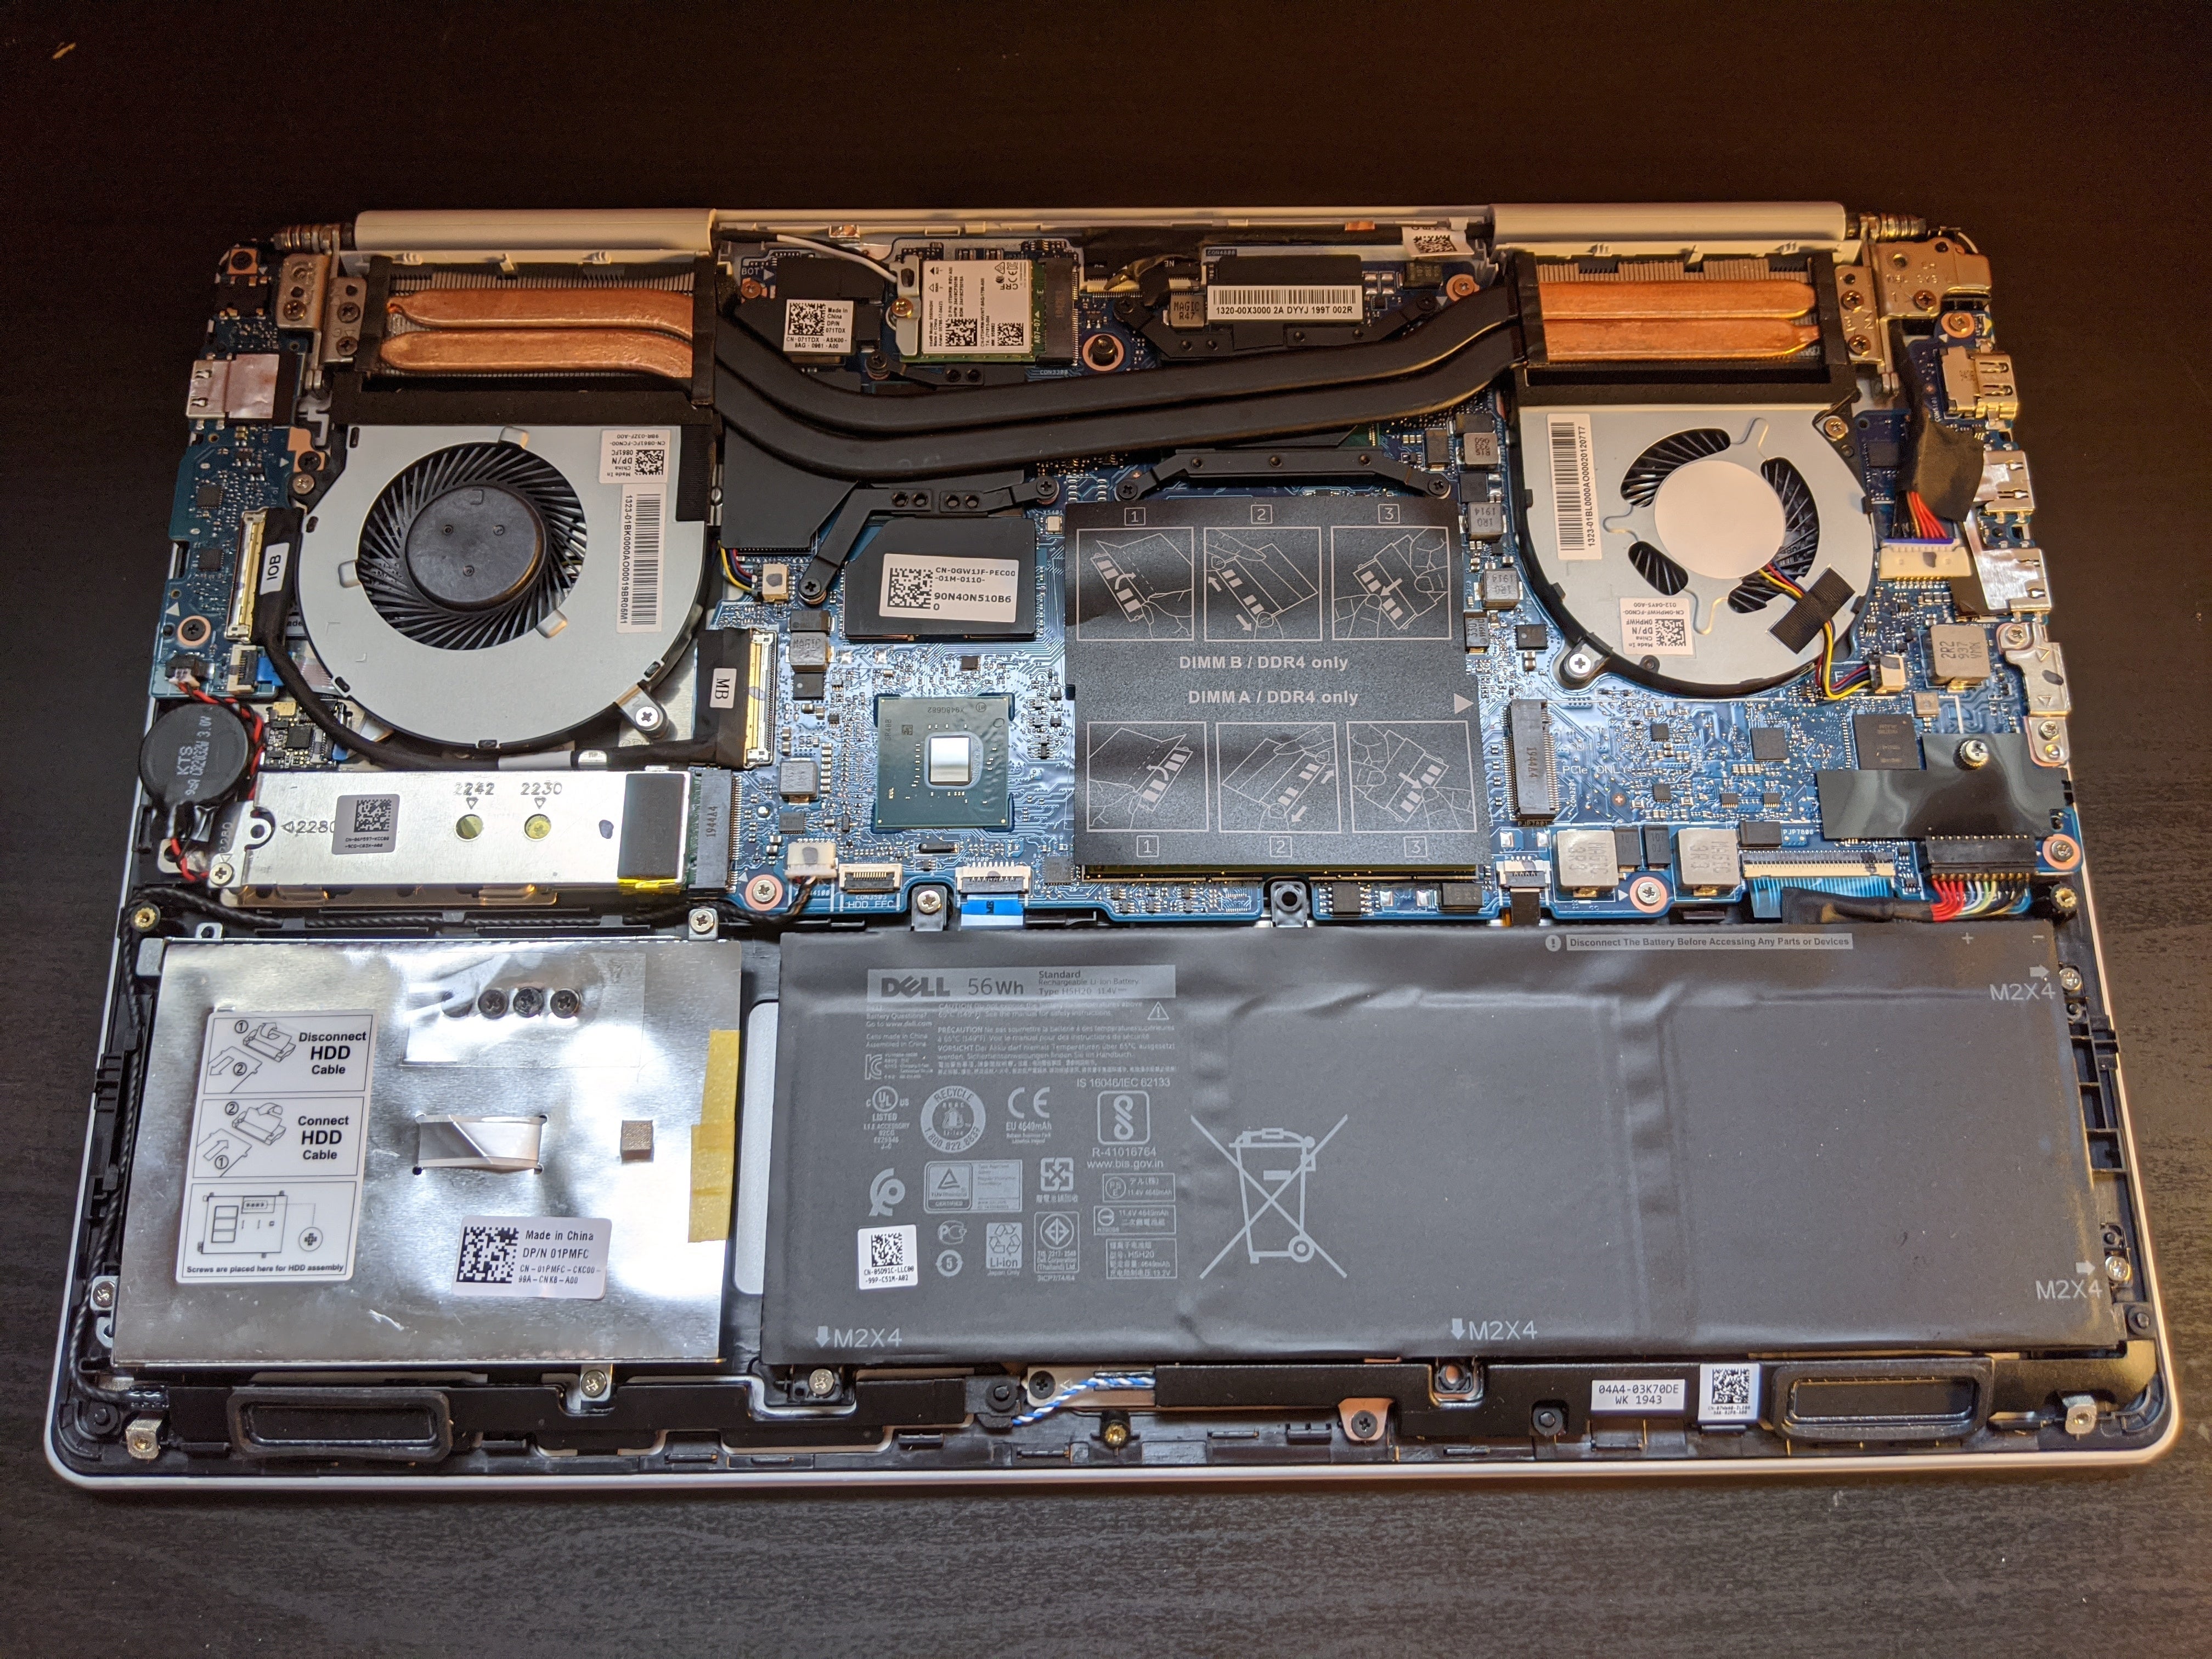
And voila, we’re inside. From here, the hardest part is just deciphering all the various components.
 IDG / Hayden Dingman
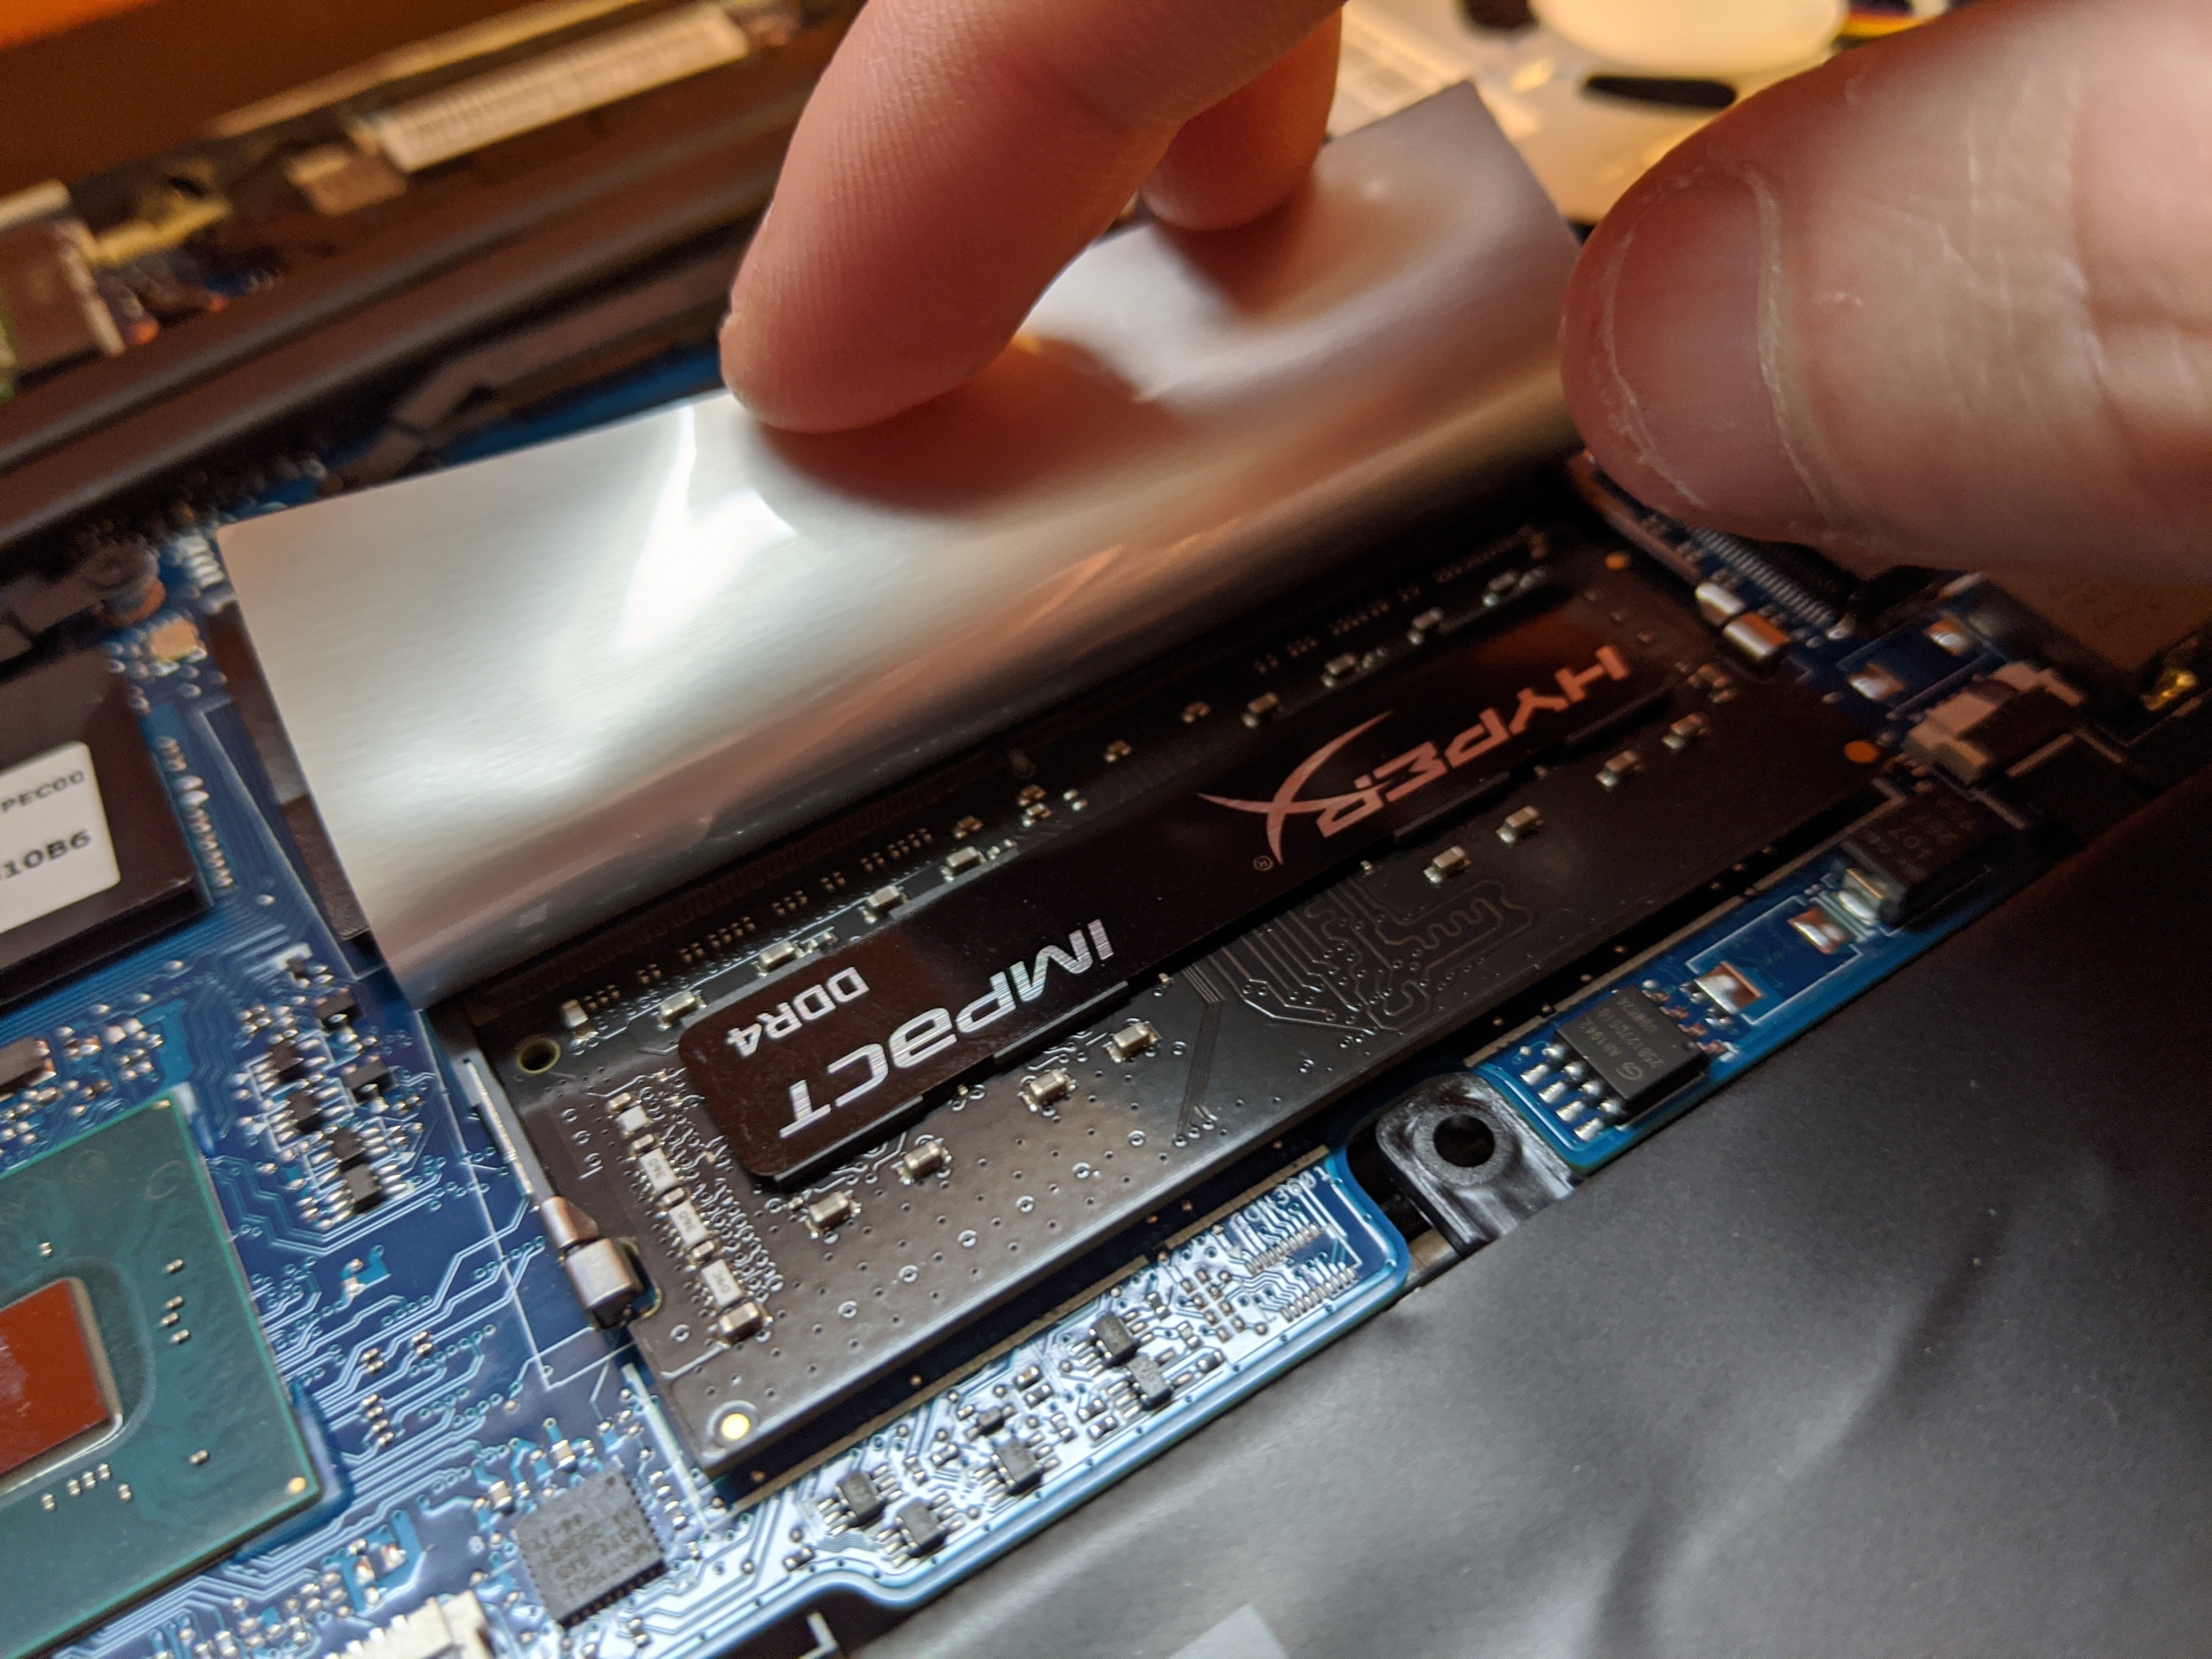
Luckily if you’re here to swap RAM, Dell labeled everything for you. DIMM A and B are covered by a thin black sheet. Lift it up and you’ll see the existing 8GB stick, which is easily freed by pressing down the little clips on either side. Line up your replacement RAM with the slot, press it in (firmly), then lower it until it clicks into place.
 IDG / Hayden Dingman
Out with the old...
 IDG / Hayden Dingman
...and in with the new.
Keep in mind: You ideally want RAM to match. Tempting as it may be to buy one 8GB stick and pair it with the existing one, you’ll typically find better performance (and fewer headaches) buying a 16GB set instead. We stuck with 16GB because it’s what we had on hand, but you could go higher if you’d like.
Dell’s provided plenty of storage options. In the bottom left corner (if the hinges are facing down) you’ll see a big, silvery panel attached by a single screw. Lift it, and you can install a standard 2.5-inch HDD or SSD. Hard drives are pretty cheap nowadays, offering massive amounts of storage space—assuming you don’t care about speed.
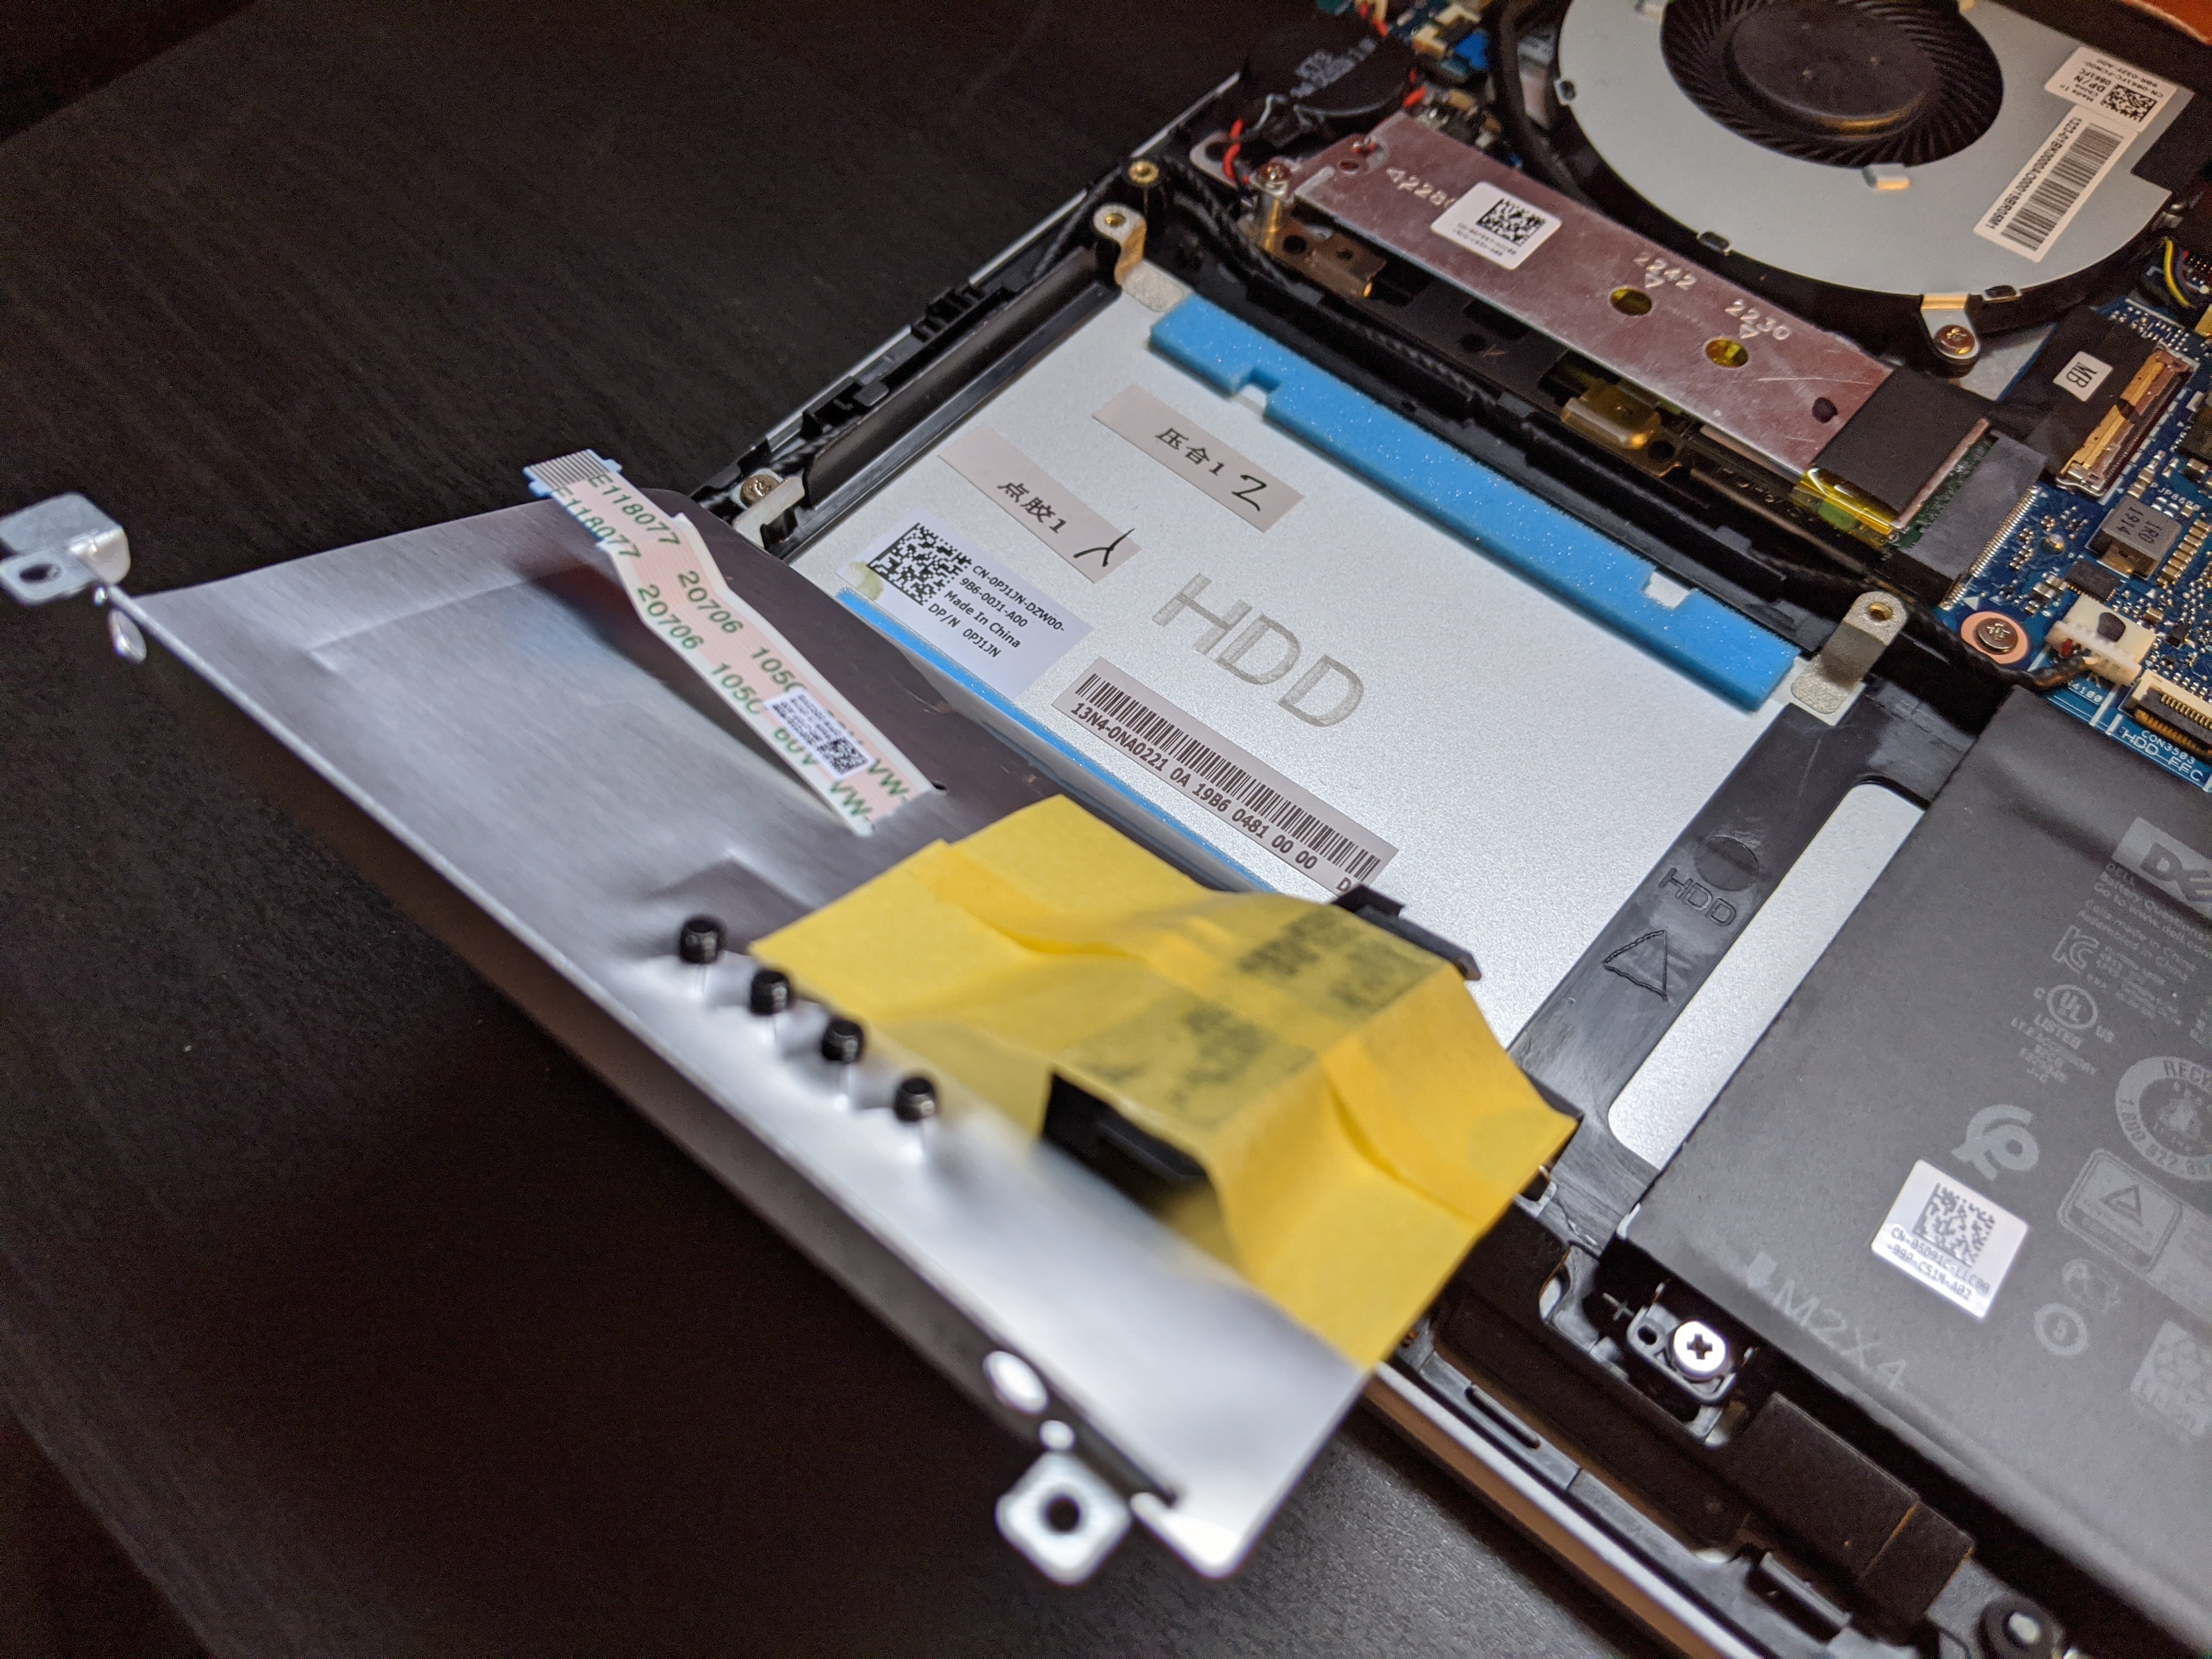 IDG / Hayden Dingman
Those with a bit more spending money can add a second M.2 SSD—or replace the existing SSD, or replace and add. You’ve got a lot of options here.
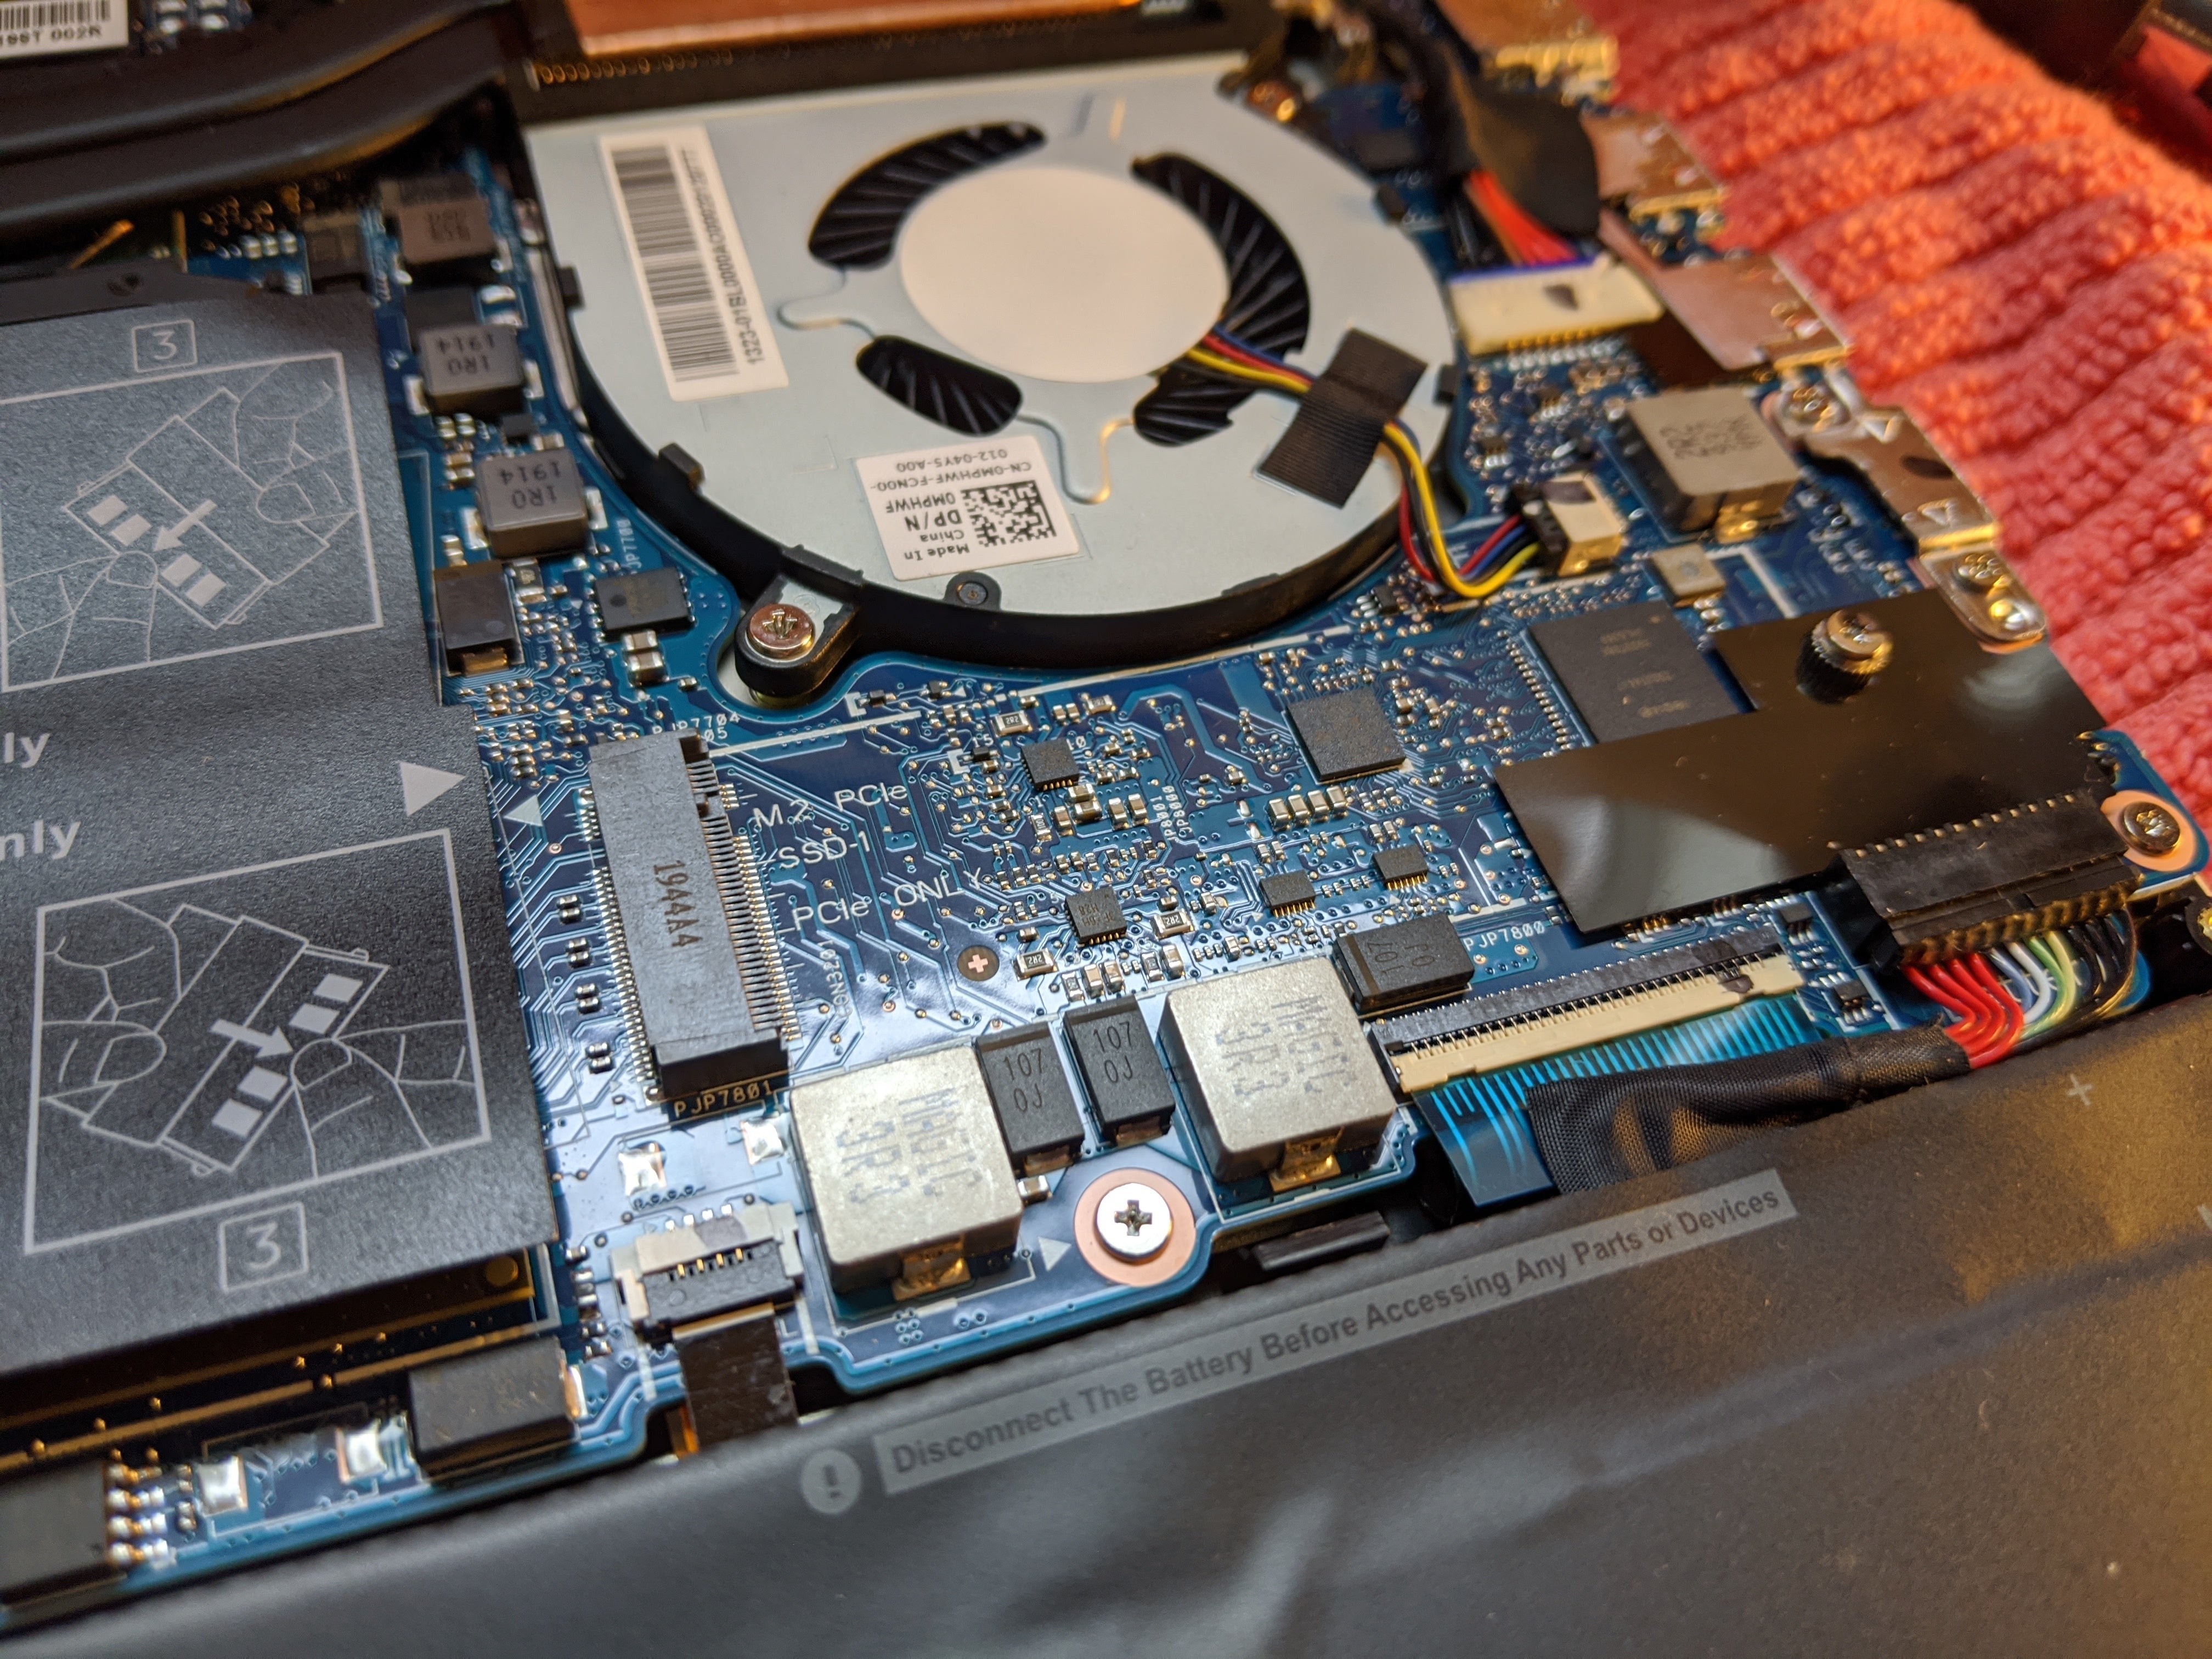
Adding an M.2 drive is the most straightforward, though spotting the M.2 slot is hard at first. With the hinges facing down, look to the right of the RAM enclosure and you’ll see a little black stripe—and a screw two inches farther to the right. Remove that screw, insert the M.2 drive into the port, press it down, and then put the screw back in. That’s it. You’re done.
 IDG / Hayden Dingman
This is what you’re looking for. Notice the “M.2” label on the motherboard.
 IDG / Hayden Dingman
All secured! Easy.
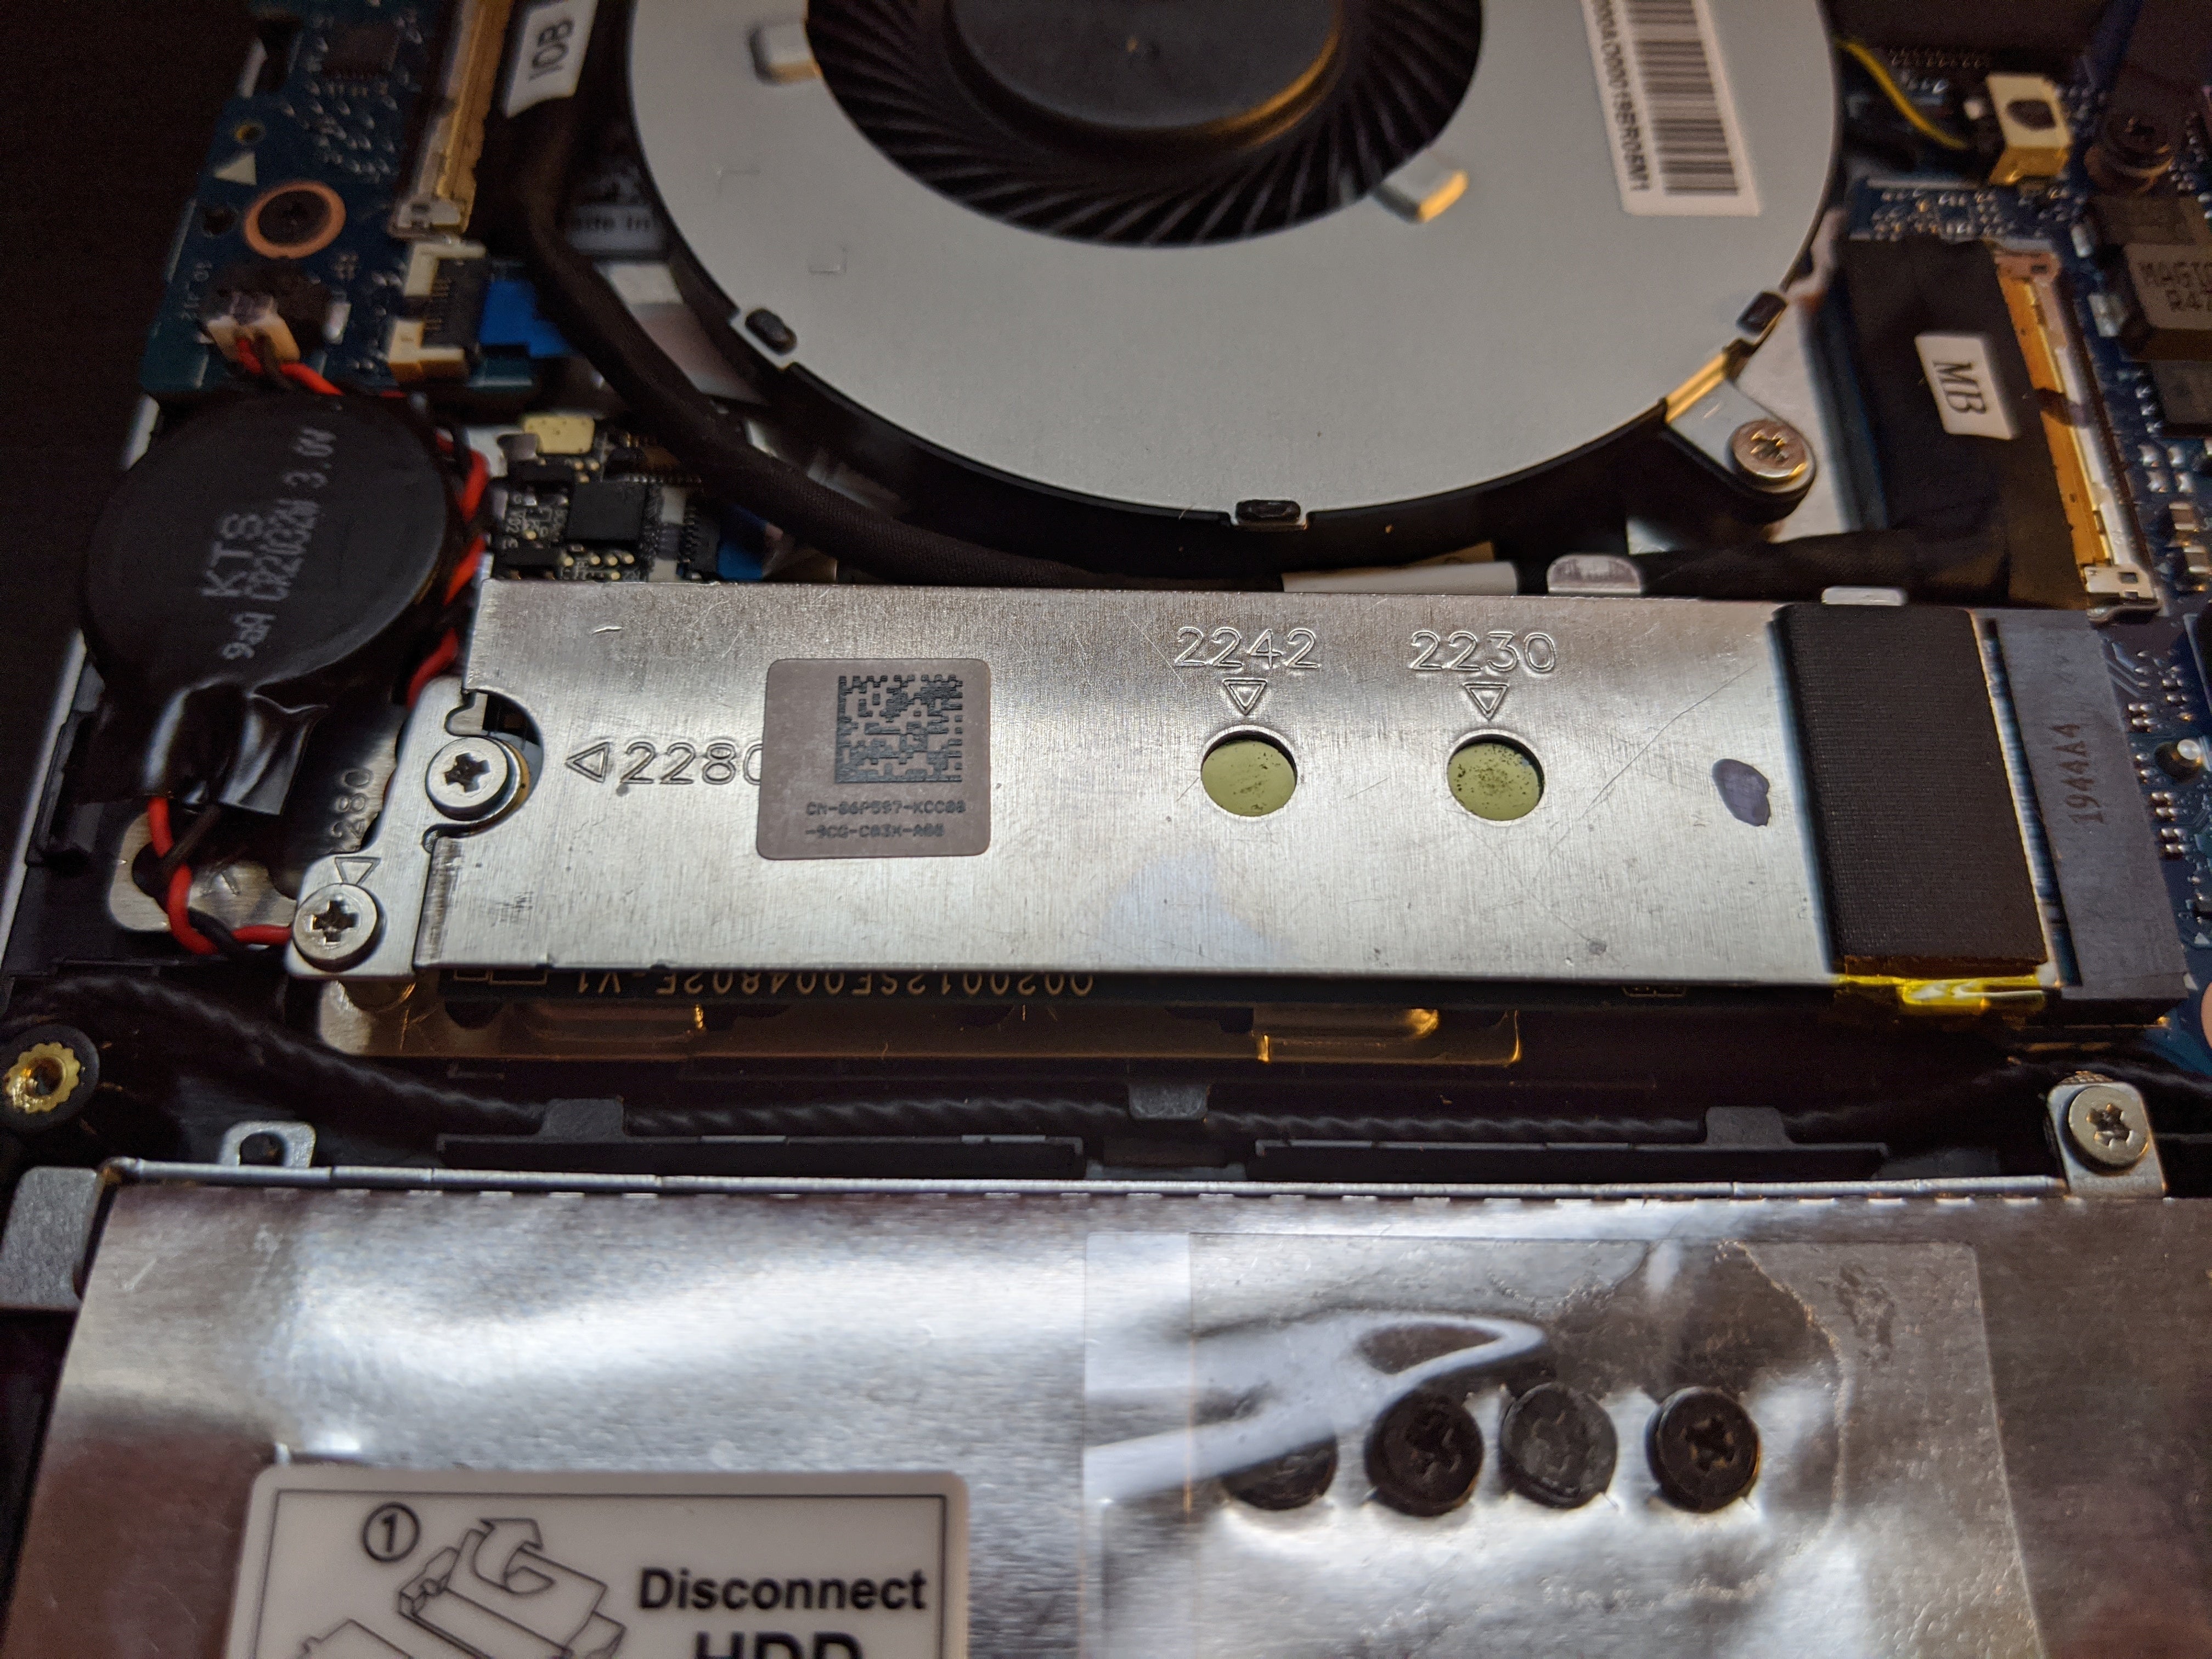
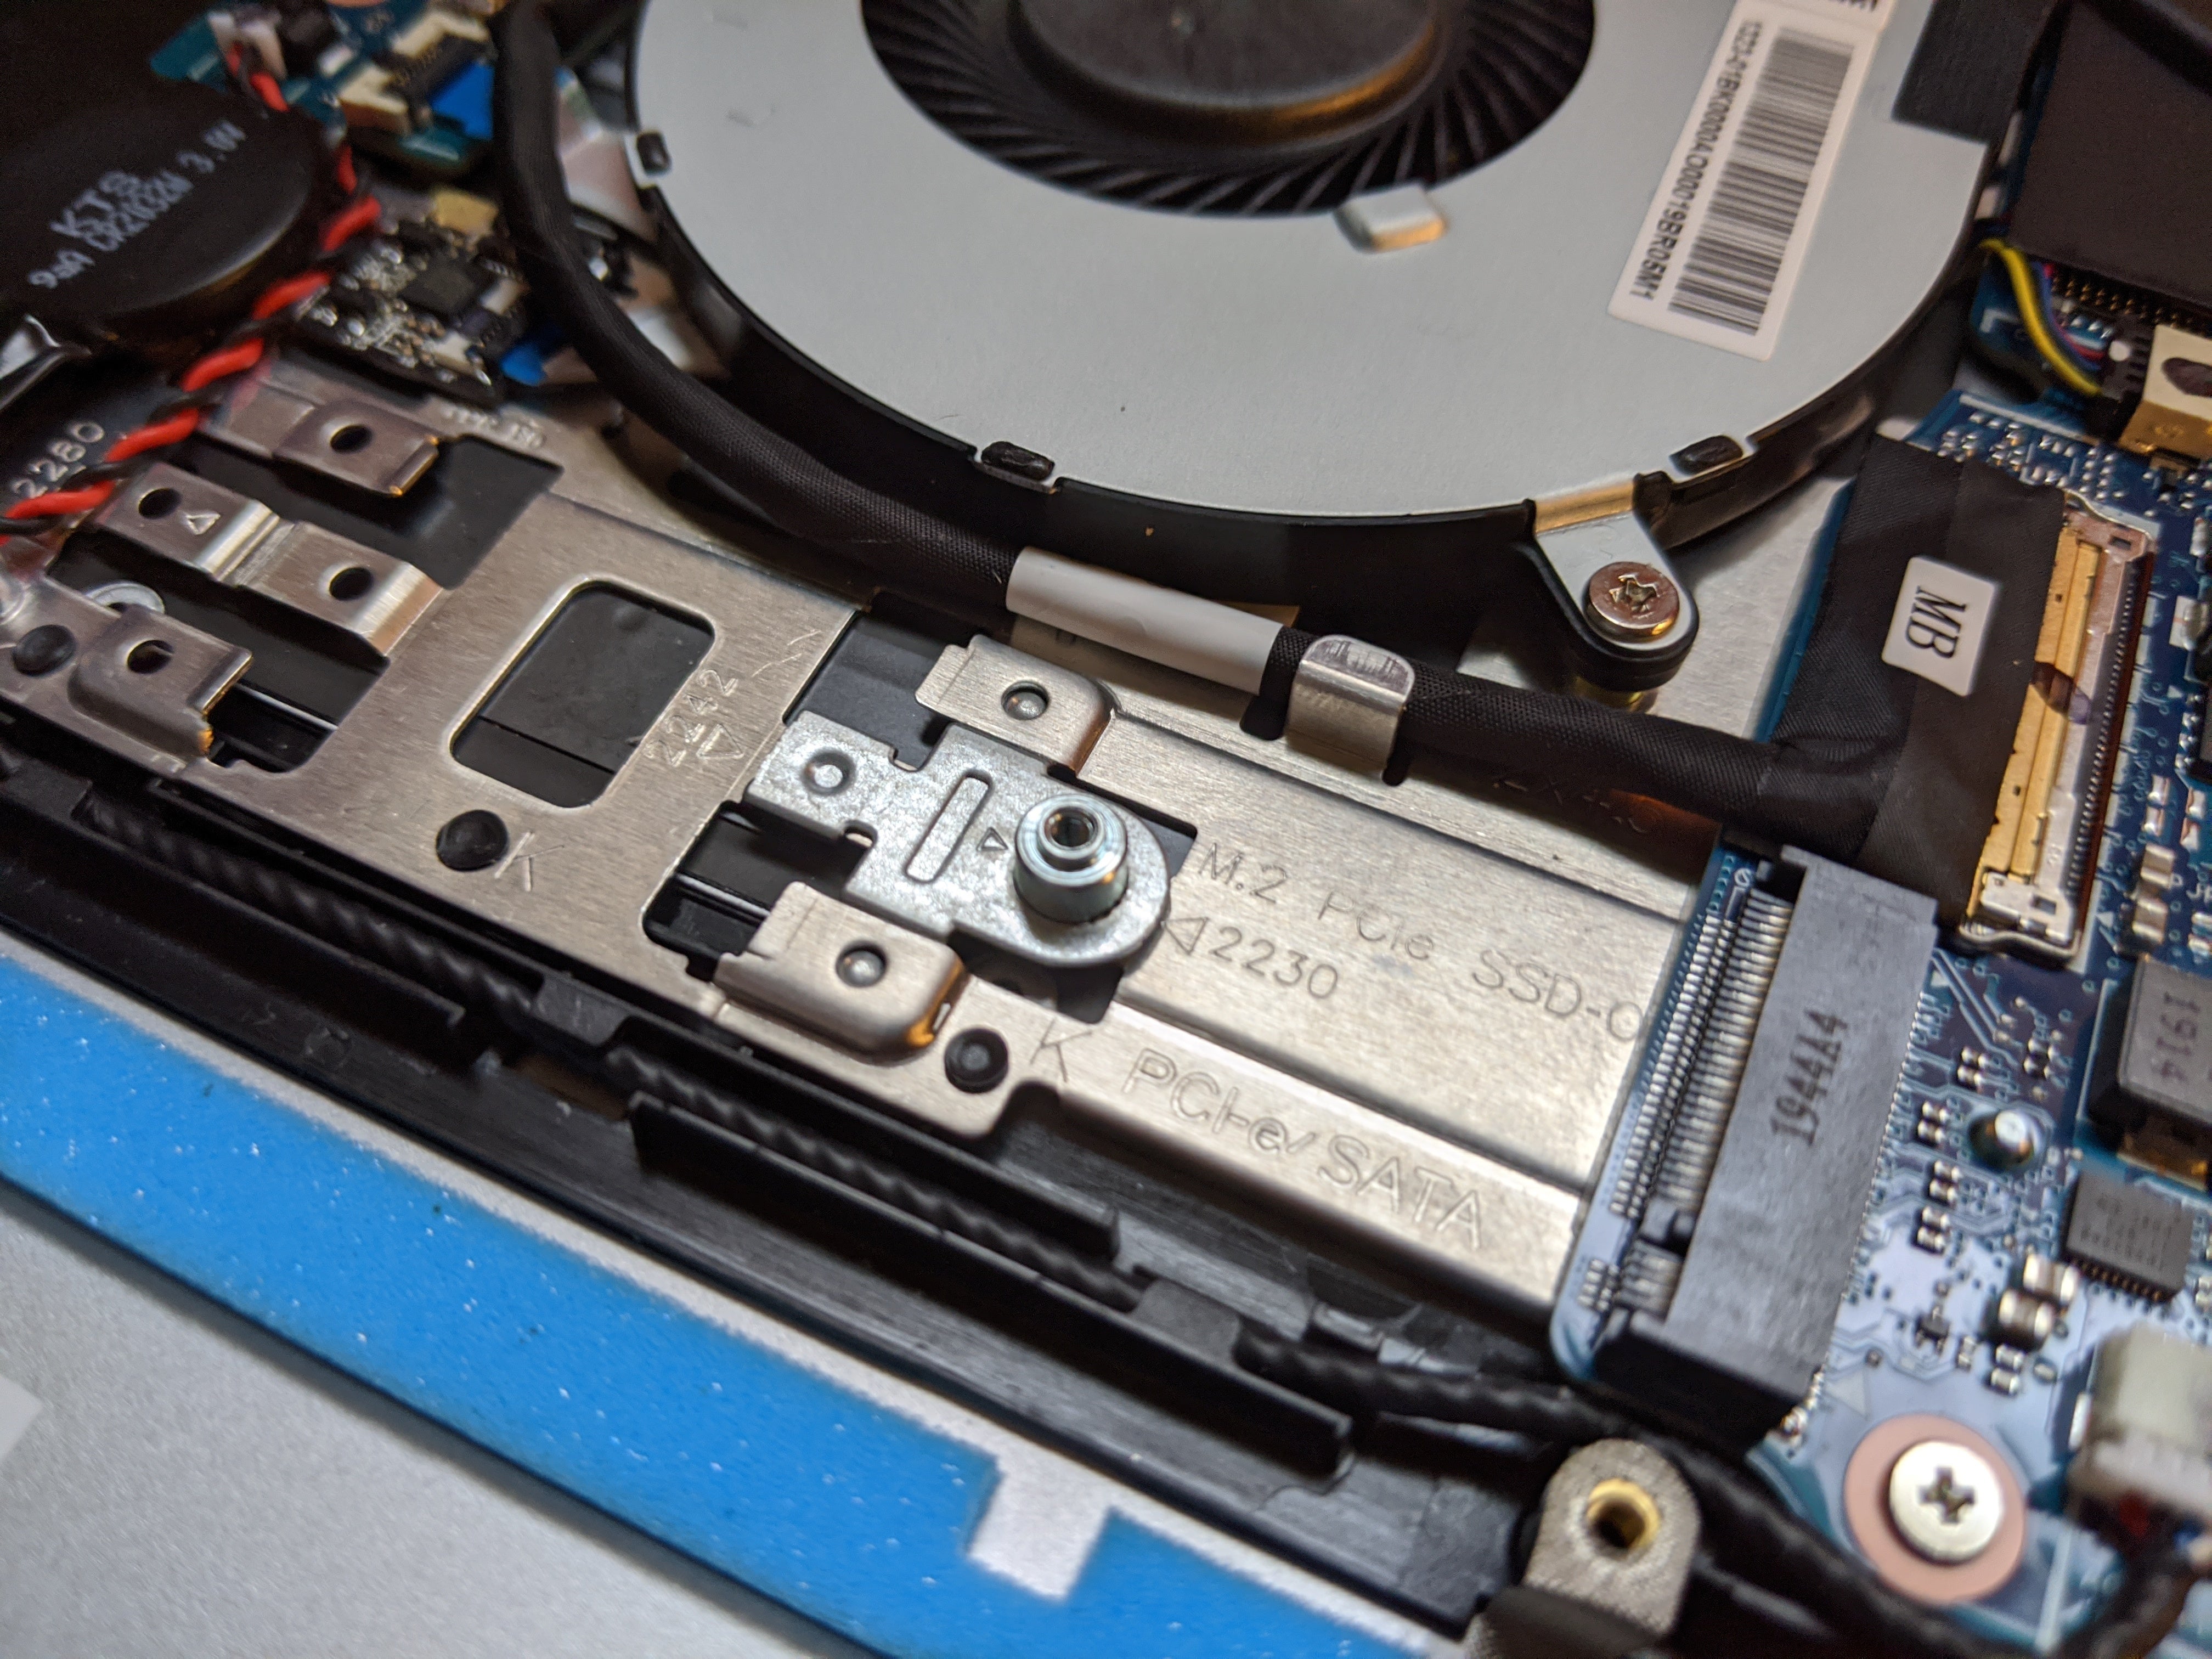
Replacing the existing drive is a bit more complicated because Dell uses an M.2 2230-size SSD. This is quite a bit smaller than the usual M.2 2280 (or 22mm x 80mm) form factor used by a Samsung 970 Evo, our 1TB Firecuda, and so forth.
The primary drive is also semi-hidden underneath a thermal panel—though proximity to the empty 2.5-inch enclosure means you might mistake it as the place for your secondary drive. (I did.)
 IDG / Hayden Dingman
It looks like this when closed up.
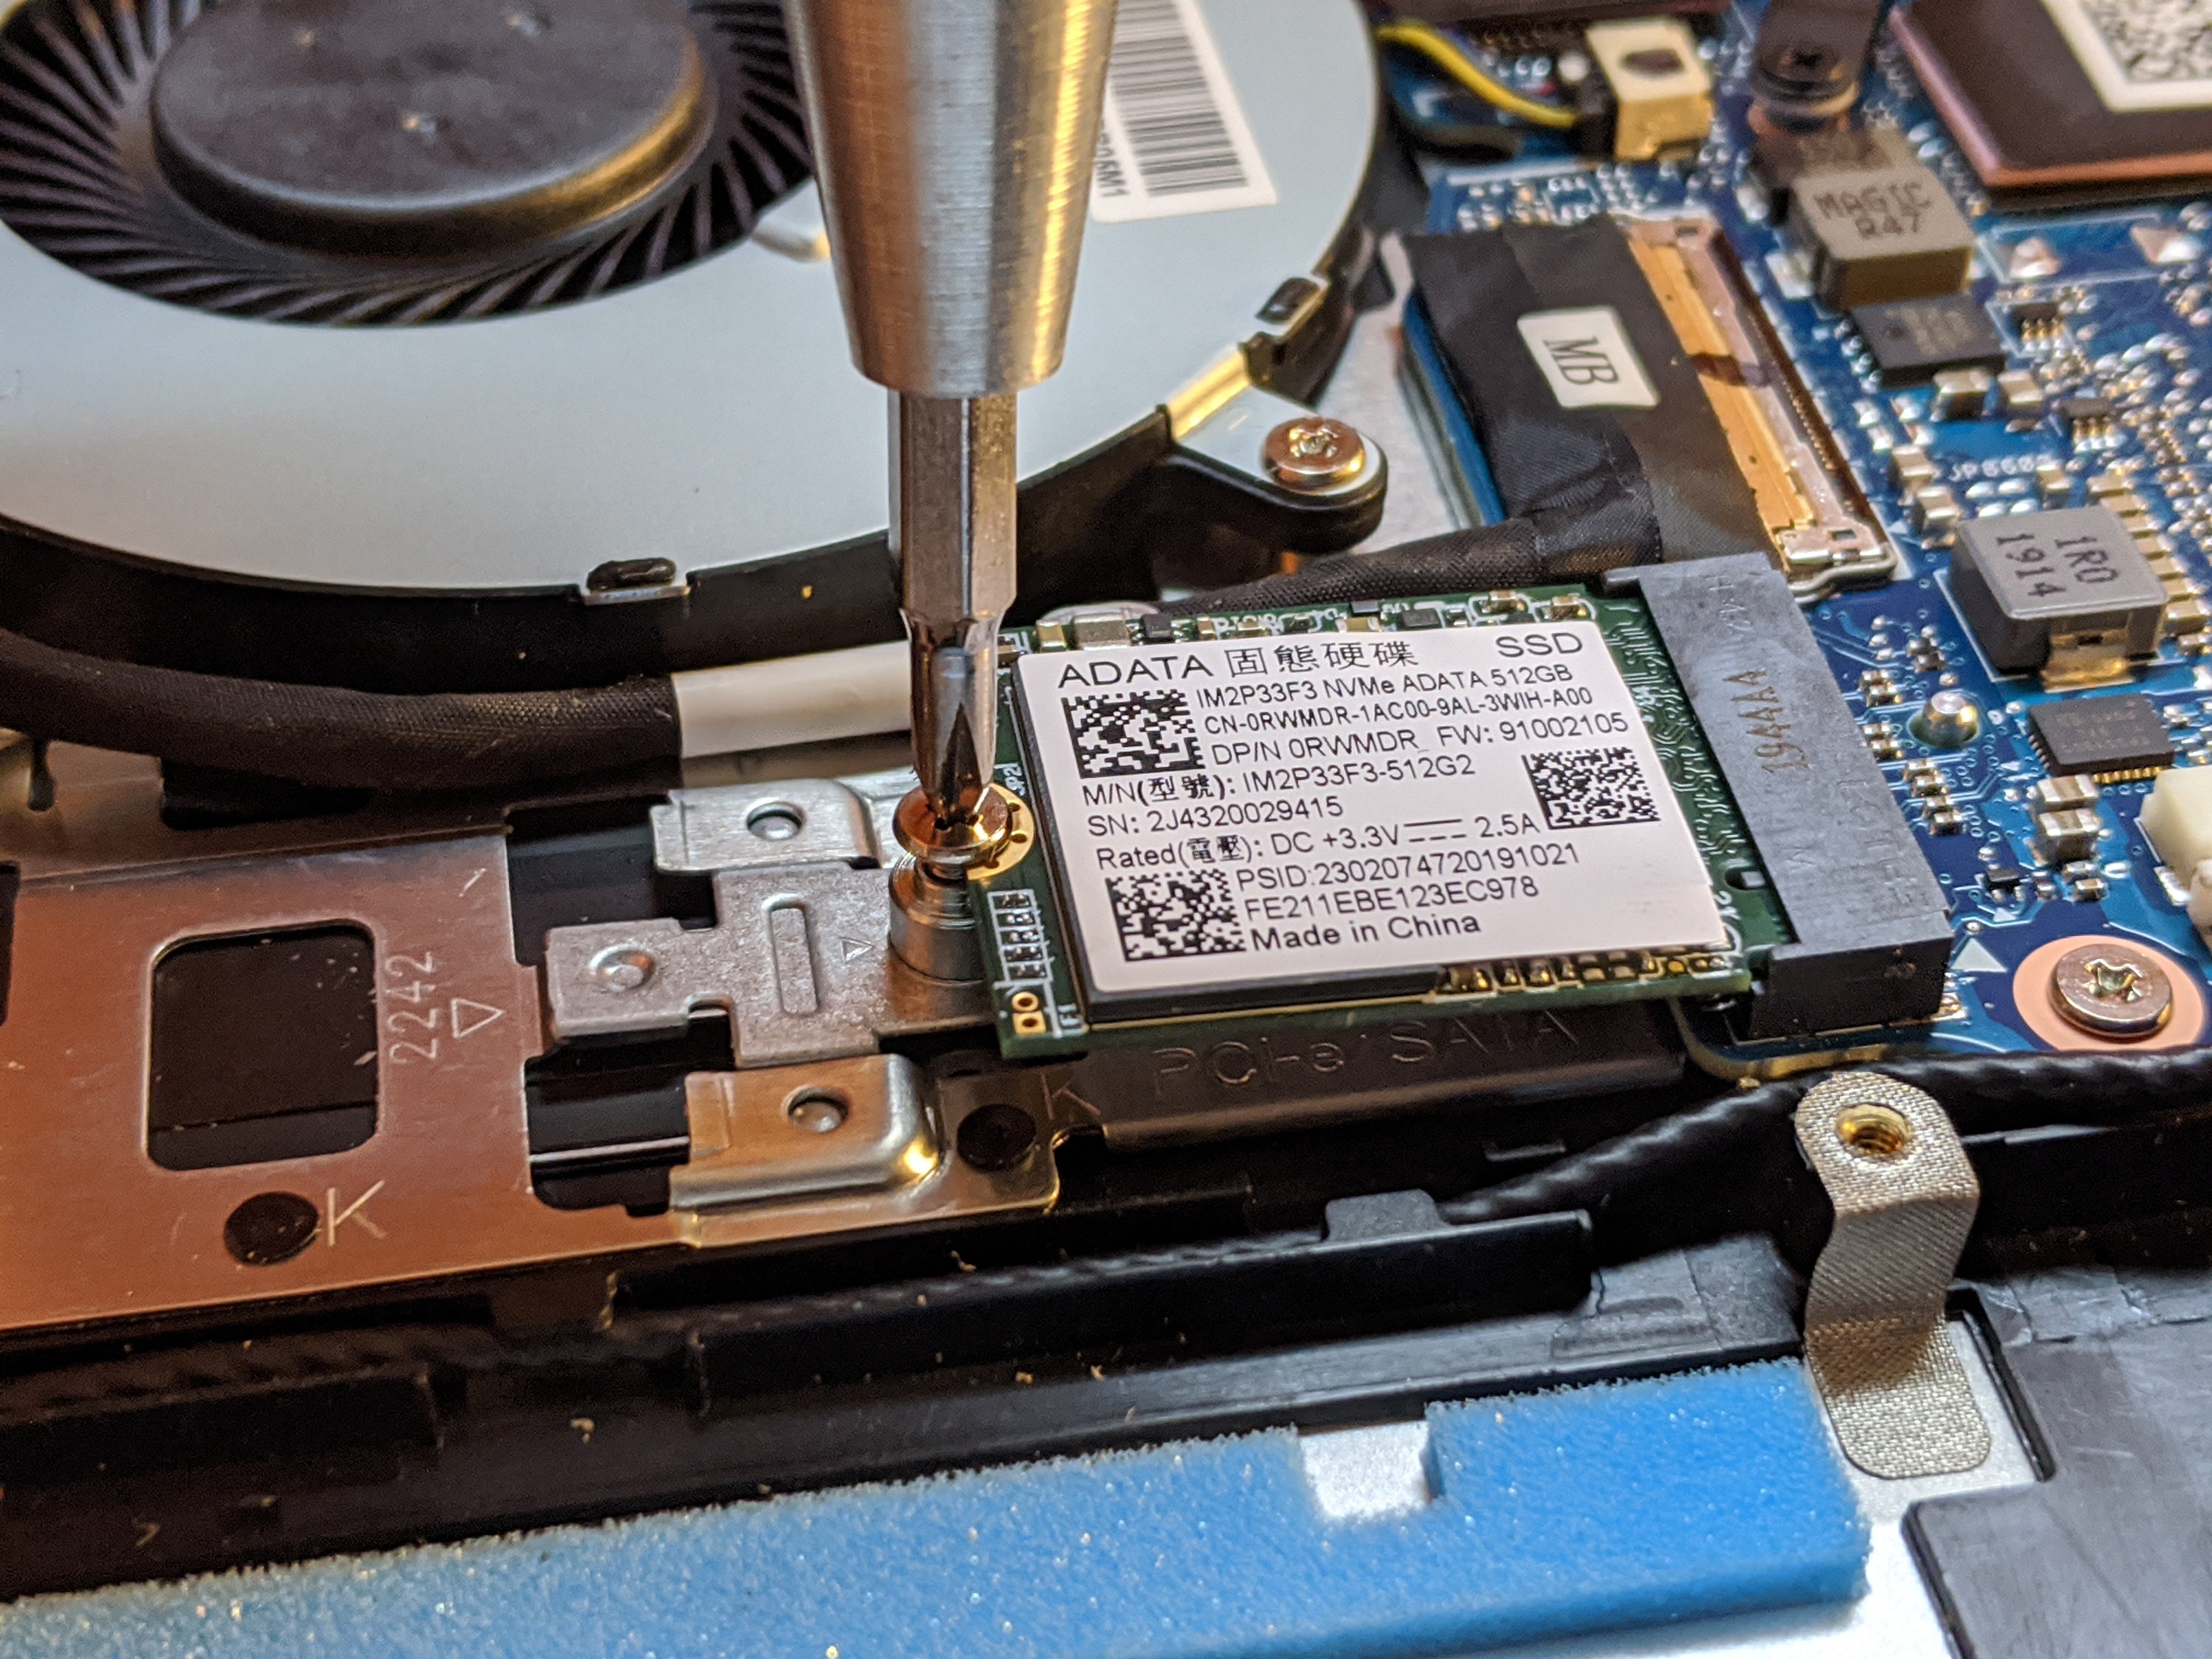
Unscrew this tiny piece of metal, then unscrew the primary drive and remove it. Once it’s out, you’ll see a tiny metal brace set to the “2230” marker. Remove that as well, swivel it, and then slot it into the clips for the 2280 setting (assuming you’re using a standard M.2 drive). And then...put it all back together.
 IDG / Hayden Dingman
Remove the default M.2 2230 form factor drive.
 IDG / Hayden Dingman
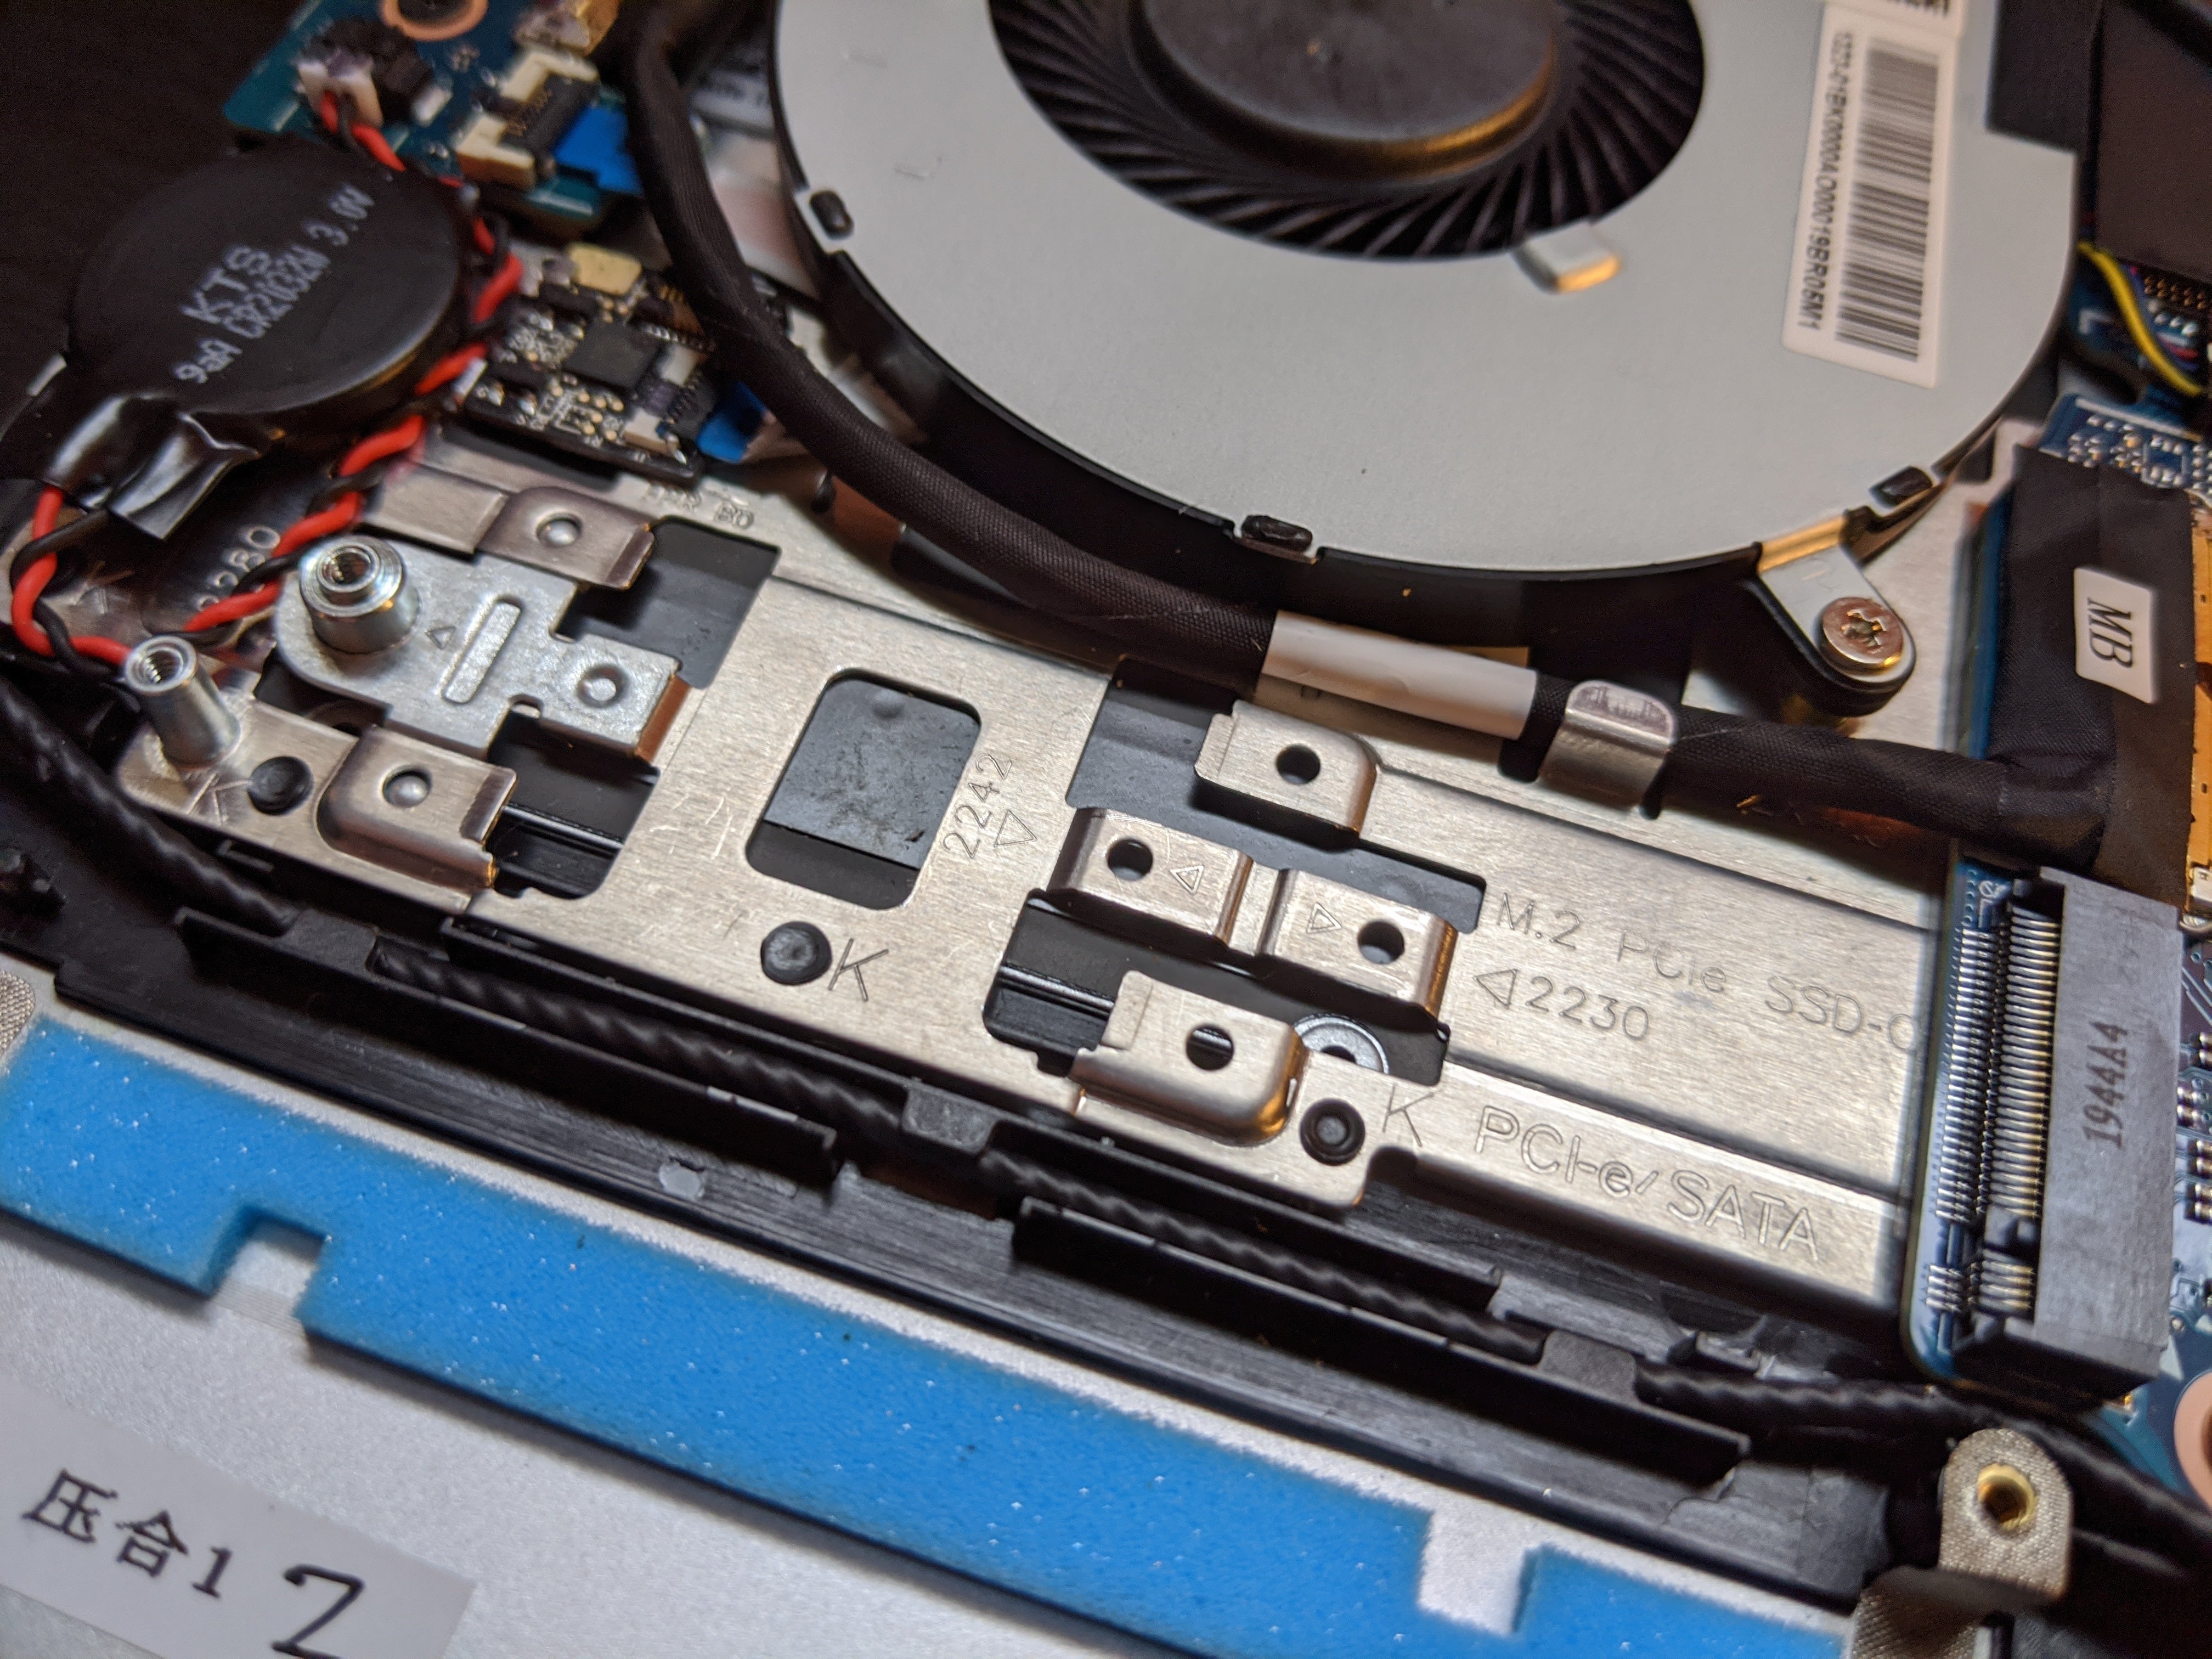
Next, look for this metal clip that’s in the “2230” position...
 IDG / Hayden Dingman
...turn it around and reinsert it at the 2280 position for most off-the-shelf M.2 drives.
This approach is also more complicated because you’ve removed the C: drive. Before upgrading, you’ll need to navigate to Dell’s website and download the Dell OS Recovery Tool, then put it on a 16GB USB stick. Plug this drive in when you boot the machine for the first time, and you’ll be walked through Dell’s custom Windows 10 installation. An OEM Windows installer will not work.
Once you’re done mucking around inside, lay the bottom panel back on the laptop’s guts—checking the orientation, of course. Secure the captive screws first, then press the keyboard layer and bottom panel back together. The area around the trackpad is tricky, and you may need to use your spudger to wedge the whole thing apart and try again. You’ll probably need to push harder than you think for everything to snap into place.
 IDG / Hayden Dingman
These angled screws are a bit of a pain. A magnetic screwdriver helps with this step.
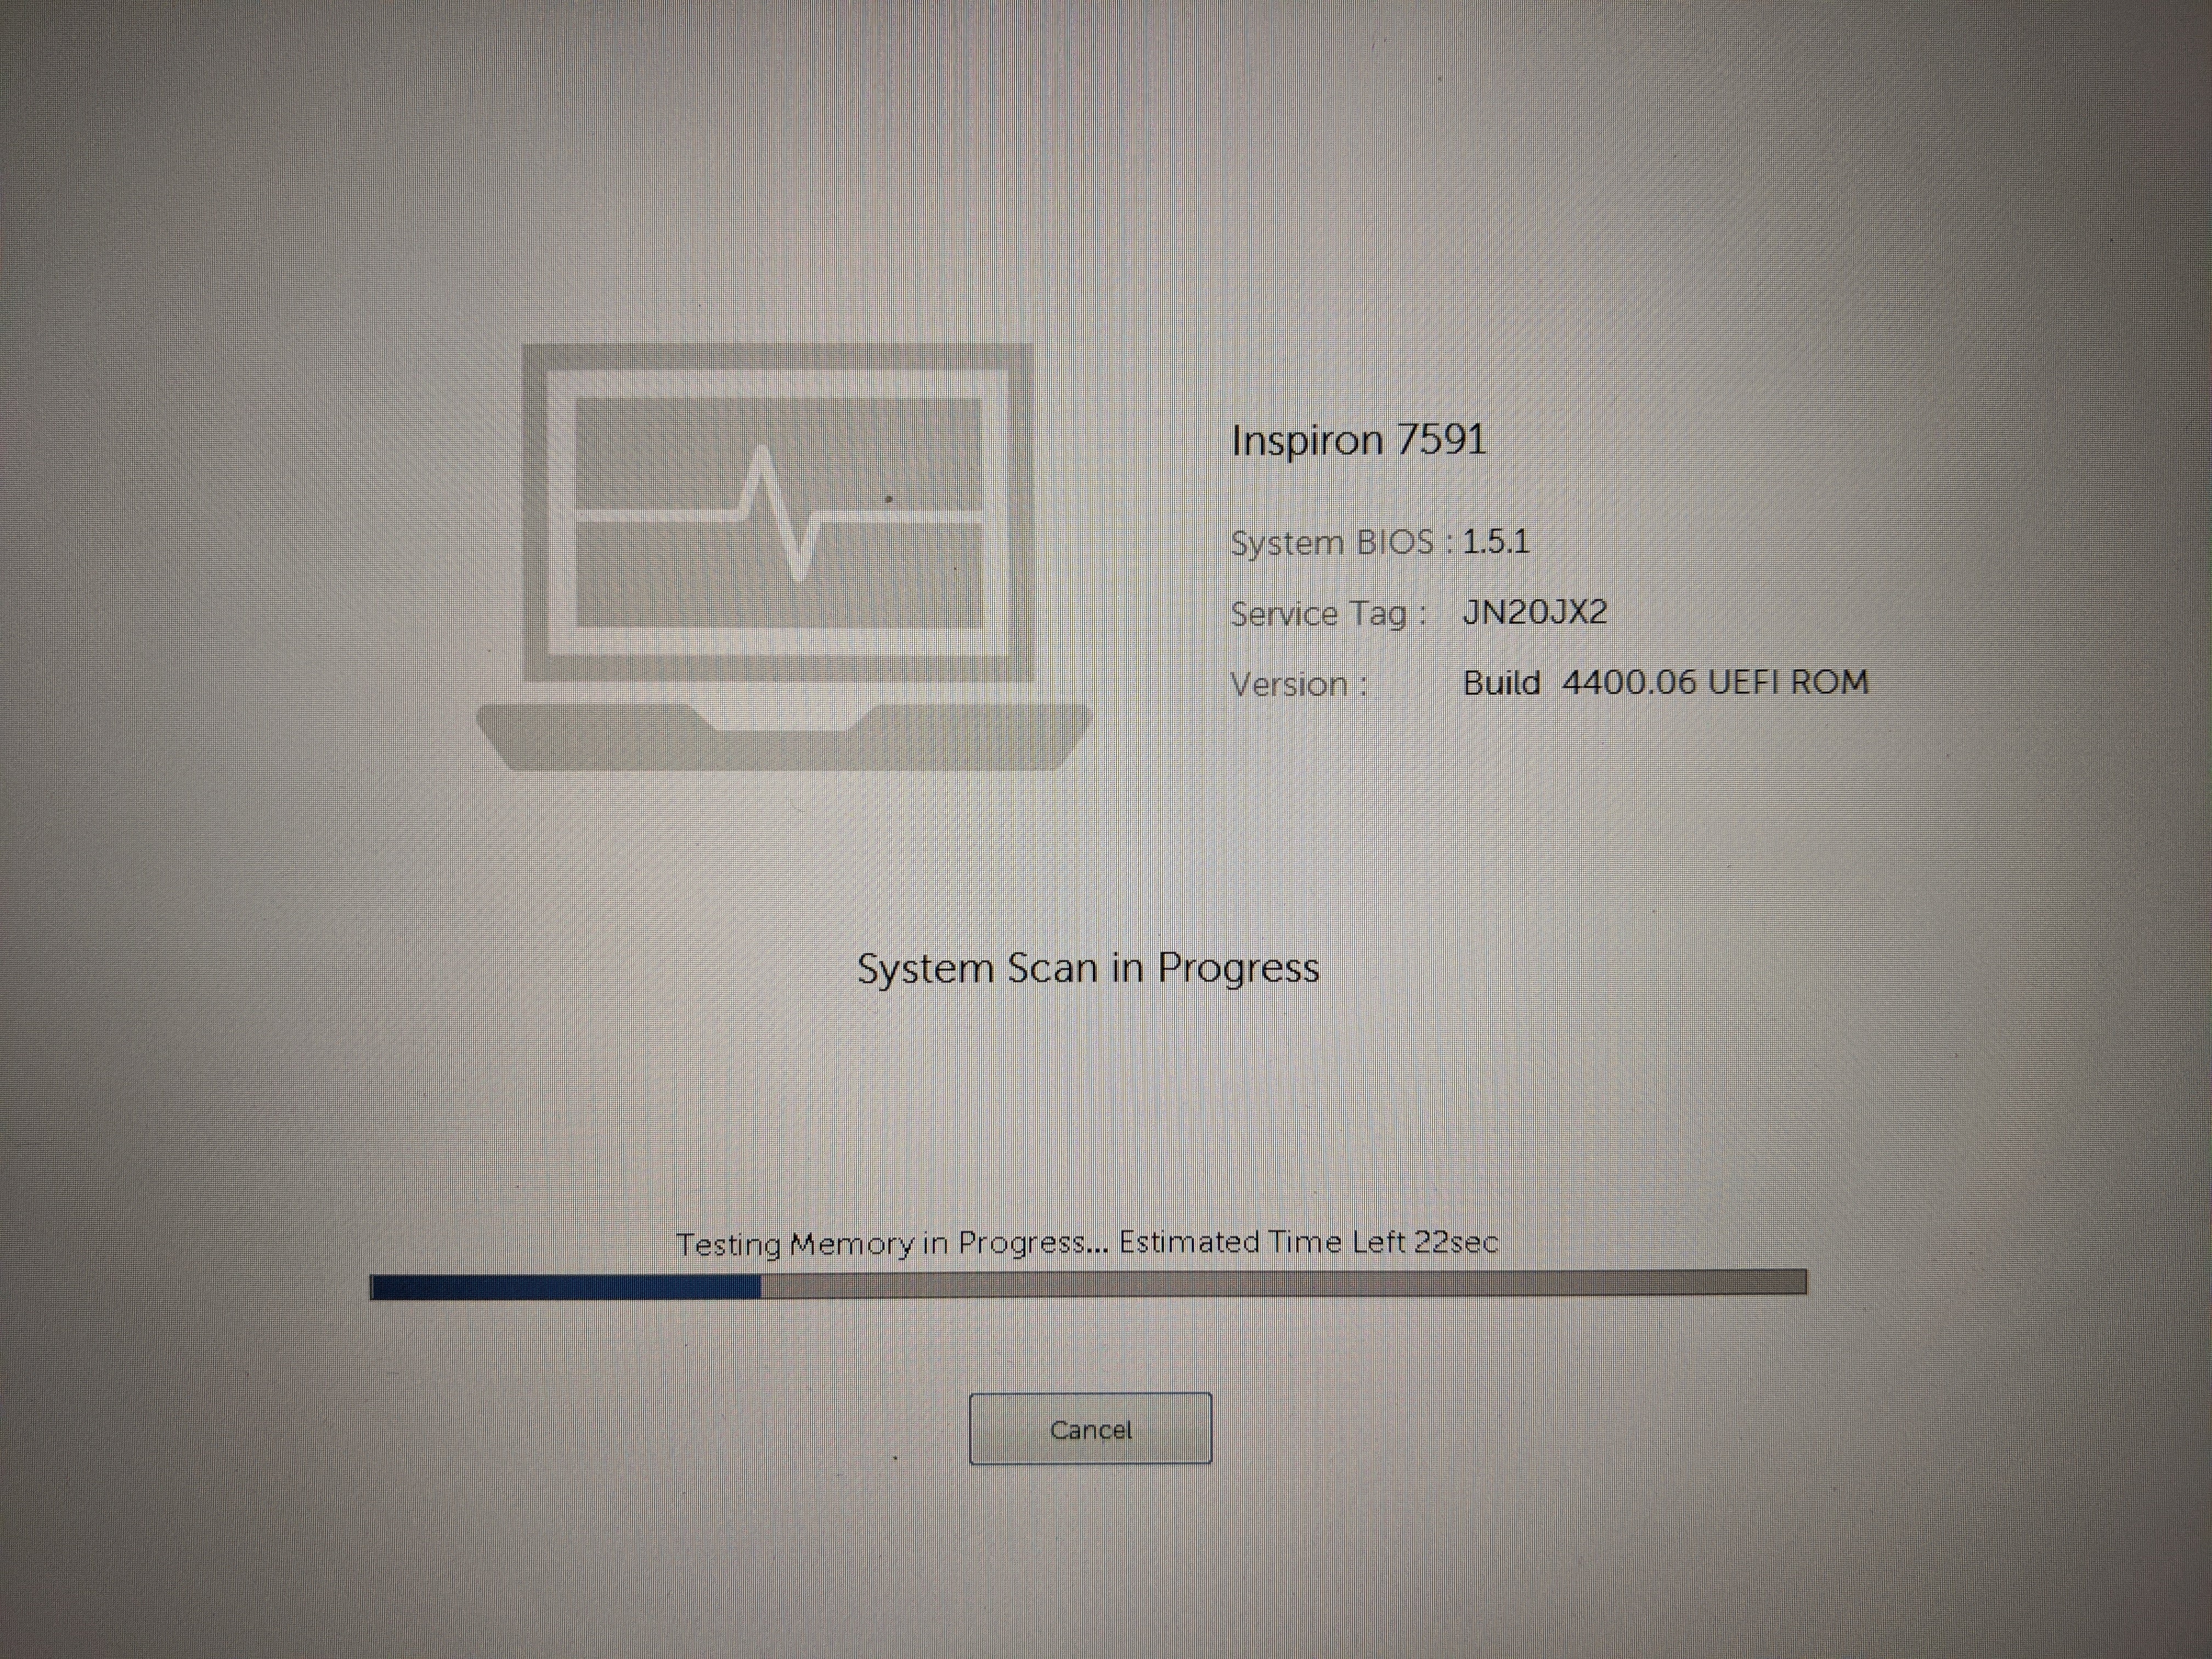
Once that’s done, find your coffee cup of screws and replace them as well. Assuming you didn’t replace the OS drive, Dell will run a quick check on your memory to make sure everything looks good.
 IDG / Hayden Dingman
Fingers crossed.
It’s (at least in my experience) pretty hard to seat RAM improperly in a laptop and still get it to close, so barring a malfunctioning stick you should be good to go.
Thoughts and benchmarks
So...should you do it? Is it worth it?
Upgrading the Inspiron 15 7000 was easier than I anticipated. No special tools (except a guitar pick), no hidden tricks. It’s not the only laptop to make it this easy, but it’s one of the few that does so while staying relatively thin and lightweight. Usually this level of access is reserved for larger gaming laptops with more room inside.
The thinner you get, the harder it is for manufacturers to lay out the components while keeping them accessible. Considering all that, the Inspiron 15 7000 is pretty impressive. It’s very clean inside, and I could get the bottom panel off, the parts replaced, and everything screwed back together in under 10 minutes, easy. Maybe five minutes, if I rushed.
There are obvious benefits—particularly when it comes to storage. When you need more space, you really need it, and the Inspiron 15 7000 makes it easy. While its included 512GB is a respectable amount of storage, it’s hardly impossible to fill. Throw in a 2TB 2.5-inch drive or another M.2, and you’ll have plenty of space to expand.
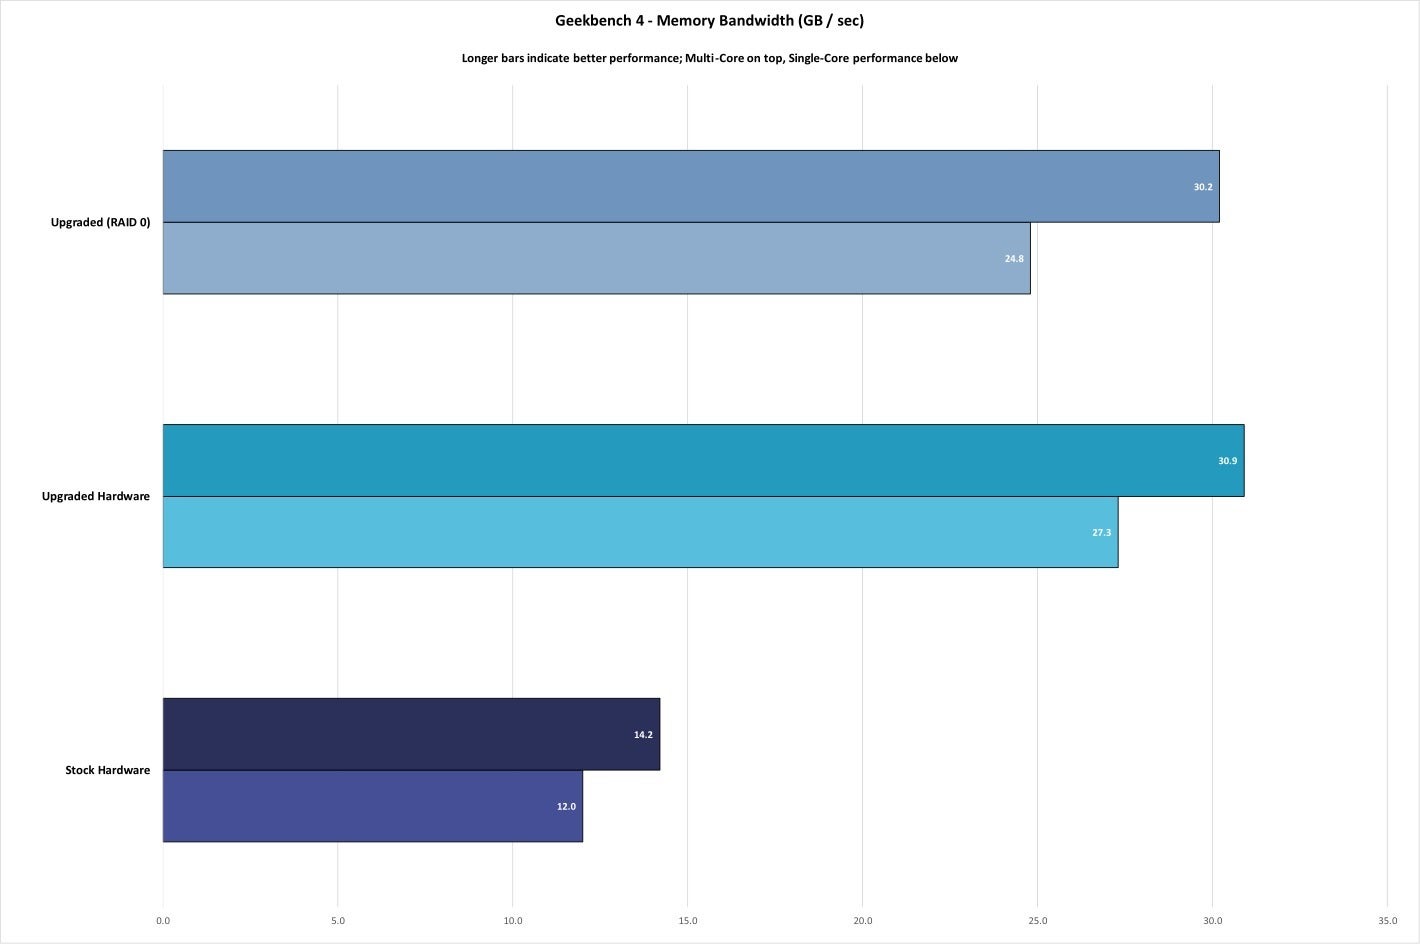
Having more memory is just generally useful—as is filling out that second DIMM. Your PC can only read and write so much information to memory at a time. Two DIMMS means effectively double the bandwidth, especially with a Core i7-9750H that can take advantage. Check out the results we saw when we ran the Inspiron 15 7000 through GeekBench 4:
 IDG / Hayden Dingman
That’s a huge bandwidth increase, most of it resulting from adding a second stick of RAM. You probably won’t notice the additional speed, but it will make the Inspiron 15 7000 a little bit more responsive across the board.
For instance, when we ran our usual HandBrake test, encoding a 30GB MKV file down to the “Android Tablet” preset, our upgraded Inspiron 15 7000 finished the task approximately a minute faster than the default hardware.
 IDG / Hayden Dingman
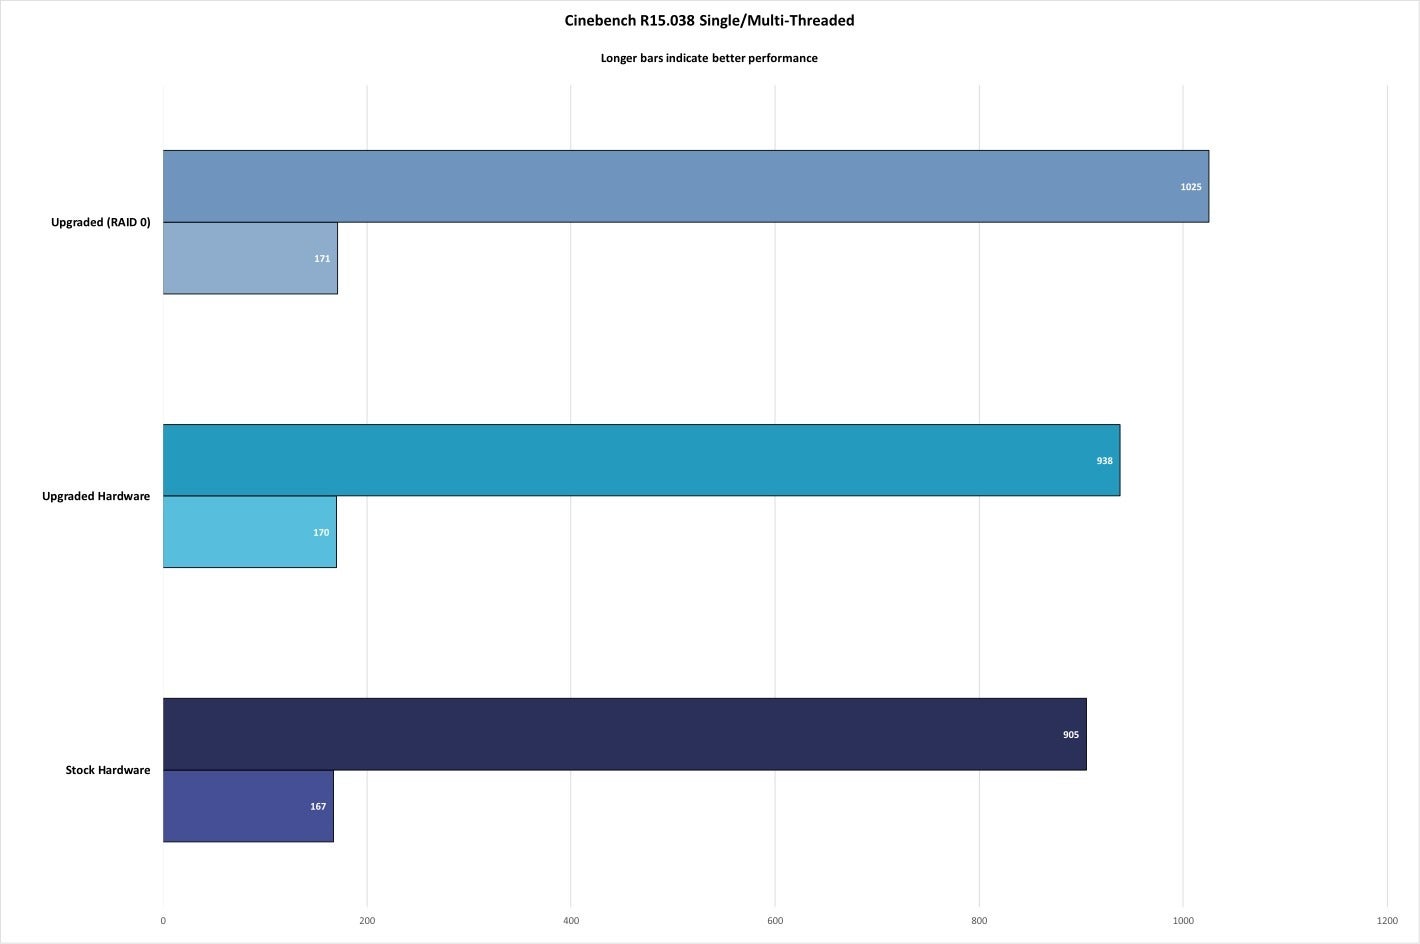
The same pattern played out in Cinebench, which tests the CPU over a much shorter period of time:
 IDG / Hayden Dingman
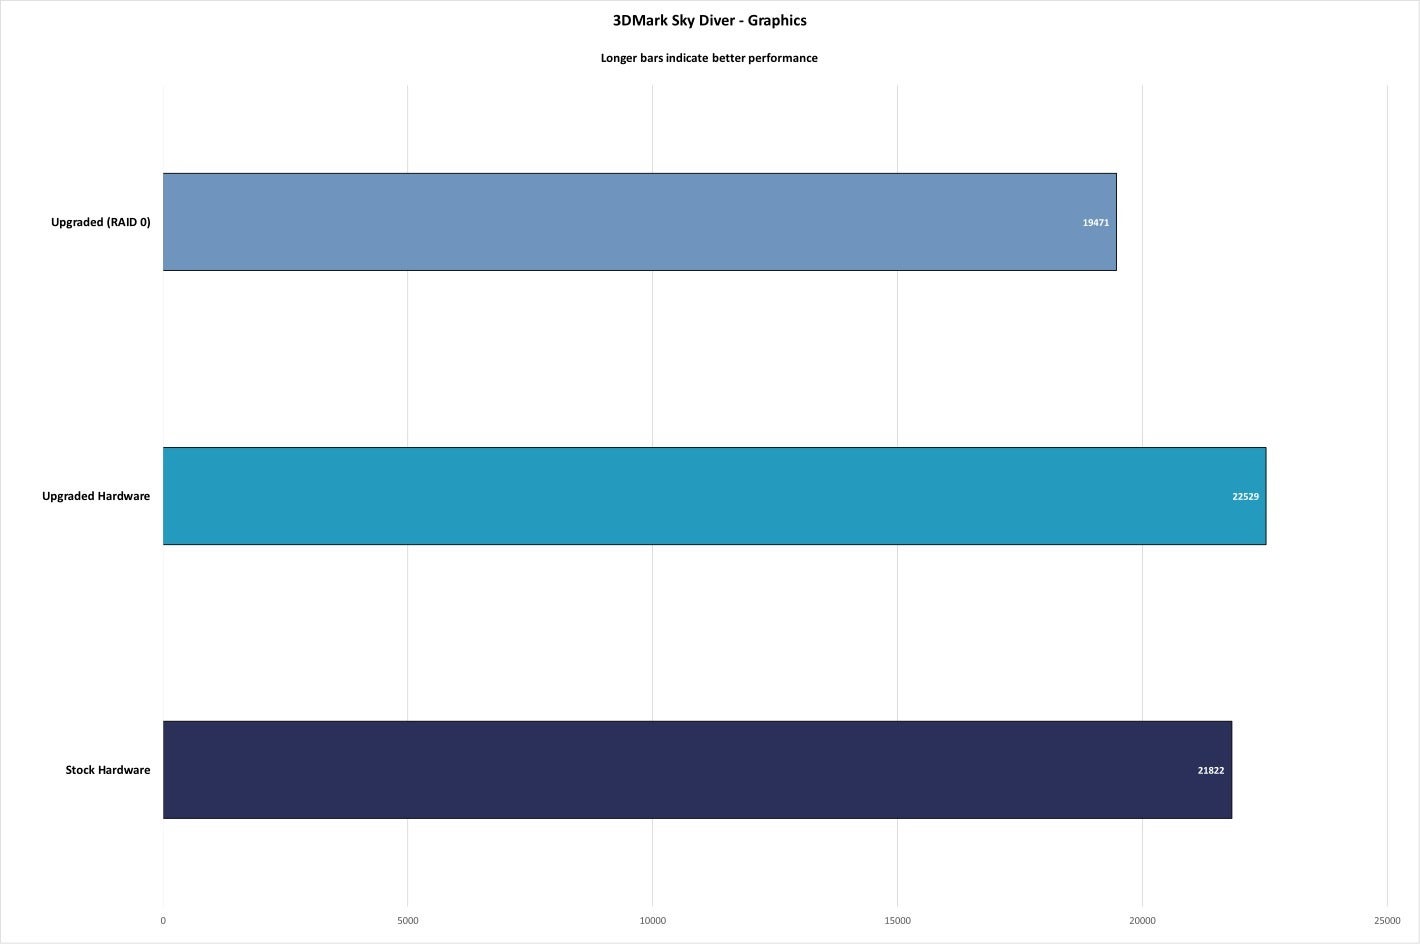
The trend repeated in 3DMark, where we used the Sky Diver benchmark to simulate some basic gaming performance, as well as some real-world testing with Counter-Strike: Global Offensive at 720p, where the performance bump from a memory increase could better come into play. Across the board, our in-house upgrades performed better than the stock Inspiron 15 7000.
 IDG / Hayden Dingman
 IDG / Hayden Dingman
Now, was it much better? No, and I think the performance benefits are probably secondary to the more tangible benefits. Adding another M.2 drive is better first and foremost because you have more space to store your files. Moving to 16GB of RAM allows you to open more Chrome tabs or run games that require 16GB of memory. That’s more important than any day-to-day speed increase.
One final note: Dell specifically asked us to explore the benefits of installing the second drive as a RAID 0 array instead of a separate drive. RAID 0 links two (or more) drives into one massive storage space, and in theory can improve performance. I typically don’t bother with RAID, though, because the speed increase is offset by the risk. If one drive in the array fails, the entire array fails, and you can lose all your data.
Still, we tried it—and if you’re sticking with the default Dell-provided drive, I wouldn’t recommend it. As you’ll see in the charts above, our benchmarks actually came in lower (for the most part) when we set up RAID 0 compared to running programs directly off our newly-installed secondary M.2 drive. The Firecuda’s speed dragged the average up, meaning the OS and anything else installed only to the C: drive probably performed better. Anything we could’ve installed directly to the secondary drive? It all performed worse, as a consequence of being split across the slower Dell drive and the faster Firecuda.
If you install two zippy new M.2 drives, RAID 0 might net a slight speed increase. Otherwise, if you’re just adding a secondary drive, it’s probably better to take full advantage of your faster M.2 speeds when needed, and leave the original drive to handle the OS and anything that’s less sensitive.
Bottom line
I hope laptops—especially gaming laptops—continue to trend toward upgradability. One of the biggest problems with gaming laptops (compared to their desktop counterparts) is they tend to last only three or four years before they’re irrelevant. Maybe five if you don’t mind dipping settings. That’s while costing two to three times as much as comparable desktop hardware.
But if you could get in there and replace some of the parts, you could potentially add another few years of use. RAM and storage are a good start, and Dell’s made it such upgrades easy.
What we really need are CPU and GPU upgrades, though. That’s trickier, but imagine buying an Inspiron 15 7000 and then being able to swap out the already-dated GTX 1050 for a top-shelf part. That’s the dream. Maybe one day.


