


The next wave of security threats are upon us: Here’s what you need to know
Sponsored By

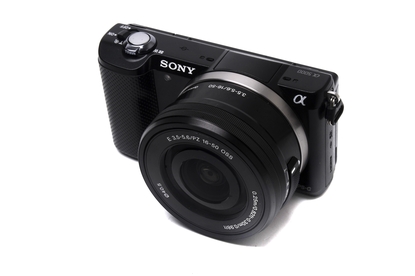
Go for the Sony a5000 if you like the idea of an interchangeable lens camera, but also want a camera body that's small and light. It can be used in manual mode, but it does good work in auto mode, too, which is just as well since changing manual settings on this camera isn't as easy as it is on a bigger camera.
Sony's a5000 (model ILCE5000LB) is one of the smallest and lightest interchangeable lens cameras that you will find, and these are its big drawcards. Its body is not bigger than a typical mid-to-high-end compact camera, yet it contains a lens mount that can accept different types of focal lengths depending on your needs. The downside is that the body lacks space for more than one manual dial, but the way we see it, this camera is actually rather fun to use when set to automatically take care of the exposure itself.
What we like about this camera is the small size and the light weight, which make it possible to take this camera with you for almost any occasion, depending on the lens that you leave attached to the body. In this respect, it's unlike a digital SLR, and even other mirrorless cameras, but it still packs plenty of capabilities that make it a worthwhile shooter, whether you're an experienced photographer, or just learning the ropes.
Note: Scroll down for sample images.
Tech specs include a 20-megapixel, APS-C sized sensor and a Bionz X image processor, JPEG and RAW shooting, a shutter speed up to 1/4000 of a second, burst mode up to 2.5 frames per second, video recording at Full HD (using AVCHD), and you get extravagant connectivity in the forms of Wi-Fi and NFC. Lenses can be attached to the camera's E-mount. There is a built-in flash, but you don't get an electronic viewfinder (EVF).
We tested it with a 16-50mm lens that has a wide aperture of f/3.6 and which stops down to f/5.6 when zoomed in all the way, and while it isn't exactly pocketable with that lens attached, it's still one of the smallest interchangeable lens cameras that you are likely to see toting a zoom lens. When the camera is switched off, the 16-50mm lens protrudes 36mm from the body, and it extends to 50mm from body when it's switched on. There are longer lenses than this available in Sony's catalogue for E-mount lenses, the longest being the 55-210mm lens, and these longer lenses will dwarf the body. Conversely, there are pancake lenses available, such as the 20mm and 16mm wide angle lenses, which will allow the camera to sit in a pocket quite easily.
The lens mount is located on the left side of the camera, but there is an adequate handgrip that allows you to swing the camera easily with one hand when the 16-50mm lens is attached. There isn't a plethora of buttons and dials on the a5000's body, and while this is to the detriment of manual control, it makes for a clean and neat shooting experience. There aren't any buttons in the way for you to accidentally press, with the customary D-pad on the back offering you the chance to change some settings manually, including the ISO, exposure compensation, and it also has drive mode and display shortcuts. The thumb ring around the D-pad changes the aperture and shutter values when you're in manual mode, and you can use the exposure button to switch between these values.
Indeed, it's possible to use the a5000 in manual mode to dial into the exposure settings that you want, but the camera is better suited to being used in one of its auto modes. In particular, there is one auto mode called 'Superior Auto', and even though we usually stick to the manual stuff, we found ourselves using this mode a lot. It's capable of detecting the best scene mode for each picture, and this includes HDR mode, in addition to macro, landscape or portrait. Basically, you don't have to do anything (except maybe pop up the flash, if needed) in order to get impressive-looking pictures from this camera.
You don't get a physical mode dial on the camera's body, but it's nevertheless very easy to switch between the manual, semi-manual, auto and scene modes just by pressing the button at the centre of the D-pad. There is a little message on the LCD screen that even tells you to do so if you want to switch shooting mode. Once you press the central button, the screen will show all the shooting modes that you can then cycle through.
For framing your shots, you have to use the 3in LCD screen on the back, and this has a simple hinge at the top that allows it to tilt up to 180 degrees for the purpose of making selfies much easier to take. It's a design that makes shooting from the hip or from the ground very easy, and it can come in handy when you want to shoot straight up in the air but don't want to crane your neck while doing so. The downside is you can shoot easily from up high because the screen can't be angled downward.
As is the case with most cameras that don't have an EVF, it can be difficult to get an exact idea of what your shot looks like when you are in a bright environment, and sometimes you have to just guess and play back the shot to see if you've got it right. There is no hotshoe for an external EVF to be attached, so you have to learn to use the screen to the best of your ability. It's also not a touchscreen, which, among other things, means you can't just tap on the screen to focus.
Automatic focusing was spot on almost all the time during our test period, and we never felt like we had to go into manual mode to get the shot we wanted. You can use manual focusing, and also change focus point manually, but these settings have to be accessed through the menu system. Manual focus has a peaking feature to allow you to quickly see if you've found your desired focus plane, but you have to enable this in the menu. There is also a magnification feature so that you can see your image up close. The focus ring on the lens can be used to bring your subject into focus, but it's a loose ring and doesn't feel all that satisfying to use.
Any changes you make to the exposure manually can be seen on the screen in real-time, which is always a good thing, and there is a small light meter indicator that can let you know if your shot is over-exposed or underexposed. If you're new to manual mode, the display can also be set to show you an on-screen tip for the aperture and exposure settings. This tip is in the form of icons that can show you the effect that a certain range of aperture or shutter values will have. For example, you can move the aperture value to the left to get more of a blurred background, or move the shutter more to the right in order to capture moving subjects without blurring.
Other physical characteristics of the a5000 include a pop-up flash that can be pointed up or down so that light can bounce off a surface rather than hit your subject directly. The lens has its own electronic zoom control on the side, which we found to be too easy to accidentally move; the zoom rocker around the shutter button is a much better option. SD cards can be installed in the side of the camera, rather than through the bottom battery compartment, and this is a great feature, especially while shooting with a tripod, as you can easily remove the card to get photos onto your computer. We used a SanDisk Extreme Pro SDHC card for our tests.
Wi-Fi performance on this camera is decent. Using a direct Wi-Fi connection method to the camera, we found file transfers from the camera to our Galaxy S5 smartphone to be very swift, even when we elected to transfer the native file size of the images. The PlayMemories Camera app is what we used for this. We could also use this app to turn the phone into a remote viewfinder for the camera, but we had to enable that function in the camera rather than through the app. In addition to transferring photos, it's easy to share them. Just select the photo, then the service that you want to share through, and the app then manages the connections so the photo can be uploaded. It's handy when you want to share a photo immediately while you're out and about.


NFC is supported for easy pairing, but we found it to be anything but easy using the Galaxy S5. Making a direct Wi-Fi connection to the camera was the easiest way to establish a connection between the devices.
We'd buy this interchangeable lens camera for a couple of reasons: the small size, and the capable auto mode. It's one of those cameras where you can set it up the way you want using manual settings, or you can just let the auto mode do the heavy lifting. For most scenes, the auto mode will do a tremendous job. That's good peace of mind for those of you who sometimes just want to point and shoot without having to worry about what's going on with the settings.
Be aware that, as with most interchangeable lens cameras, lenses are a hefty investment, and once you buy more lenses, you're pretty much stuck in Sony's ecosystem unless you sell your gear to move to another vendor's camp.
The a5000 with the 16-50mm lens is $699 from Sony's site ($850 in New Zealand), but can be found cheaper from a camera store.
Picture quality is very good, though the camera does tend to over-exaggerate colours when left to its own devices. For some shots, this looks good, but for others it can be annoying. Image clarity is high, though we do recommend that you frame your pictures the way you want from the get-go, rather than cropping them afterwards, even though you do have so many megapixels to play with.
When using auto mode, the ISO speed can be limited so that it doesn't exceed a specific value and cause too much noise to appear in a shot. Chromatic aberration wasn't an issue for us in our tests, and the lens was fun to use for blurring out the background when shooting portraits and macros. In particular, we love the circular 'bokeh' pattern that it rendered.
All of the images below are JPEGs straight out of the camera that have been unmodified apart from re-sizing to fit this page.


What's new, plus best mac-related tips
and tricks

The latest business news, reviews, features and whitepapers

Watch our video news and reviews from around the world

Comprehensive buying guides, features, and step-by-step articles

Aruba Instant On AP11D

Set up is effortless.
Aruba Instant On AP11D

The strength of the Aruba Instant On AP11D is that the design and feature set support the modern, flexible, and mobile way of working.
Aruba Instant On AP11D

Aruba backs the AP11D up with a two-year warranty and 24/7 phone support.
Dynabook Portégé X30L-G

Ultimately this laptop has achieved everything I would hope for in a laptop for work, while fitting that into a form factor and weight that is remarkable.
MSI P65

This smart laptop was enjoyable to use and great to work on – creating content was super simple.
MSI GT76

It really doesn’t get more “gaming laptop” than this.